This post is the next in a series of posts on authentication in ASP.NET Core. In the previous post we showed how you can use the OAuth 2.0 protocol to provide 'Login via Facebook' functionality to your website.
While a common approach, there are a number of issues with using OAuth as an authentication protocol, rather than the authorisation protocol it was designed to be.
Open ID Connect adds an additional layer on top of the OAuth protocol that solves a number of these problems. In this post we take a look at the differences between OpenID Connect and OAuth, how to use Open ID Connect in your ASP.NET Core application, and how to register your application with an OpenID Connect provider (in this case, Google).
What is OpenID Connect?
OpenID Connect is a simple identity layer that works over the top of OAuth 2.0. It uses the same underlying REST protocol, but adds consistency and additional security on top of the OAuth protocol.
It is also worth noting that OpenID Connect is a very different protocol to OpenID. The later was an XML based protocol, which follows similar approaches and goals to OpenID Connect but in a less developer-friendly way.
Why use it instead of OAuth 2.0?
In my recent post I showed how you could use OAuth 2.0 to login with Facebook on your ASP.NET Core application. You may be thinking 'why do I need another identity layer, OAuth 2.0 works perfectly well?'. Unfortunately there are a few problems with OAuth 2.0 as an authentication mechanism.
First of all, OAuth 2.0 is fundamentally an authorisation protocol, not an authentication protocol. It's entire design is based around providing access to some protected resource (e.g. Facebook Profile, or Photos) to a third party (e.g. your ASP.NET Core application).
When you 'Login with Facebook' we are doing a pseudo-authentication, by proving that you can provide access to the protected resource. Nat Sakimura explains it brilliantly on his blog, when he says using OAuth for authentication is like giving someone a valet key to your house. By being able to produce a key to your house, the website is able to assume that you are a given person, but you haven't really been properly authenticated as such. Also, that website now has a key to your house! That latter point is one of the major security concerns around OAuth 2.0 - there are various mitigations in place, but they don't address the fundamental concern.
OpenID Connect handles this issue in OAuth 2.0 by essentially only providing a key to a locker that contains your identity proof. Rather than granting access to your whole house, the locker is all you can get to.
Secondly, OAuth 2.0 is very loose in it's requirements for implementation. The specification sets a number of technical details, but there are many subtly different implementations across various providers. Just take a look at the number of providers available in the AspNet.Security.OAuth.Providers repository to get a feel for it. Each of those providers requires some degree of customisation aside from specifying urls and secrets. Each one returns data in a different format and must have the returned Claims parsed. OpenID Connect is far more rigid in its requirements, which allows a great deal of interoperability.
Finally, OpenID Connect provides additional features that enhance security such as signing of web tokens and verification that a given token was assigned to your application. It also has a discovery protocol which allows your website to dynamically register with a new OpenID Connect Provider, without having to explicitly pre-register your application with them.
Where it is available, it really seems like the best advice is to always choose over OpenID Connect over plain OAuth. Indeed, Dominick Baier, of Identity Server fame (among other things), says pretty much this on his blog:
...we always saw OpenID Connect as a “super-set” of OAuth 2.0 and always recommended against using OAuth without the OIDC parts.
The Flow
In terms of the protocol flow between the user, your ASP.NET application and the identity provider when using OpenID Connect, it is essentially the same as the OAuth 2.0 flow I outlined in the previous article on OAuth 2.0. As mentioned previously, OpenID Connect builds on top of OAuth 2.0, so it probably shouldn't be that surprising!
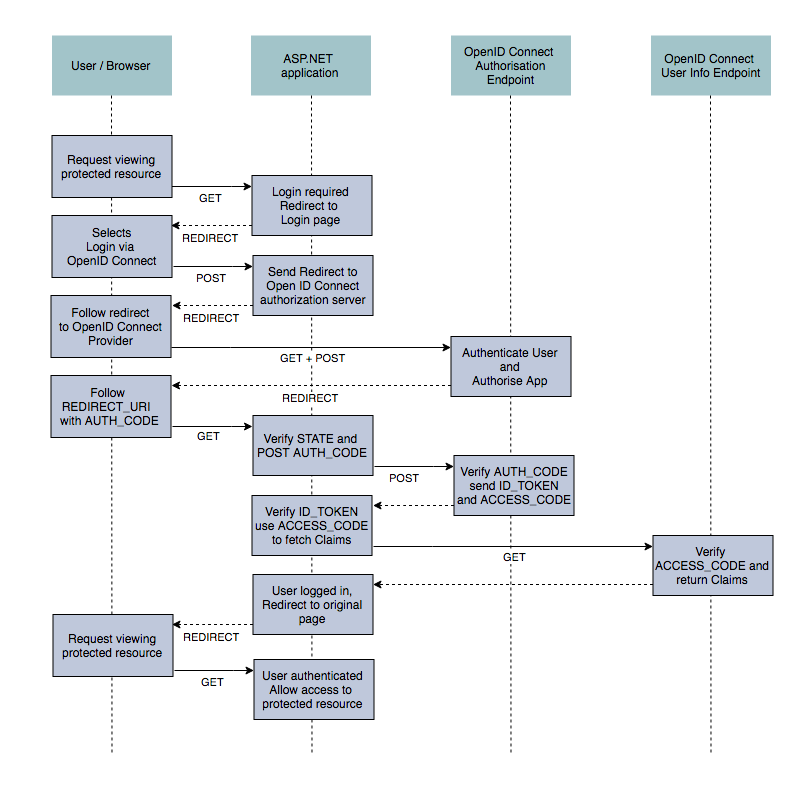
As before there are multiple different possible flows depending on your application type (e.g. mobile app, website, single page application etc), but the standard website flow is essentially identical to OAuth 2.0. This version typically still requires you register your application with the provider before adding it to your website, but allows automatic configuration of the endpoint urls in your website through a service discovery protocol. You just need to set the domain (Authority in spec parlance) at which the configuration can be found and your application can set everything else up for you.
Under the covers there are some subtle differences in the data getting sent back and forth between your application and the authorisation servers, but this is largely hidden from you as a consuming developer. The scope parameter has an additional openid value to indicate that it is a OpenID Connect request and the ACCESS_CODE response contains an id_token which is used to verify the integrity of the data. Finally, the request to the resource server to fetch any additional claims returns claims in a standardised way, using preset claim keys such as given_name, family_name and email. This spares you the implementation-specific mapping of claims that is necessary with OAuth 2.0.
Adding OpenID Connect to your application
Hopefully by now you are convinced of the benefits OpenID Connect can provide, so lets look at adding it to an ASP.NET Core project.
As before, I'll assume you have an ASP.NET Core project, built using the default 'Individual user accounts' MVC template.
The first thing is to add the OpenID Connect package to your project.json:
{
  "dependencies": {
    "Microsoft.AspNetCore.Authentication.OpenIdConnect": "1.0.0"
  }
}
and configure the middleware in your Startup.Configure method:
public void Configure(IApplicationBuilder app, IHostingEnvironment env)
{

    app.UseStaticFiles();

    app.UseIdentity();

    app.UseOpenIdConnectAuthentication(new OpenIdConnectOptions
        {
            ClientId = Configuration["ClientId"],
            ClientSecret = Configuration["ClientSecret"],
            Authority = Configuration["Authority"],
            ResponseType = OpenIdConnectResponseType.Code,
            GetClaimsFromUserInfoEndpoint = true
        });

    app.UseMvc(routes =>
    {
        routes.MapRoute(
            name: "default",
            template: "{controller=Home}/{action=Index}/{id?}");
    });
}
We created a new OpenIdConnectOptions object, added the ClientId and ClientSecret we received when registering our app with the OpenID Connect provider (more on that below), and specified the Authority which indicates the actual OpenID Connect provider we are using. As usual, we loaded these values from configuration, which should be stored in the user secrets manager when developing.
For the remainder of the article I'll assume you are configuring Google as your provider, so in this case the 'Authority' value would be "https://accounts.google.com". With the middleware in place, we have everything we need for a basic 'Login via Google' OpenID Connect implementation.
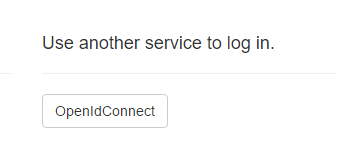
When the user gets to the login page, they will see the option to login using 'OpenIdConnect'. Obviously in production you would probably want to update that to something more user-friendly!
The user is then presented with their usual google login screen (if not already logged in) and asked to authorise your ASP.NET application:
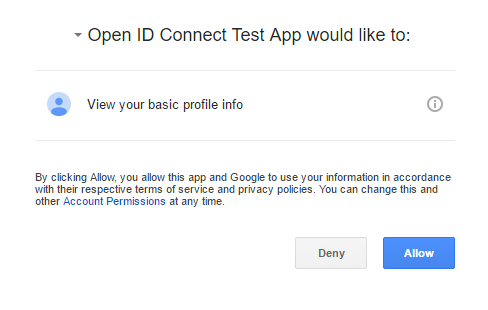
Clicking 'Allow' will redirect the user back to your ASP.NET application with an AUTH_CODE. You app can then communicate through the back channel to Google to authenticate the user, and to sign them in to your application.
Registering your application with Google
Just like when we were configuring Facebook to be an OAuth 2.0 provider for our application, we need to register our application with Google before we can use OpenID Connect.
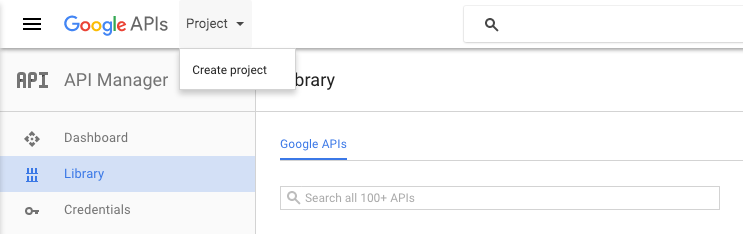
The first step is to visit http://console.developers.google.com and sign up as a developer. Once you are logged in and configured, you can register your app. Click 'Project' and 'Create Project' from the top menu
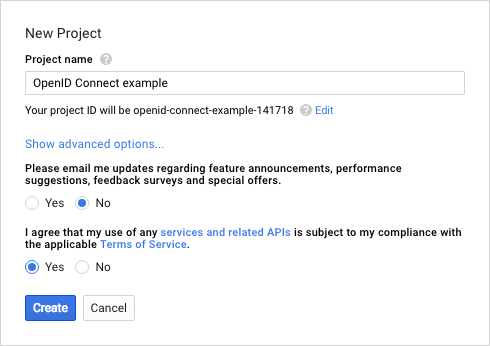
You will need to give your application a name and agree to the terms and conditions:
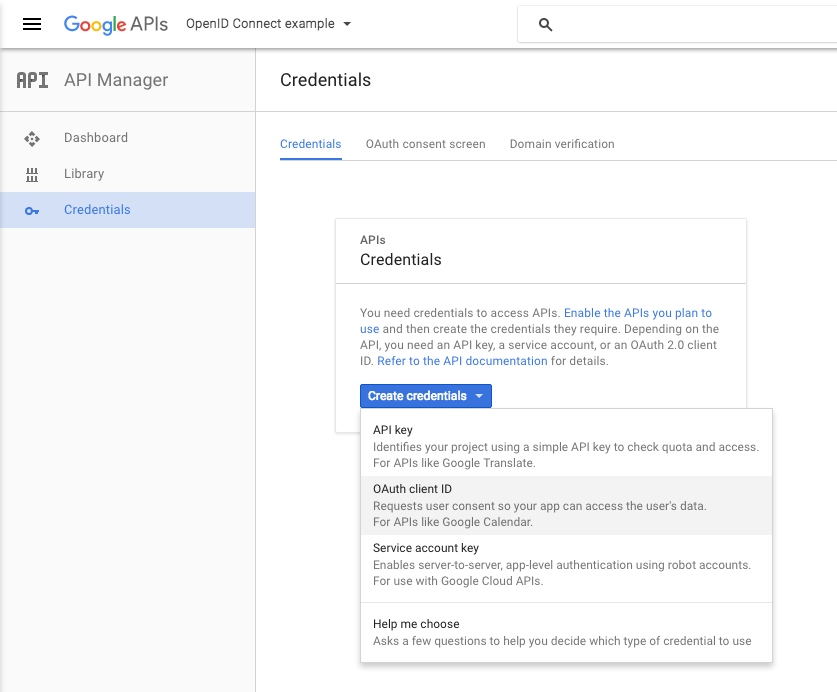
Now you need to generate some credentials for your application so we can obtain the necessary CLIENT_ID and CLIENT_SECRET. Click 'Credentials' in the left bar, and if necessary, select your project. You can then create credentials for your project. For an ASP.NET Core website you will want to select the OAuth client ID option:
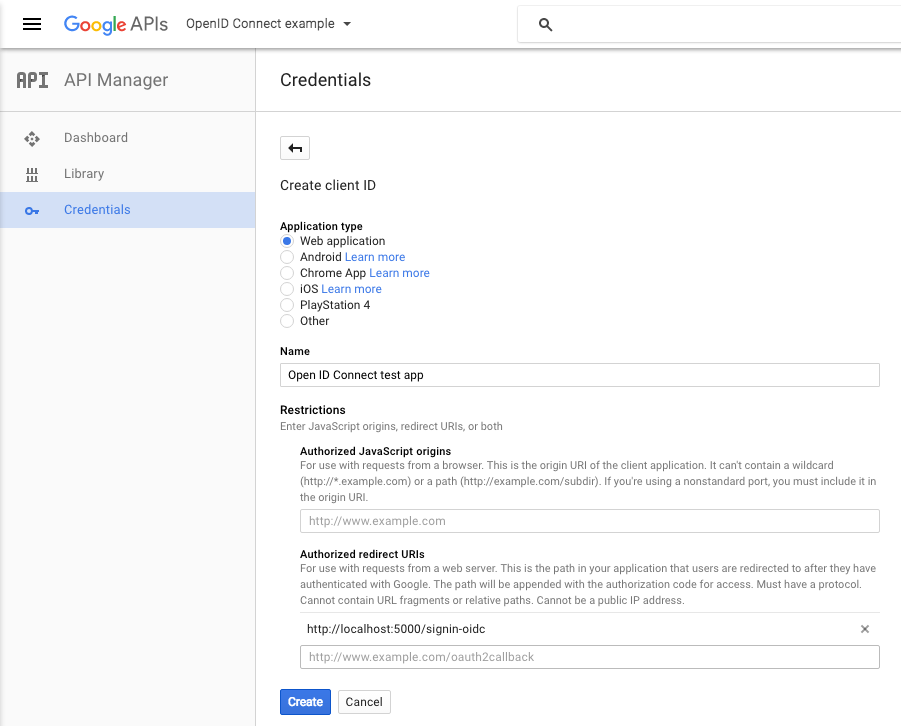
Next, choose Web application from the available options, provide a name, and a redirect URI. This URI will be the domain at which your application will be deployed (in my case http://localhost:5000) followed by /signin-oidc (by default)
On clicking create, you will be presented with your CLIENT_ID and CLIENT_SECRET. Simply store these in your user secrets and you're good to go!
Summary
In this post we saw how to add sign in using OpenID Connect to an ASP.NET Core application. We outlined the differences of the OpenID Connect protocol compared to OAuth 2.0 and highlighted the security and development benefits over plain OAuth. Finally, we showed how to register your application with Google to obtain your Client Id and Secret.
Additional Links
- http://nat.sakimura.org/2011/05/15/dummys-guide-for-the-difference-between-oauth-authentication-and-openid/
- http://nat.sakimura.org/2012/01/20/openid-connect-nutshell/
- https://developers.google.com/identity/protocols/OpenIDConnect
- http://www.thread-safe.com/2012/01/problem-with-oauth-for-authentication.html
- http://openid.net/connect/faq/
- https://leastprivilege.com/2016/07/29/fixing-oauth-2-0-with-openid-connect/
- http://rimdev.io/openid-connect-and-asp-net-core-1-0/