In this post I look at the new support for ASP.NET Core Identity being added to .NET 8 in the form of API endpoints you can use to perform basic Identity operations like registering users. These endpoints serve as API-friendly alternatives to the "default UI" that has been available with ASP.NET Core Identity for some time. I'll show how to use these APIs to interact with protected APIs in your app.
As this post is using the preview 7 build, some of the features may change, be fixed, or be removed before .NET 8 finally ships in November 2023!
What is ASP.NET Core Identity and why do we need APIs?
ASP.NET Core Identity is an additional layer/framework that ships with ASP.NET Core, and provides a wide variety of services for managing user accounts in your ASP.NET Core application. This includes both abstractions and default implementations for each service.
ASP.NET Core Identity lets you store user accounts in your application, manage user details, enable two factor authentication, and associate third-party logins with users. Fundamentally, it's about storing user accounts in your app, and using those accounts to login.
There are three main abstractions to consider in the core Identity system:
- Data model—the fundamental types of the ASP.NET Core Identity model. Includes types such as
IdentityUserandIdentityRole. - Stores—the persistence layer for storing and retrieving instance of the data model types. Includes interfaces such as
IUserStore<>andIRoleStore<>, as well as a whole host of fine-grained interfaces, such asIUserPasswordStore<>,IUserAuthenticatorKeyStore<>etc. - Managers—provide a service layer on top of the stores for managing users. There are three main abstractions:
UserManager—performs relatively high-level operations on users, such as creating a user from a username and an email, taking care to hash the password, generate normalized names, update security stamps etc.RoleManager—similar to theUserManager, performs high-level operations related to roles, such as adding or removing claims from a role.SignInManager—provides high-level APIs for signing users in and out, validating two-factor codes, checking for account lockout etc.

The managers provide relatively high-level APIs for interacting with Identity, but you still need to actually call the interfaces to use them, for example. To help with this stage, Microsoft have long provided a default UI package, Microsoft.AspNetCore.Identity.UI, which includes over 30 Razor Pages for working with Identity. This includes pages for logging in and out, pages for changing your email and password, pages for enabling and managing tow factor authentication (2FA) codes etc.

The sheer amount of code the default UI adds (and so saves you writing) is staggering. You can dump this code into your application using the scaffolding tool (shown above) so that you can customise the pages, and then you really get a sense of how much is going on here! Trying to implement all this yourself would typically be a fools-errand.
Unfortunately, that puts you in an awkward place. If you want to use ASP.NET Core Identity to store user accounts in-app, you're stuck taking one of three main paths:
- Use the Default Razor Pages UI as-is. That means you're stuck with the default styling, other than anything you can theme at a global level. Fine for toy, or even internal-only apps, but not great for anything else.
- Scaffold the default Razor Pages UI, and then customise the Razor templates. This means you can have custom styling, but there's a lot of pages to update, and keeping the scaffolded code up-to-date is difficult.
- Build the whole UI yourself. That's a lot of pages to create. And you better hope you don't introduce any bugs, given the sign-in and account pages are likely the most sensitive parts of your app.
None of these options are particularly appealing. What's more, if you're building a mobile app or building a SPA using Blazor (or JavaScript), there's both a technical and mental dissonance between the Identity pages that use Razor Pages and the rest of your app. Not to mention the fact there was no way to issue bearer tokens for use in mobile (or SPA apps, if you're not using the BFF pattern).
That's where the new Identity API endpoints come in.
What are the new Identity API endpoints?
In .NET 8, helpers have been added to ASP.NET Core to add Identity-related minimal API endpoints to your app. These endpoints are roughly equivalent to the pages in the default Razor Pages UI. This solves two main use cases:
- You can now easily create your own UI in your SPA app that uses the APIs. This keeps the style of your app's identity/accounts UI aligned with the rest of your app.
- You can issue access tokens for use by the SPA app or a mobile app when calling other APIs in your ASP.NET Core app.
The benefits of the first point are relatively obvious, but that latter point is worth exploring further.
For the default Razor Pages UI, you sign in with a username and password, and the app signs you in by setting an authentication cookie. Setting that cookie is the result of the sign in process.
However, cookies in mobile apps are typically hard to manage. It's much easier to use bearer token authentication instead, and to store an access token. With the default Razor Pages UI that wasn't really possible, but retrieving a token is simple with the identity APIs:
POST http://localhost:5117/account/login
Content-Type: application/json

{
  "username": "[email protected]",
  "password": "SuperSecret1!"
}
This endpoint gives a JSON response that looks something like the following (I've truncated the tokens for brevity)
{
  "token_type": "Bearer",
  "access_token": "CfDJ8CuDyfVIT-VKm_2z2YS9T0jen4IyKKwsovVDRrrFyC_nU4HRXbiOjkOr64HnnXYT35pCnWdVXaE32Ztu6PgKhwawiTLLy9J5AYFVF3j9S9SEYoibQQyQ5L7pu",
  "expires_in": 3600,
  "refresh_token": "CfDJ8CuDyfVIT-VKm_2z2YS9T0gvL1EYfbVBnppccNrI6WrfRcsOb7LHPTC6VewrV8UUsARjkdFT5CPj_ofGTGWw_gWtsPtfKDjrlLqeYfvmYllWJ8-LssInwA_fn"
}
The access token is relatively short-lived (the lifetime is controllable by configuration) but the client can fetch a new token using the refresh_token included in the response and use that to retrieve a new token. This is all pretty normal stuff, but it wasn't built-in to ASP.NET Core Identity before, and now it is!
Design considerations and limitations
As you might expect, there are various limitations and things to consider when using these APIs. The first thing to think about is how these APIs work. Behind the scenes they're essentially using the exact same APIs as the default Identity UI. That means that if you have an Identity implementation currently, you should just be able to plug these endpoints in without much difficulty.
An important feature to note is that the access token returned by the Identity endpoint is not a JWT. The token essentially contains the exact same information the Identity cookie in the default UI contains. That makes the implementation of the endpoint relatively easy, but it also tells you something about what these APIs are for.
In particular, the Identity endpoints are not intended to replace your IdentityServer or OpenIddict token servers. The access tokens generated by the Identity endpoint are intended to be used by that app and that app only. Also, they're intended to be used by interactive users, not for machine-to-machine communication.
That said, you could use the identity endpoints inside an IdentityServer implementation. People often get confused about the interplay between IdentityServer and ASP.NET Core Identity, so I intend to do a post on that and where the Identity endpoints fit in soon!
If you're building a simple backend+SPA combination, then the new Identity endpoints might seem like an easy choice. If you're building something more substantial, then you will likely want to consider an OpenID Connect server like IdentityServer.
That said, be aware that choosing to use the Identity API endpoints with a bearer token comes with a whole raft of limitations, potential for impersonation, and vulnerabilities, compared to using the established "cookies for authentication + OIDC for applications" approach. I'll got into more details in a follow up post, but be aware that using the Identity endpoints for anything more than a hobby project may be risky.
Adding the Identity APIs to an application
In this section I'll create a demo application, add all the prerequisite packages and services, and finally map the Identity APIs. As far as I can tell, the Identity APIs aren't currently included in any of the dotnet new templates.
The
webapitemplate has an--authoption, but that currently only has support for Azure AD, Azure AD B2C, or Windows authentication. I would expect that this template will be updated with Individual using the Identity APIs for .NET 8, but we'll see!
We'll start by creating a new dotnet new webapi. I used the .NET 8 preview 7 SDK for everything in this post.
Generate the initial template in a folder by running
dotnet new webapi
To add the Identity APIs we need to do several things:
- Add the required packages
- Add EF Core
- Add the required Identity EF Core models and generate migrations
- Add the Identity APIs and services
- Add authorization services and middleware
I'll walk through each of those steps in the following sections
Adding the EF Core packages
We'll start by adding EF Core to our application, which requires bringing in various packages.
For more details on adding EF Core to an existing application, you can see chapter 12 (section 12.2) of my new book, ASP.NET Core in Action, Third Edition.
For this demo I'm going to use SQLite as the backing database because it's nice and simple. You probably shouldn't use SQLite in production for a web app, but it works well for tests like this.
We'll start by adding the required packages
# The main package for SQLite EF Core support
dotnet add package Microsoft.EntityFrameworkCore.SQLite --prerelease

# Contains shared build-time components for EF Core
dotnet add package Microsoft.EntityFrameworkCore.Design --prerelease

# The ASP.NET Core Identity integration for EF Core
dotnet add package Microsoft.AspNetCore.Identity.EntityFrameworkCore --prerelease
I've used the --prerelease flag to make sure we pull in the latest packages (the .NET 8 preview 7 packages). You'll also need to install the ef tool if you haven't already. I updated to the latest (.NET 8 preview) version of the tool using:
dotnet tool update --global dotnet-ef --prerelease
We now have all the tools and packages we need, so lets add EF Core to our app.
Configuring EF Core in the app
To get started with EF Core, we need a DbContext implementation in our app. The simplest DbContext implementation looks like the following (note that we'll update this to support Identity shortly)
public class AppDbContext : DbContext
{
    public AppDbContext(DbContextOptions<AppDbContext> options)
     : base(options)
    {
    }
}
We can register the AppDbContext with our app by calling AddDbContext<> on WebApplicationBuilder:
using Microsoft.EntityFrameworkCore;

var builder = WebApplication.CreateBuilder(args);

// Add EF Core
builder.Services.AddDbContext<AppDbContext>(options =>
    options.UseSqlite(builder.Configuration.GetConnectionString("DefaultConnection")));

// ...
In the above snippet we configure EF Core to use our AppDbContext class, to use SQLite, and to use a connection string called "DefaultConnection". We can define the connectionstring in appsettings.json (note I haven't shown the existing configuration, just the new key):
{
  "ConnectionStrings": {
    "DefaultConnection": "Data Source=my_test_app.db"
  }
}
That's EF Core configured, so now we can configure ASP.NET Core Identity.
Adding Identity and the Identity API endpoint services
Before we can add the Identity services we need to do two things:
- Create a user type that derives from
IdentityUser - Update our
AppDbContextto derive fromIdentityDbContext<>
The first point isn't strictly necessary, as you can use IdentityUser directly in your apps if needs be. But given you'll probably want to customise your user type at some point, I think it makes sense to use a custom type sooner rather than later.
public class AppUser : IdentityUser
{
    // Add customisations here later
}

                            // 👇 Change from DbContext to IdentityDbContext<>
public class AppDbContext : IdentityDbContext<AppUser>
{
    public AppDbContext(DbContextOptions<AppDbContext> options) : base(options)
    {
    }
}
With those types created in your application, you can now add the Identity services using the new AddIdentityApiEndpoints<> method, and configure the standard Identity EF Core stores:
builder.Services
    .AddIdentityApiEndpoints<AppUser>()
    .AddEntityFrameworkStores<AppDbContext>();
The AddIdentityApiEndpoints<> method does several things:
- Configures Bearer and cookie authentication (more on the cookie auth in a subsequent post!)
- Adds core Identity services such as the
UserManager - Adds services required by the Identity API endpoints such as the
SignInManager, token providers, and a no-opIEmailSenderimplementation
After all these services are added, we can finally scaffold some migrations and create the database.
Creating the database
As the app uses EF Core, we need to create a migration and update the database. If your app is building successfully you should be able to do both these steps using the following:
dotnet ef migrations add InitialSchema
dotnet ef database update
If all goes well this should create the my_test_app.db SQLite database file. We're almost ready to give our app a try.
Adding authorization to an API
Ultimately we want to be able to protect our APIs using authorization, so to make sure this works correctly, lets add an authorization requirement to the weather forecast endpoint:
app.MapGet("/weatherforecast", () => /* not show for brevity */)
  .WithName("GetWeatherForecast")
  .RequireAuthorization() // 👈 Add this
  .WithOpenApi();
If you run your application and try to hit this endpoint then you'll get an error warning you that you haven't add the authorization middleware to your application:
System.InvalidOperationException: Endpoint HTTP: GET /weatherforecast contains
authorization metadata, but a middleware was not found that supports authorization.
Configure your application startup by adding app.UseAuthorization() in the application
startup code. If there are calls to app.UseRouting() and app.UseEndpoints(...),
the call to app.UseAuthorization() must go between them.
So to resolve the issue add the Authorization services to WebApplicationBuilder and add the Authorization middleware. Your app should now look something like this:
var builder = WebApplication.CreateBuilder(args);

// 👇 Add the authorization services
builder.Services.AddAuthorization();

// Add EF Core
builder.Services.AddDbContext<AppDbContext>(options =>
    options.UseSqlite(builder.Configuration.GetConnectionString("DefaultConnection")));

// add identity services
builder.Services
    .AddIdentityApiEndpoints<AppUser>()
    .AddEntityFrameworkStores<AppDbContext>();

// Swagger/OpenAPI services
builder.Services.AddEndpointsApiExplorer();
builder.Services.AddSwaggerGen();

var app = builder.Build();

if (app.Environment.IsDevelopment())
{
    app.UseSwagger();
    app.UseSwaggerUI();
}

app.UseHttpsRedirection();
app.UseAuthorization(); // 👈 Add Authorization middleware

// ...
All that remains is to add the Identity endpoints!
Adding the Identity API endpoints
You can add the Identity endpoints to your app by calling MapIdentityApi<> on WebApplication. This adds a whole variety of endpoints to your app (which you'll see shortly).
You will most likely want to scope these to a sub-path like /account or /identity, so that instead of the endpoints /login and /confirmEmail, you'll have /account/login and /account/confirmEmail, for example. You can add the prefix using MapGroup, as in the following example:
app.MapGroup("/account").MapIdentityApi<AppUser>();
And with that, we're done! It's time to explore the application to see what we can do with it.
Exploring the Identity APIs
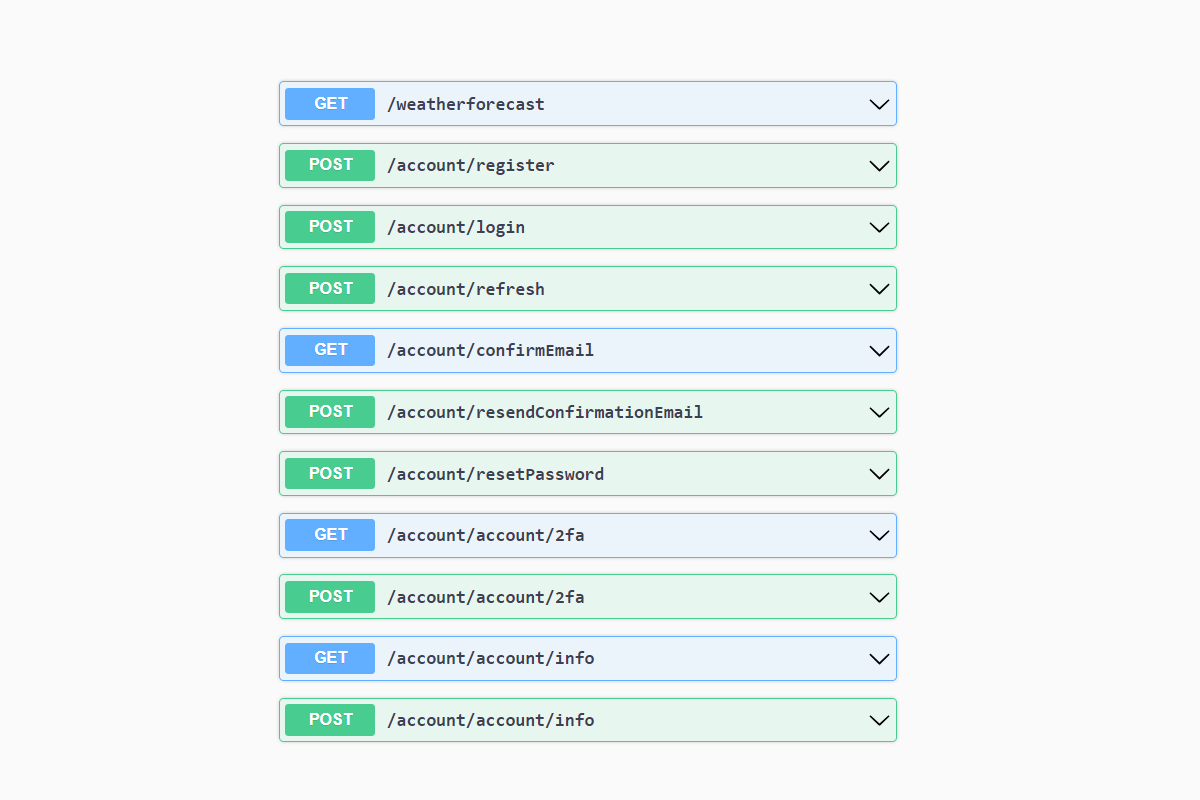
The easiest way to see the endpoints available is to run the application and navigate to /swagger/index.html to see the SwaggerUI documentation:

At the top of the list you can see the /weatherforecast API, and below that are all the endpoints added by MapIdentityApi<>(). You can use the SwaggerUI to interact with the API, but I couldn't be bothered to mess around with tokens in the UI, so I decided to use Rider's built-in HttpClient support instead.
Visual Studio recently gained support for .http files as well, so you can do pretty much the same thing there.
Testing the protected endpoint
The first interesting point for me was that Rider's Endpoints window picked up the /weatherforecast endpoint, it didn't pickup the Identity endpoints, even with the Show from libraries option enabled. Still, that's the first endpoint we want to test anyway, to make sure it's secure. I right-clicked the endpoint and selected Generate Request in HTTP Client:

This generated a simple `GET`` request to the endpoint in an .http file:

Clicking the Run icon in the gutter set the request to the endpoint and, unsurprisingly, returned a 401 Unauthorized response, indicating the API was correctly protected:
GET http://localhost:5117/weatherforecast

HTTP/1.1 401 Unauthorized
Content-Length: 0
Date: Sat, 02 Sep 2023 19:46:02 GMT
Server: Kestrel
WWW-Authenticate: Bearer
The first step to calling this endpoint is to create a user we can login with.
Registering a new user
The first endpoint we'll look at is the /register endpoint (exposed at /account/register in my example). This is a POST endpoint, to which we send an email, username, and a password:
### Register a new user
POST http://localhost:5117/account/register
Content-Type: application/json

{
  "username": "[email protected]",
  "password": "SuperSecret1!",
  "email": "[email protected]"
}
If this succeeds you'll get a 200 response back. Note that the password you send must meet all the standard IdentityOptions requirements, so it will be rejected if you don't meet the length or complexity requirements for example.
As a side point, I suggest you get rid of most of the complexity requirements for user passwords, increase the minimum length requirements, and integrate a validator that checks for commonly used or breached passwords, such as those exposed on haveibeenpwned.com.
Retrieving an access token
Assuming the user is created correctly, we now need to retrieve an access token. We can use the /login path for this:
### Login and retrieve tokens
POST http://localhost:5117/account/login
Content-Type: application/json

{
  "username": "[email protected]",
  "password": "SuperSecret1!"
}
If you provide a valid username and password, this returns a response similar to the one you saw previously:
{
  "token_type": "Bearer",
  "access_token": "CfDJ8CuDyfVIT-VKm_2z2YS9T0jen4IyKKwsovVDRrrFyC_nU4HRXb...",
  "expires_in": 3600,
  "refresh_token": "CfDJ8CuDyfVIT-VKm_2z2YS9T0gvL1EYfbVBnppccNrI6WrfRcsOb..."
}
We can use the Rider HttpClient's built-in scripting to automatically grab this token from the response and save it to a variable we can use later:
> {%
    client.global.set("access_token", response.body.access_token);
    client.global.set("refresh_token", response.body.refresh_token);
%}
So the whole thing looks like this in Rider:

Calling the protected API
Now that we have an access_token, we can use it to call the protected API:
### Call Forecast API with bearer token
GET http://localhost:5117/weatherforecast
Authorization: Bearer {{access_token}}
And this now returns the JSON response we expected!
[
  {
    "date": "2023-09-03",
    "temperatureC": 20,
    "summary": "Chilly",
    "temperatureF": 67
  },
  ...
]
Generating a refresh token
Eventually the access token will expire, and we'll need to fetch a new one. We can do this with the /refresh endpoint:
### Fetch a new access token
POST http://localhost:5117/account/refresh
Content-Type: application/json

{
  "refreshToken": "{{refresh_token}}"
}
Note that this also returns a new refresh token as well.
There are a bunch of other endpoints you can call for managing 2fa tokens for the user etc, but this post is plenty long enough, so I'm going to leave that as an exercise for the reader!
Summary
In this post I described the existing state of ASP.NET Core Identity, the various abstractions it provides, and how much functionality the Razor Pages default UI provides. I then described some of the problems with the UI, in particular the styling complexities and integration with SPA or mobile apps.
Next I showed how you can add ASP.NET Core Identity to a new application and use the Identity APIs. I started from a blank template so added EF Core, Identity, and finally the Identity APIs. I then showed how you can interact with the APIs using an HTTP client.