
Microsoft.FeatureManagement allows you to add feature flags to an ASP.NET Core app that are controlled by the configuration system. In the previous post I introduced feature filters, and showed how they can be used to create dynamic feature flags. I described two feature filters that are built-in to the library, the TimeWindowFilter and PercentageFilter.
In this post I show how you can create your own custom feature filter. The example in this post looks for a Claim in the currently logged-in user's ClaimsPrincipal and enables a feature flag if it's present. You could use this filter to enable a feature for a subset of your users.
Microsoft.FeatureManagement was introduced in a recent .NET Community Standup and is currently in preview, so some details may change when it's properly released.
Creating a custom IFeatureFilter
This post assumes that you're already familiar with feature filters, and the Microsoft.FeatureManagement in general, so if they're new to you, I suggest reading the previous posts in this series.
Creating a custom feature filter requires two things:
- Create a class that derives from
IFeatureFilter. - Optionally create a settings class to control your feature filter.
I'll start with the settings class, as we'll use that inside our custom feature filter.
Creating the filter settings class
For this example, we want to enable a feature for only those users that have a certain set of claims. For simplicity, I'm only going to require the presence of a claim type and ignore the claim's value, but extending the example in this post should be simple enough. The settings object contains an array of claim types:
public class ClaimsFilterSettings
{
    public string[] RequiredClaims { get; set; }
}
There's nothing special about this settings class; it will be bound to your app's configuration, so you're only restricted by the limitations of the standard ASP.NET Core/Microsoft.Extensions configuration binder.
Implementing IFeatureFilter
To create a feature filter, you must implement the IFeatureFilter interface, which consists of a single method:
public interface IFeatureFilter
{
    bool Evaluate(FeatureFilterEvaluationContext context);
}
The FeatureFilterEvaluationContext argument passed in to the method contains the name of the feature requested, and an IConfiguration object that allows you to access the settings for the feature:
public class FeatureFilterEvaluationContext
{
    public string FeatureName { get; set; }
    public IConfiguration Parameters { get; set; }
}
It's worth noting that there's nothing specific to ASP.NET Core here - there's no HttpContext, and no IServiceProvider. Luckily, your class is pulled from the DI container, so you should be able to get everything you need in your feature filter's constructor.
Creating the custom feature filter
In order to implement our custom feature filter, we need to know who the current user is for the request. To do so, we need to access the HttpContext. The correct way to do that (when you don't have direct access to it as you do in MVC controllers etc) is to use the IHttpContextAccessor.
The ClaimsFeatureFilter below takes an IHttpContextAccessor in its constructor and uses the exposed HttpContext to retrieve the current user from the request.
[FilterAlias("Claims")] // How we will refer to the filter in configuration
public class ClaimsFeatureFilter : IFeatureFilter
{
    // Used to access HttpContext
    private readonly IHttpContextAccessor _httpContextAccessor;
    public ClaimsFeatureFilter(IHttpContextAccessor httpContextAccessor)
    {
        _httpContextAccessor = httpContextAccessor;
    }

    public bool Evaluate(FeatureFilterEvaluationContext context)
    {
        // Get the ClaimsFilterSettings from configuration
        var settings = context.Parameters.Get<ClaimsFilterSettings>();

        // Retrieve the current user (ClaimsPrincipal)
        var user = _httpContextAccessor.HttpContext.User;

        // Only enable the feature if the user has ALL the required claims
        var isEnabled = settings.RequiredClaims
            .All(claimType => user.HasClaim(claim => claim.Type == claimType));

        return isEnabled;
    }
}
I named this feature filter "Claims" using the [FilterAlias] attribute. This is the string you need to add in configuration to enable the filter, as you'll see shortly. You can retrieve the ClaimsFilterSettings associated with a given instance of the custom feature filter by calling context.Parameters.Get<>().
The logic of the filter is relatively straightforward - if the ClaimsPrincipal for the request has all of the required claims, the associated feature is enabled, otherwise the feature is disabled.
Using the custom feature filter
To use the custom feature filter, you must explicitly register it with the feature management system in Startup.ConfigureServices(). We also need to make sure the IHttpContextAccessor is available in DI:
using Microsoft.FeatureManagement;

public class Startup
{
    public void ConfigureServices(IServiceCollection services)
    {
        // Add IHttpContextAccessor if it's not yet added
        services.AddHttpContextAccessor();

        services.AddFeatureManagement()
            .AddFeatureFilter<ClaimsFeatureFilter>(); // add our custom filter
    }
}
Depending on which framework and third-party services you've already added to your app,
IHttpContextAccessormay already be available. It's safe to callAddHttpContextAccessor()multiple times though, so worth including just in case.
That's all the custom configuration needed to enable our ClaimsFeatureFilter. To actually use it in an app, we'll add a feature flag called "Beta":
public static class FeatureFlags
{
    public const string Beta = "Beta";
}
and enable the filter in configuration using the format described in the previous post:
{
  "FeatureManagement": {
    "Beta": {
      "EnabledFor": [
        {
          "Name": "Claims",
          "Parameters": {
            "RequiredClaims": [ "Internal" ]
          }
        }
      ]
    }
  }
Notice that I've used the [FilterAlias] value of "Claims" as the filter's Name. The Parameters object corresponds to the ClaimsFilterSettings settings object. With this configuration, user's who have the "Internal" claim will have the Beta feature flag enabled - other user's will find it's disabled.
Testing the ClaimsFeatureFilter
To test out the feature filter, it's easiest to start with an ASP.NET Core app that has individual authentication enabled. For demonstration purposes, I updated the home page Index.cshtml to show a banner when the Beta feature flag is enabled using the FeatureTagHelper:
@page
@model IndexModel
@{
    ViewData["Title"] = "Home page";
}

<!-- Only visible when Beta feature flag is enabled -->
<feature name="@FeatureFlags.Beta">
    <div class="alert alert-primary" role="alert">
        Congratulations - You're in the Beta test!
    </div>
</feature>

<!-- ... -->
Run the database migrations for the application using
dotnet ef database update
and then run your app and register a new user. You should see the standard home page:
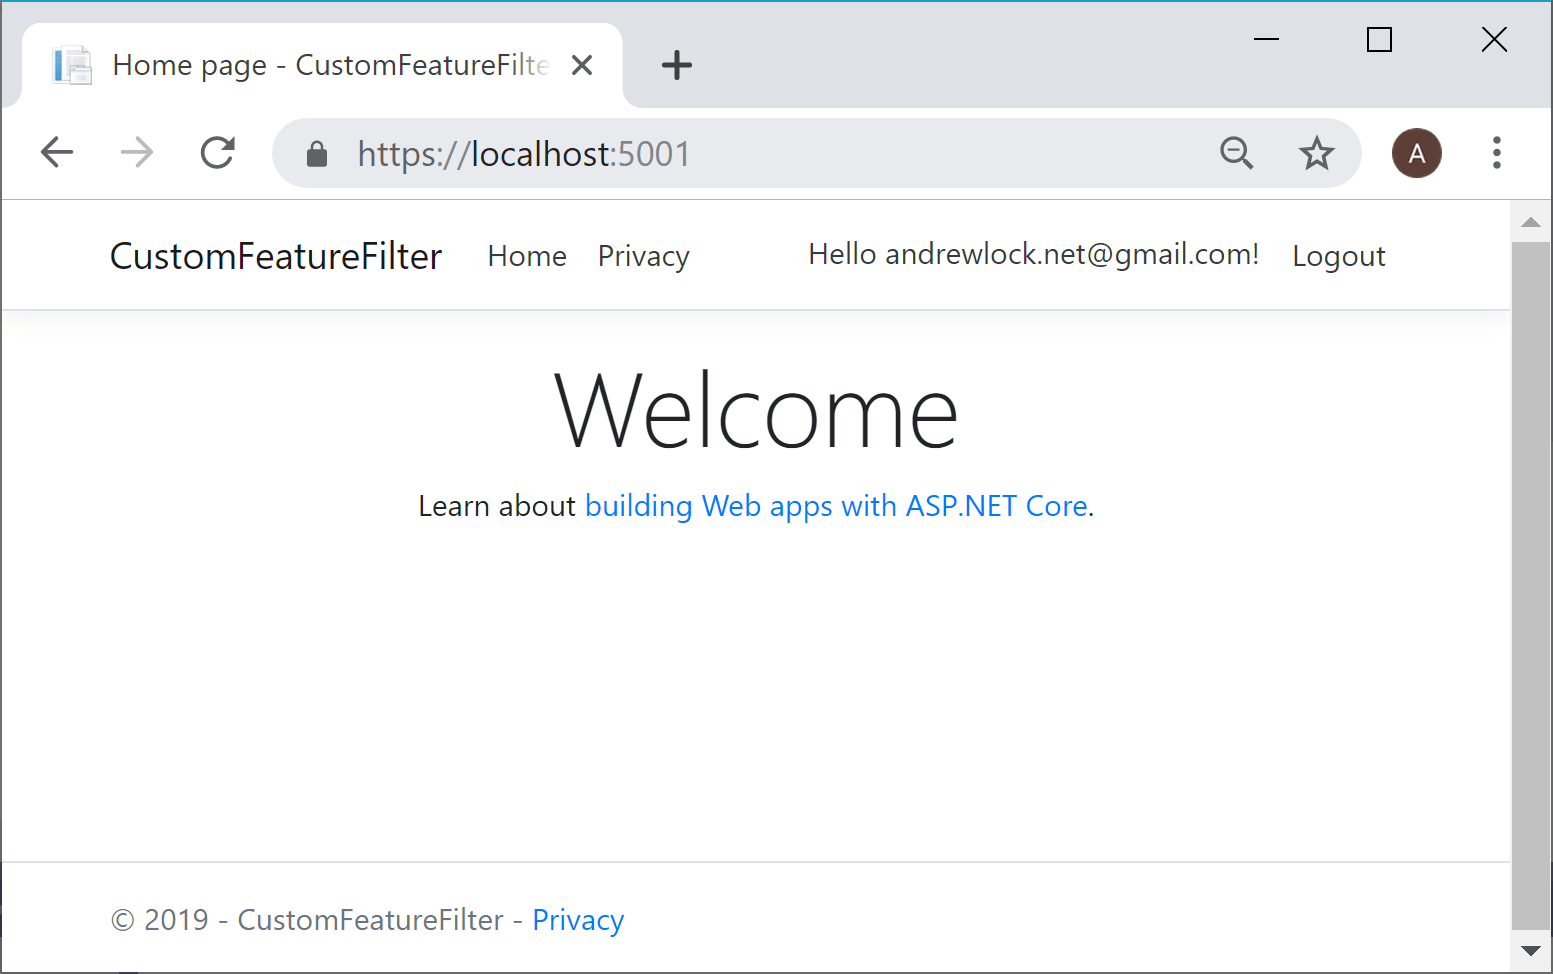
The "Beta" banner is hidden because by default. Our ClaimsFeatureFilter checked the user's claims for the required "Internal" claim, which is absent by default, and so returned false for IsEnabled(). To enable the feature we need to add an extra claim to the user.
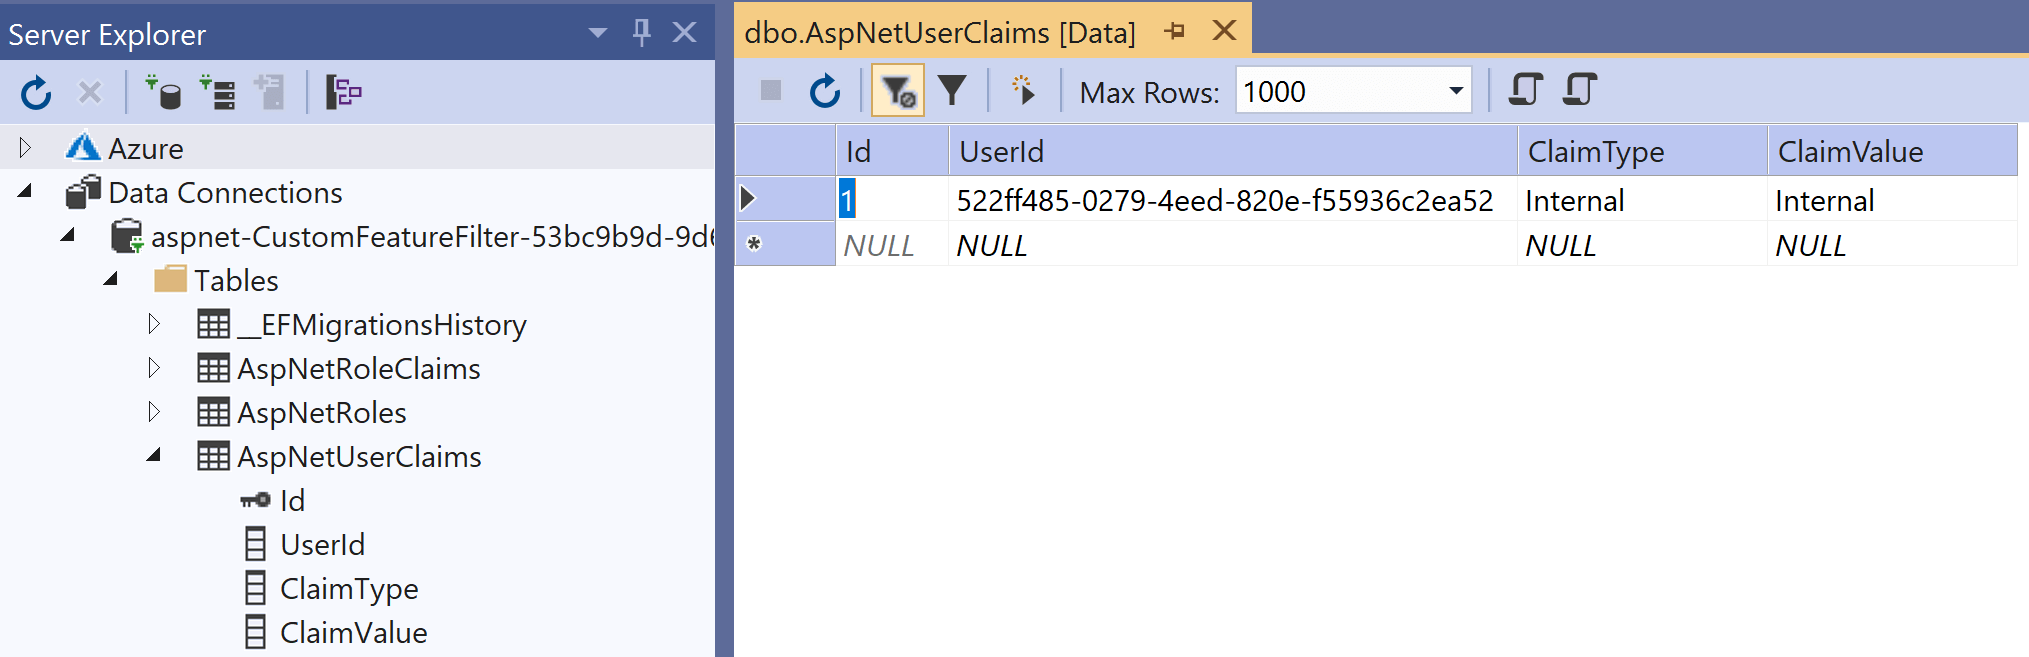
There are a number of ways to add claims to users - either when the user is created, at a later time, or when they sign in. I'm taking the easy route here and just manually adding the claim in the database.
With ASP.NET Core Identity, arbitrary additional Claims can be added to a user. These are stored in the AspNetUserClaims table (by default). I used VisualStudio server explorer to add a new row in this table associated with my user, using the claim type "Internal"
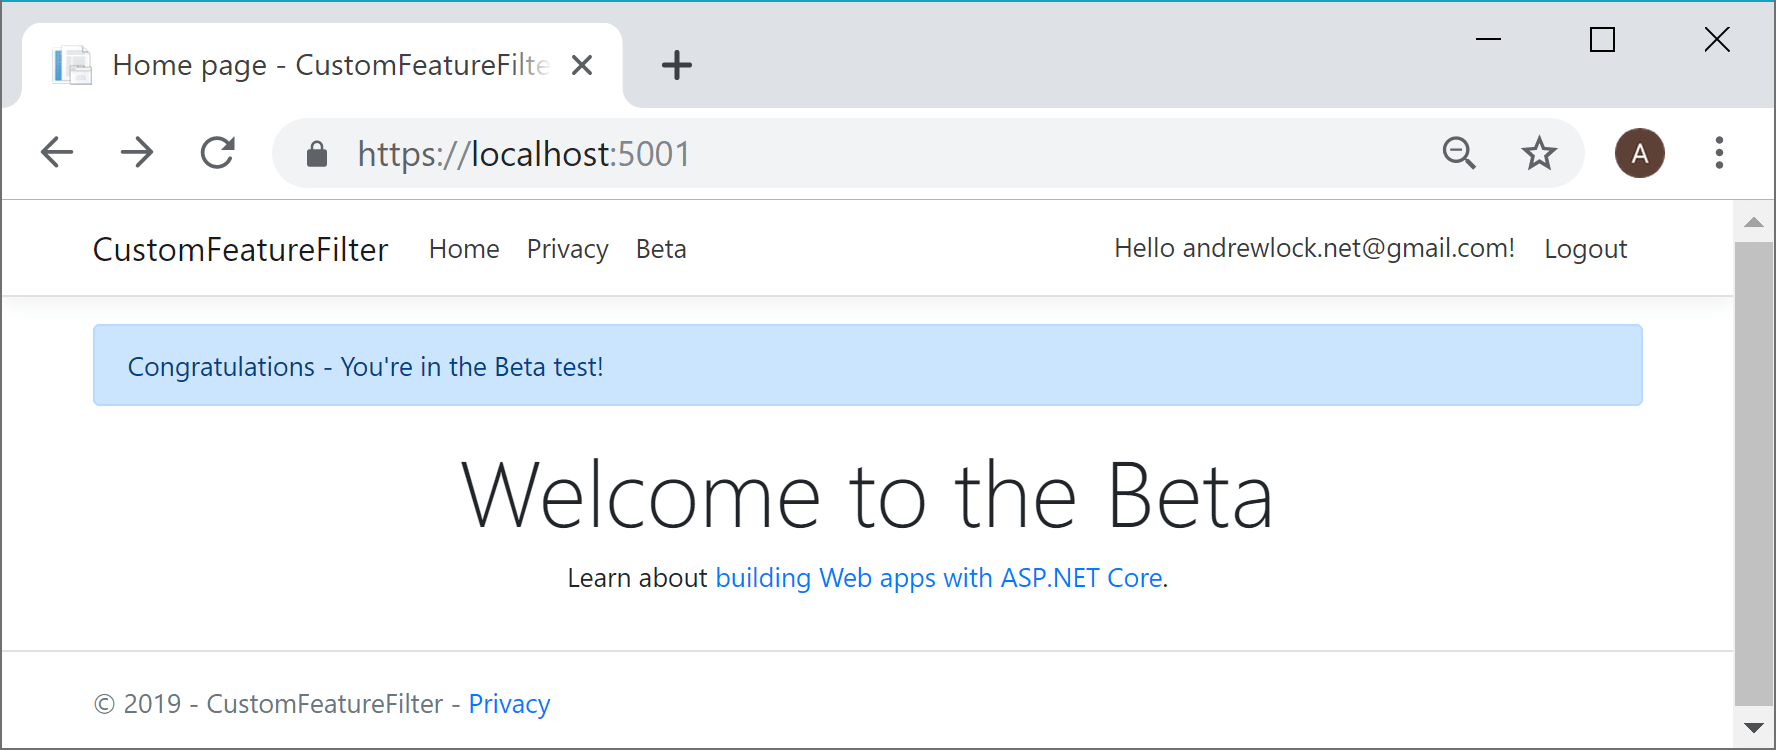
If you log out and then sign back in (to ensure the new claim is picked up) the "Beta" banner is now visible - the custom feature filter works!
Limitations with the ClaimsFeatureFilter
The custom feature filter ClaimsFeatureFilter described in this post is only intended as an example of a filter you could use. The reliance on HttpContext gives it a specific limitation: it can't be used outside the context of an HTTP request.
Attempting to access HttpContext outside of an HTTP request can result in a NullReferenceException. You also need to be careful about using it in a background thread, as HttpContext is not thread safe.
One of the slightly dangerous implications of this is that consumers of the feature flags don't necessarily know which features are safe to interrogate in which context. There's nothing in the following code that suggests it could throw when used on a background thread, or in a hosted service.
var isEnabled = _featureManager.IsEnabled(FeatureFlags.Beta); // may throw!
One basic option to avoid this situation is to use naming conventions for your feature flags. For example, you could use a convention where feature flags prefixed with "UI_" are only considered "safe" to access when withan an HTTP request context.
public static class FeatureFlags
{
    // These flags are safe to access in any context
    public const string NewBranding = "NewBranding";
    public const string AlternativeColours = "AlternativeColours";

    // These flags are only safe to access from an HttpContext-safe request
    public static class Ui
    {
      const string _prefix = "UI_";
      public const string Beta = _prefix + "Beta";
      public const string NewOnboardingExperiences = _prefix + "NewOnboardingExperiences";
    }
}
This at least gives an indication to the caller when the flag is used. Obviously it requires you configure the flags correctly, but it's a step in the right direction!
// Flags on the main FeatureFlags class are safe to use everywhere
var isEnabled = _featureManager.IsEnabled(FeatureFlags.NewBranding);

// Flags on the nested Ui class are only safe when HttpContext is available
var isEnabled = _featureManager.IsEnabled(FeatureFlags.Ui.Beta);
Summary
Microsoft.FeatureManagement allows using feature filters to add dynamic behaviour to your feature flags. In this post I showed how to implement your own custom IFeatureFilter which uses claims of the current user to decide whether a flag should be enabled. This feature filter works well in the context of a request, but it's important to be aware of the implications of using HttpContext as regards to using feature flags in background threads and outside of an HTTP context.