
When running ASP.NET Core apps, the WebHostBuilder will automatically attempt to determine which environment it is running in. By convention, this will be one of Development, Staging or Production but you can set it to any string value you like.
The IHostingEnvironment allows you to programatically retrieve the current environment so you can have environment-specific behaviour. For example, you could enable bundling and minification of assets when in the Production environment, while serving files unchanged in the Development environment.
In this post I'll show how to change the current hosting environment used by ASP.NET Core using environment variables on Windows and OS X, using Visual Studio and Visual Studio Code, or by using command line arguments.
Changing the hosting environment
ASP.NET Core uses the ASPNETCORE_ENVIRONMENT environment variable to determine the current environment. By default, if you run your application without setting this value, it will automatically default to the Production environment.
When you run your application using dotnet run, the console output lists the current hosting environment in the output:
> dotnet run
Project TestApp (.NETCoreApp,Version=v1.0) was previously compiled. Skipping compilation.

Hosting environment: Production
Content root path: C:\Projects\TestApp
Now listening on: http://localhost:5000
Application started. Press Ctrl+C to shut down.
There are a number of ways to set this environment variable, the method that is best depends on how you are building and running your applications.
Setting the environment variable in Windows
The most obvious way to change the environment is to update the environment variable on your machine. This is useful if you know, for example, that applications run on that machine will always be in a given environment, whether that is Development, Staging or Production.
On Windows, there are a number of ways to change the environment variables, depending on what you are most comfortable with.
At the command line
You can easily set an environment variable from a command prompt using the setx.exe command included in Windows since Vista. You can use it to easily set a user variable:
>setx ASPNETCORE_ENVIRONMENT "Development"

SUCCESS: Specified value was saved.
Note that the environment variable is not set in the current open window. You will need to open a new command prompt to see the updated environment. It is also possible to set system variables (rather than just user variables) if you open an administrative command prompt and add the /M switch:
>setx ASPNETCORE_ENVIRONMENT "Development" /M

SUCCESS: Specified value was saved.
Using PowerShell
Alternatively, you can use PowerShell to set the variable. In PowerShell, as well as the normal user and system variables, you can also create a temporary variable using the $Env: command:
$Env:ASPNETCORE_ENVIRONMENT = "Development"
The variable created lasts just for the duration of your PowerShell session - once you close the window the environment reverts back to its default value.
Alternatively, you could set the user or system environment variables directly. This method does not change the environment variables in the current session, so you will need to open a new PowerShell window to see your changes. As before, changing the system (Machine) variables will require administrative access
[Environment]::SetEnvironmentVariable("ASPNETCORE_ENVIRONMENT", "Development", "User")
[Environment]::SetEnvironmentVariable("ASPNETCORE_ENVIRONMENT", "Development", "Machine")
Using the windows control panel
If you're not a fan of the command prompt, you can easily update your variables using your mouse!Click the windows start menu button (or press the Windows key), search for environment variables, and choose Edit environment variables for your account:

Selecting this option will open the System Properties dialog:
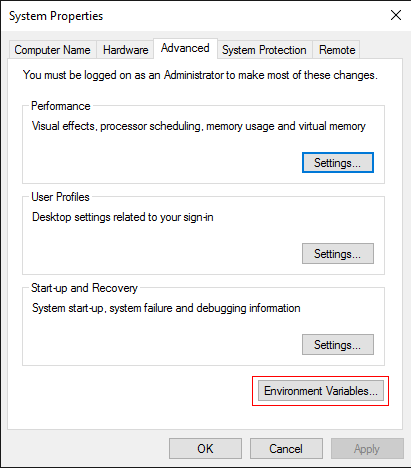
Click Environment Variables to view the list of current environment variables on your system.
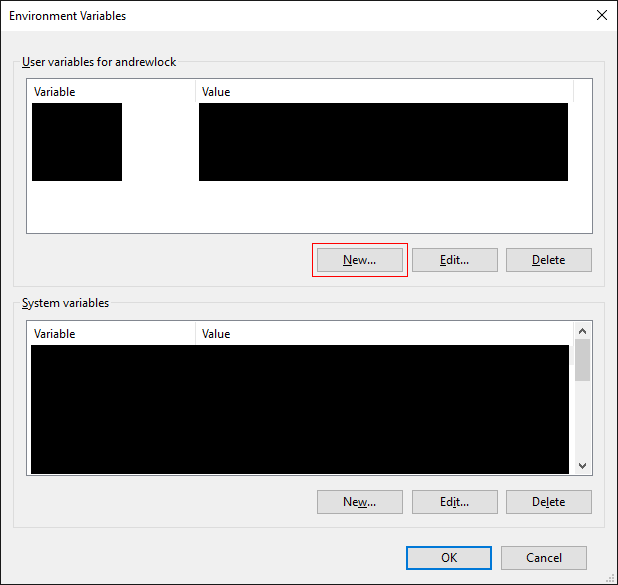
Assuming you do not already have a variable called ASPNETCORE_ENVIRONMENT, click the New... button and add a new account environment variable:
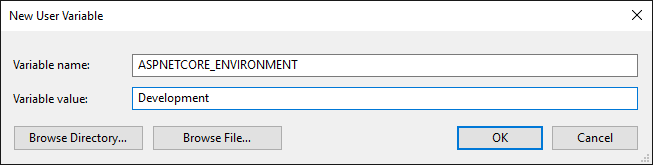
Click OK to save all your changes. You will need to re-open any command windows to ensure the new environment variables are loaded.
Setting the environment variables on OS X
You can set an environment variable on OS X by editing or creating the .bash_profile file in your favourite editor (I'm using nano):
$ nano ~/.bash_profile
You can then export the ASPNETCORE_ENVIRONMENT variable. The variable will not be set in the current session, but will be updated when you open a new terminal window:
export ASPNETCORE_ENVIRONMENT=development
Important, the command must be as is written above - there must be no spaces either side of the =. Also note that my bash knowledge is pretty poor, so if this approach doesn't work for you, I encourage you to go googling for one that does:)
Configuring the hosting environment using your IDE
Instead of updating the user or system environment variables, you can also configure the environment from your IDE, so that when you run or debug the application from there, it will use the correct environment.
Visual studio launchSettings.json
When you create an ASP.NET Core application using the Visual Studio templates, it automatically creates a launchSettings.json file. This file serves as the provider for the Debug targets when debugging with F5 in Visual Studio:
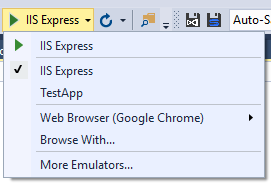
When running with one of these options, Visual Studio will set the environment variables specified. In the file below, you can see the ASPNETCORE_ENVIRONMENT variable is set to Development.
{
  "iisSettings": {
    "windowsAuthentication": false,
    "anonymousAuthentication": true,
    "iisExpress": {
      "applicationUrl": "http://localhost:53980/",
      "sslPort": 0
    }
  },
  "profiles": {
    "IIS Express": {
      "commandName": "IISExpress",
      "launchBrowser": true,
      "environmentVariables": {
        "ASPNETCORE_ENVIRONMENT": "Development"
      }
    },
    "TestApp": {
      "commandName": "Project",
      "launchBrowser": true,
      "launchUrl": "http://localhost:5000",
      "environmentVariables": {
        "ASPNETCORE_ENVIRONMENT": "Development"
      }
    }
  }
}
You can also edit this file using the project Properties window. Just double click the Properties node in your solution, and select the Debug tab:

Visual Studio Code launch.json
If you are using Visual Studio Code, there is a similar file, launch.json which is added when you first debug your application. This file contains a number of configurations one of which should be called ".NET Core Launch (web)". You can set additional environment variables when launching with this command by adding keys to the env property:
{
    "version": "0.2.0",
    "configurations": [
        {
            "name": ".NET Core Launch (web)",
            "type": "coreclr",
            "request": "launch",
            "preLaunchTask": "build",
            "program": "${workspaceRoot}/bin/Debug/netcoreapp1.0/TestApp.dll",
            "args": [],
            "cwd": "${workspaceRoot}",
            "stopAtEntry": false,
            "launchBrowser": {
                "enabled": true,
                "args": "${auto-detect-url}",
                "windows": {
                    "command": "cmd.exe",
                    "args": "/C start ${auto-detect-url}"
                },
                "osx": {
                    "command": "open"
                },
                "linux": {
                    "command": "xdg-open"
                }
            },
            "env": {
                "ASPNETCORE_ENVIRONMENT": "Development"
            },
            "sourceFileMap": {
                "/Views": "${workspaceRoot}/Views"
            }
        }
    ]
}
Setting hosting environment using command args
Depending on how you have configured your WebHostBuilder, you may also be able to specify the environment by providing a command line argument. To do so, you need to use a ConfigurationBuilder which uses the AddCommandLine() extension method from the Microsoft.Extensions.Configuration.CommandLine package. You can then pass your configuration to the WebHostBuilder using UseConfiguration(config):
var config = new ConfigurationBuilder()
    .AddCommandLine(args)
    .Build();

var host = new WebHostBuilder()
    .UseConfiguration(config)
    .UseContentRoot(Directory.GetCurrentDirectory())
    .UseKestrel()
    .UseIISIntegration()
    .UseStartup<Startup>()
    .Build();
This allows you to specify the hosting environment at run time using the --environment argument:
> dotnet run --environment "Staging"

Project TestApp (.NETCoreApp,Version=v1.0) was previously compiled. Skipping compilation.

Hosting environment: Staging
Content root path: C:\Projects\Repos\Stormfront.Support\src\Stormfront.Support
Now listening on: http://localhost:5000
Application started. Press Ctrl+C to shut down.
Summary
In this post I showed a number of ways you can specify which environment you are currently running in. Which method is best will depend on your setup and requirements. However you choose, if you change the environment variable you will need to restart the Kestrel server, as the environment is determined as part of the server start up.
Altering the hosting environment allows you to configure your application differently at run time, enabling debugging tools in a development setting or optimisations in a production environment. For details on using the IHostingEnvironment service, checkout the documentation here.
One final point - environment variables are case insensitive, so you can use "Development", "development" or "DEVELOPMENT" to your heart's content.