Update 2 Aug 2016 - As of 3 days ago there was been a problem running the original scripts on this page on OSX due to an update in HomeBrew. For details, check out this issue. The travis pre-install script has been updated using one of the workarounds highlighted so if you find your CI build suddenly breaks, you will probably need to apply the same tweak!
In my last post I described A CI/CD pipeline for ASP.NET Core projects that used AppVeyor to build and test the project in a Windows environment, and deploy the packages to MyGet and NuGet.
In this post I'm going to describe how to build and test your project in a Linux and Mac environment using Travis CI. I'm not going to worry about publishing packages as AppVeyor is going to handle that for us.
As previously, we are first going to create a build script to allow us to build and test our project in the same way both locally and on the server. Our build script will perform 5 operations:
- Clean any previous build artifacts
- Restore necessary dependencies
- Build the project
- Run tests
- Package project (but don't publish)
Based on these requirements, I came up with the following script build.sh. I'm very much a Windows developer (even though I work on a Mac), so creating the script was definitely a case of trial and error!
#!/usr/bin/env bash

#exit if any command fails
set -e

artifactsFolder="./artifacts"

if [ -d $artifactsFolder ]; then
  rm -R $artifactsFolder
fi

dotnet restore

# Ideally we would use the 'dotnet test' command to test netcoreapp and net451 so restrict for now
# but this currently doesn't work due to https://github.com/dotnet/cli/issues/3073 so restrict to netcoreapp

dotnet test ./test/TEST_PROJECT_NAME -c Release -f netcoreapp1.0

# Instead, run directly with mono for the full .net version
dotnet build ./test/TEST_PROJECT_NAME -c Release -f net451

mono \
./test/TEST_PROJECT_NAME/bin/Release/net451/*/dotnet-test-xunit.exe \
./test/TEST_PROJECT_NAME/bin/Release/net451/*/TEST_PROJECT_NAME.dll

revision=${TRAVIS_JOB_ID:=1}
revision=$(printf "%04d" $revision)

dotnet pack ./src/PROJECT_NAME -c Release -o ./artifacts --version-suffix=$revision
To use in your project, just replace PROJECT_NAME with your project name and TEST_PROJECT_NAME with your test project name.
The script is as simple as feasibly possibly (partly by design, partly due to my like of familiarity with Shell scripts!) with one particular complication. Currently, there is a bug running xUnit using the dotnet CLI on mono - the dotnet test command is unable to find the test runner. There is currently an open issue about this on GitHub.
In order to work around this, we do three things. First, we restrict out dotnet test call to only test the .NET Core framework and skip the .NET 4.5.1 framework using the -f option. Secondly, we explicitly build the test project for net451 using dotnet build. Finally, we directly invoke mono and pass in the path to dotnet-test-xunit.exe and the test project dll. This allows us to test our project on both supported frameworks.
You may notice there is a wildcard * in the path for specifying the test runner exe and the test dll. This is required as the intermediate folder is named depending on the current operating system and architecture, for example osx.10.11-x64 or debian.8-x64.
An additional smaller issue I ran into which wouldn't hamper more seasoned *nix developers is simply assigning values - when assigning a value make sure to not put spaces around the
=, e.g.artifactsFolder="./artifacts"!
Even though we are not going to be pushing our packages to NuGet, we still build our package using dotnet pack, just so that we know we can, and that everything is working correctly on the Mac and linux side.
To test our script we first give it execute permissions, and then execute it:
chmod +x ./build.sh
./build.sh
Finally, we create a branch, and commit our new build script to it
git checkout -b configure_travis
git add .
git commit -m "Add build script"
Continuous Integration using Travis CI
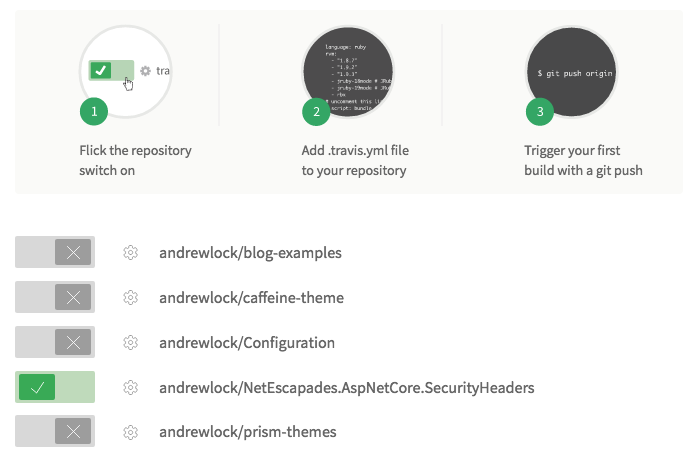
Now we have a build script running locally we just need to set up Travis. You will need to sign up for a new account using your GitHub account - it takes all of 10 seconds! Once authorised you will be presented with a list of your repositories - just flick the switch on the correct repository to enable Travis continuous integration:
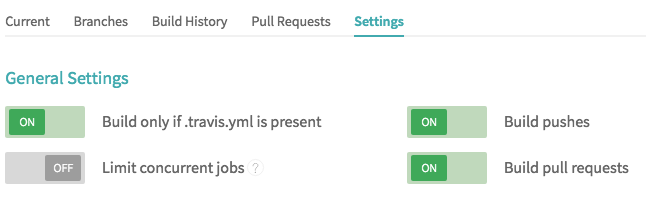
Next, click the settings icon next to your repo. I have updated the repo to build on all pushes and on pull-requests, but we will lock this down further using our .travis.yml file later:
The last step in our configuration is to add a .travis.yml file to the repository. This file contains the repository specific settings for Travis builds:
language: csharp
sudo: required
dist: trusty
env:
  - CLI_VERSION=latest
addons:
  apt:
    packages:
    - gettext
    - libcurl4-openssl-dev
    - libicu-dev
    - libssl-dev
    - libunwind8
    - zlib1g
mono:
  - 4.2.3
os:
  - linux
  - osx
osx_image: xcode7.1
branches:
  only:
    - master
before_install:
  - if test "$TRAVIS_OS_NAME" == "osx"; then brew update; brew install openssl; ln -s /usr/local/opt/openssl/lib/libcrypto.1.0.0.dylib /usr/local/lib/; ln -s /usr/local/opt/openssl/lib/libssl.1.0.0.dylib /usr/local/lib/; fiopenssl; fi
install:
  - export DOTNET_INSTALL_DIR="$PWD/.dotnetcli"
  - curl -sSL https://raw.githubusercontent.com/dotnet/cli/rel/1.0.0/scripts/obtain/dotnet-install.sh | bash /dev/stdin --version "$CLI_VERSION" --install-dir "$DOTNET_INSTALL_DIR"
  - export PATH="$DOTNET_INSTALL_DIR:$PATH"
script:
  - ./build.sh
As noted at the beginning of this article, an update in homebrew means that the
before_installportion oftravis.ymlwill fail on OS X. The script above has been updated with working values - the previous version is included at the bottom of the page for prosperity. See this issue for details.
Many of the settings should be self explanatory but I'll run through the important ones. You can see we are installing a bunch of packages that we need in order to run mono, and that we are installing mono itself. We will be running both on Linux and OS X, and we specify the OS X Xcode version we will be using. In the branches section, we specify that we only want pushes to master to be built. Note that this will also allow pull-requests to master to be built.
As for scripts, before we start installing we ensure that openssl is installed when we are running on OSX. We then fetch the latest dotnet CLI, install it inside our current working directory, and add dotnet to to the PATH. Finally, we specify our script build.sh to build, test and pack our project.
I ran into a couple of minor issues when configuring this script. First, if you were running your build script locally using sh ./build.sh then you may run into permission denied errors on the Travis server:

This is due to the script not having execute permissions - adding execute using chmod should fix this as described here.
Another issue I ran into, was the OS X build hanging for no apparent reason after running the tests on mono. Updating the version of mono from 4.0.5 to 4.2.3 fixed the issue easily.
Commit the .travis.yml file to your branch and push to the server, we're ready to try it out now.
git add .travis.yml
git commit -m "Add travis config file"
git push origin configure_travis
Building a pull request
All the infrastructure we need is now in place, so it's just a case of creating our pull request for the configure_travis branch in GitHub.
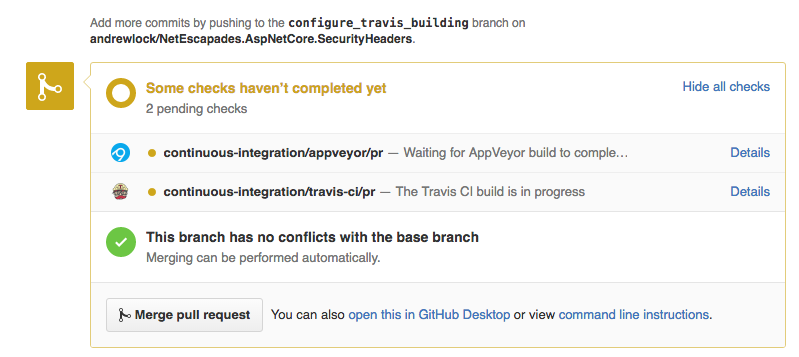
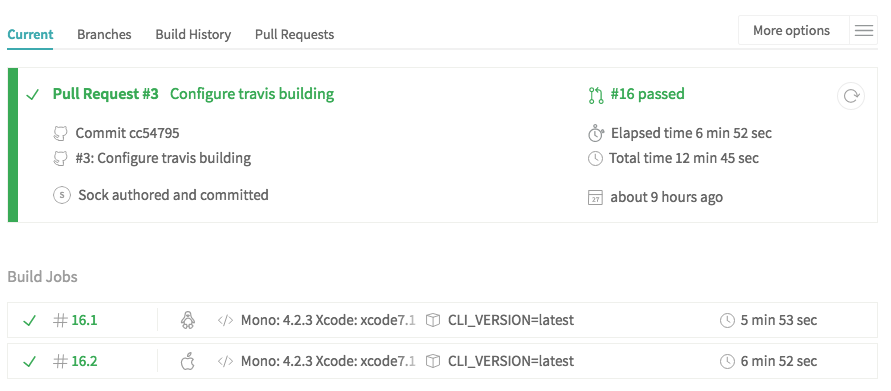
As before with our AppVeyor setup, GitHub knows there are build checks waiting to complete. If you click details you will be taken to the build in Travis where you can see the build progress. Hopefully all will go to plan, and you'll see successful builds on both linux and OS X:
We're now free to merge the pull request to master. Doing so will trigger another build on both AppVeyor and Travis. We can add a Travis badge to our readme.md to give some visibility to our build state using the following markdown, where USER and REPO is your GitHub username and repository respectively:
[](https://travis-ci.org/andrewlock/NetEscapades.AspNetCore.SecurityHeaders)

Success! We now have a continuous integration pipeline that automatically validates out repository builds on Windows, OS X and linux, and then publishes the results to MyGet and NuGet!
Alternative approach - KoreBuild
While the build script shown above works well for me, there is an alternative - KoreBuild. This is a project which is part of ASP.NET Core and provides build scripts for the other projects.
I tried it out and it works great for building on Linux/OS X, with just one caveat - it does not appear to run tests for the full .NET framework on mono i.e. it runs test for netcoreapp1.0 but not net451. It may be that this is only temporary while the dotnet test xUnit bug is hanging around, but I wanted to make sure I was running tests on both TFNs.
If that's not a concern for you, then KoreBuild offers an easy to use alternative. You can just copy the build.sh script from one of the ASP.NET Core projects and use that as your *nix build script. If you are doing this, then there is also a build.ps1 you can use for your Windows build script too.
#!/usr/bin/env bash
repoFolder="$( cd "$( dirname "${BASH_SOURCE[0]}" )" && pwd )"
cd $repoFolder

koreBuildZip="https://github.com/aspnet/KoreBuild/archive/dev.zip"
if [ ! -z $KOREBUILD_ZIP ]; then
    koreBuildZip=$KOREBUILD_ZIP
fi

buildFolder=".build"
buildFile="$buildFolder/KoreBuild.sh"

if test ! -d $buildFolder; then
    echo "Downloading KoreBuild from $koreBuildZip"

    tempFolder="/tmp/KoreBuild-$(uuidgen)"
    mkdir $tempFolder

    localZipFile="$tempFolder/korebuild.zip"

    retries=6
    until (wget -O $localZipFile $koreBuildZip 2>/dev/null || curl -o $localZipFile --location $koreBuildZip 2>/dev/null)
    do
        echo "Failed to download '$koreBuildZip'"
        if [ "$retries" -le 0 ]; then
            exit 1
        fi
        retries=$((retries - 1))
        echo "Waiting 10 seconds before retrying. Retries left: $retries"
        sleep 10s
    done

    unzip -q -d $tempFolder $localZipFile

    mkdir $buildFolder
    cp -r $tempFolder/**/build/** $buildFolder

    chmod +x $buildFile

    # Cleanup
    if test ! -d $tempFolder; then
        rm -rf $tempFolder
    fi
fi

$buildFile -r $repoFolder "$@"
Summary
In order to set up continuous integration on Linux/OS X we added a simple build script and a .travis.yml file to our repository. By connecting our GitHub account to Travis-CI, pull requests and pushes to the master branch will trigger a build and test of our project on both Linux and OS X. Happy coding!
Appendix
The full (now defunct) version of travis.yml which broke at the beginning of August 2016 is given below for prosperity:
language: csharp
sudo: required
dist: trusty
env:
  - CLI_VERSION=latest
addons:
  apt:
    packages:
    - gettext
    - libcurl4-openssl-dev
    - libicu-dev
    - libssl-dev
    - libunwind8
    - zlib1g
mono:
  - 4.2.3
os:
  - linux
  - osx
osx_image: xcode7.1
branches:
  only:
    - master
before_install:
  - if test "$TRAVIS_OS_NAME" == "osx"; then brew update; brew install openssl; brew link --force openssl; fi
install:
  - export DOTNET_INSTALL_DIR="$PWD/.dotnetcli"
  - curl -sSL https://raw.githubusercontent.com/dotnet/cli/rel/1.0.0/scripts/obtain/dotnet-install.sh | bash /dev/stdin --version "$CLI_VERSION" --install-dir "$DOTNET_INSTALL_DIR"
  - export PATH="$DOTNET_INSTALL_DIR:$PATH"
script:
  - ./build.sh