In this post I show how to use the Azure DevOps REST API to view the results of builds in Azure DevOps Pipelines for a given branch/tag, and how to download the artifacts. The hardest part of the process for me was figuring out which NuGet packages to use. Once I managed that, the API was pretty pleasant to work with!
Background: automate all the things
I've been working a lot on updating the build and CI process for Datadog's .NET APM tracer recently. As part of that, I wanted to improve our laborious release process. Prior to my changes, this required:
- Creating a PR to update the tracer version, and merging that.
- Pushing a tag for the new version, which triggers new builds in Azure DevOps.
- Navigate to 3 different pipelines in Azure DevOps, and download the correct build output.
- Writing the release notes for the new release, and attaching the aforementioned artifacts.
We've been improving and automating various parts of this process, but in this post I'm going to describe how I achieved step 3, highlighted above - downloading specific artifacts from an Azure DevOps pipeline.
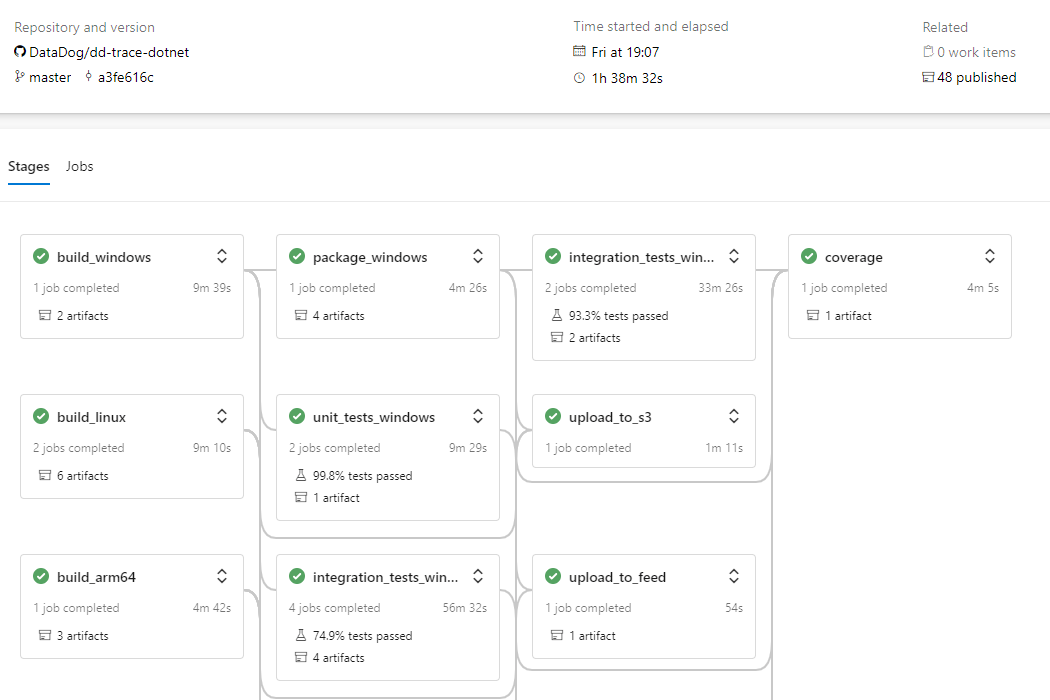
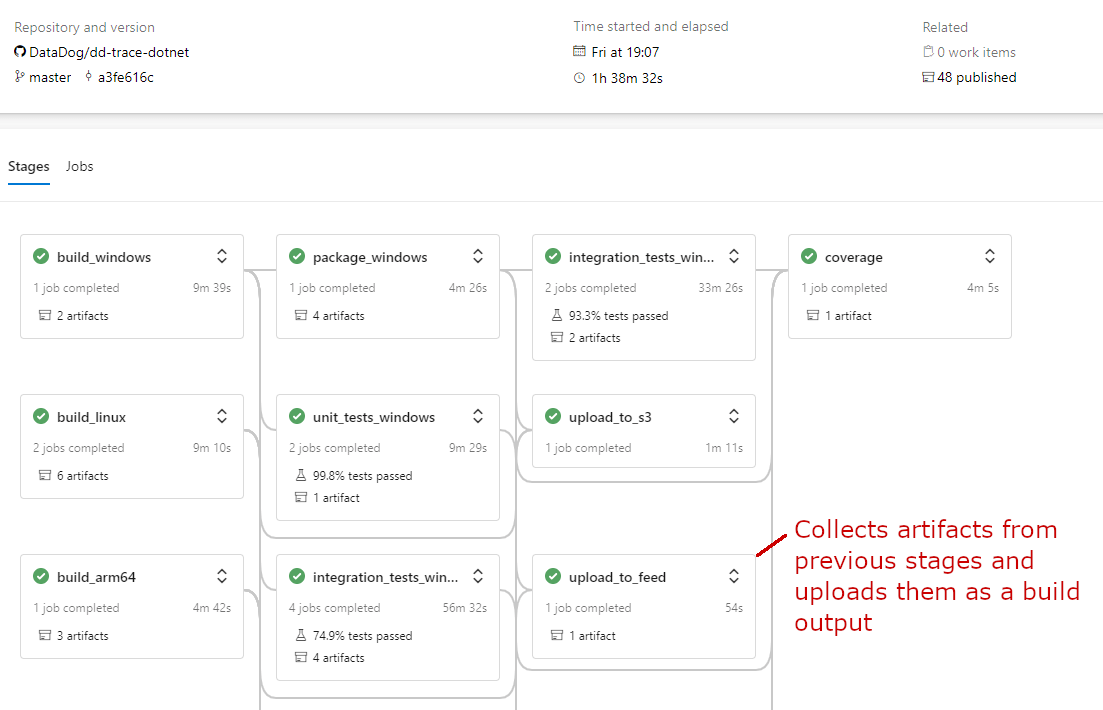
Thanks to previous work, we now do all of the build for the tracer in a single, multi-stage, pipeline. As a final step, we collect all of the artifacts from previous stages and publish them as a single build artifact. Even before we auto-downloaded it, this made the process of finding and downloading the correct artifacts easier.
The goal was automate the creation of a GitHub release from a GitHub Actions workflow. As part of that workflow, I wanted to download the artifacts from Azure DevOps and attach them. We're using Nuke for our build automation, so that meant using .NET to download the artifacts from Azure DevOps. Doesn't sound too hard, right?
Interacting with Azure DevOps… so many NuGet packages to choose from
Azure DevOps is obviously a Microsoft product, so I assumed there would be a NuGet package for interacting with your builds from .NET. In fact there are many NuGet packages. And that's where I had some difficulties.
You'd have thought that an article in the Azure DevOps section of the documentation titled ".NET client libraries" would clear things up, but it only served to confuse me further with diagrams like this one:

and tables like this:

That document lists sixteen different NuGet packages. Some of them are Microsoft.VisualStudio.* packages, some of them are Microsoft.TeamFoundationServer.* packages. None of them contain the words "Azure" or "DevOps". On top of that, it has a version table that describes how different versions of the NuGet packages map onto different versions of TFS and Azure DevOps Server but none of the versions mention Azure DevOps Services, which is the actual SaaS platform that I (and surely most people) are using?
Anyway…</end-rant>.
The package I needed for calling Azure DevOps from an automated workflow was Microsoft.TeamFoundationServer.Client. In the next section I show how to use it.
Authenticating with Azure DevOps using a token
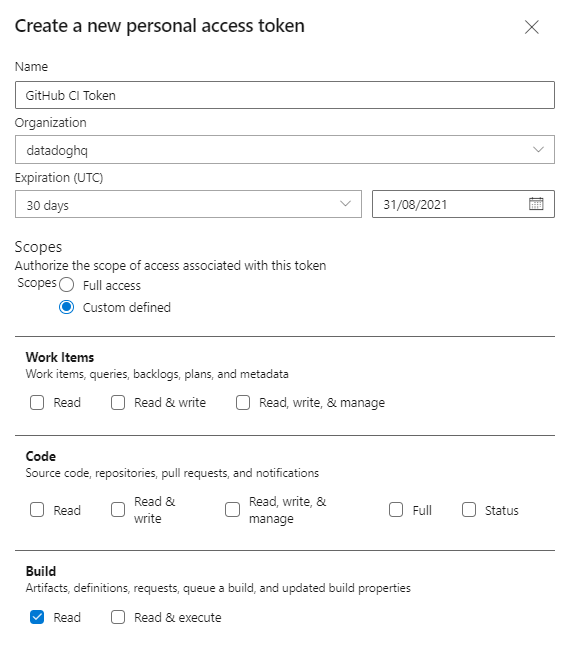
The first thing you'll need to do is to obtain a token for accessing Azure DevOps. Luckily the documentation on how to do this is good. First you'll need to create a Personal Access Token (PAT) in Azure DevOps, as described in this document. Navigate to User Settings > Personal Access Tokens and create a new token.
Give the token a descriptive name (e.g. Github CI Token), set the expiration, and choose the scopes the token is authorized to use. The scopes are effectively the "permissions" the token will have. All we need at this stage is the ability to read Azure pipeline build results, so check Build:Read and leave it at that.
After creating the token, you're shown the value. It's important you copy this value, as you can't get it back later!
Now you have a token, you need to expose it to your GitHub action. I'm only focusing on the .NET side of interacting with Azure DevOps in this article, so I won't go into here, but this article describes how to store a secret in GitHub and access it in a GitHub Action.
We now have the prerequisites we need: we've installed the Microsoft.TeamFoundationServer.Client NuGet package, and our .NET code has access to an Azure DevOps token. It's time to write some code.
Downloading the latest tagged build artifacts
As a reminder, I needed to download the build artifacts from the Azure pipeline run that was triggered when a git tag is pushed to the repository. That means we need to take the following steps
- Authenticate with Azure DevOps
- Find the completed builds for the tag
- Find the artifacts associated with the build
- Download the artifact contents
Creating an authenticated connection
To interact with Azure pipelines, we first need to authenticate. This is easy enough using the NuGet package and token we've already added:
using Microsoft.VisualStudio.Services.Common;
using Microsoft.VisualStudio.Services.WebApi;

// Point this to your Azure DevOps organisation
var azureDevopsOrganisation = "https://dev.azure.com/datadoghq";

// The personal access token previously configured, should never be hard coded like this"
// Load as a GitHub Actions secret or similar instead
var azureDevopsToken = "MY_SUPER_SECRET_TOKEN";

var connection = new VssConnection(
    new Uri(azureDevopsOrganisation),
    new VssBasicCredential(
        userName: string.Empty,
        password: azureDevopsToken));
It's a slightly strange API, but you can create an VssConnection using the token by setting the userName parameter to an empty string, and the token as the password.
With the connection created, we can now make calls to Azure DevOps to retrieve the builds associated with out tag.
Finding the builds associated with a given tag/branch
For the next step, we need to grab a few constants. First, we need the tag name that we're going to find the builds for. In the example below I'm using a tag called v1.28.2, which corresponds to the git "branch" refs/tags/v1.28.2 when it's triggered in Azure DevOps. In practice, you may want to provide the tag name as an argument to your script, or otherwise use Git operations to find the latest tag.
Additionally, you'll need some details about the Azure DevOps project and pipeline. First you'll need the GUID for your Azure DevOps project. Unfortunately, this is hard to find, as it's not obviously exposed in the UI. I found it by navigating to the Azure organisation page (which lists all the projects), hitting F12 to open browser tools, and noting the value of the id attribute. Hacky I know

The third piece we need is the ID of the Azure DevOps pipeline. Luckily this appears in the querystring of the URL when you navigate to the pipeline itself:

We now have everything we need to fetch all the builds for our pipeline for the given branch.
using Microsoft.TeamFoundation.Build.WebApi;

var branch = $"refs/tags/v1.28.2"; // generally will be dynamic
var azureDevopsProjectId = Guid.Parse("a51c4863-3eb4-4c5d-878a-58b41a049e4e"); // found by inspecting the HTML
var azureDevopsPipelineId = 54; // found in the querystring of the


// Create the client for interacting with Azure DevOps Pipelines
using var buildHttpClient = connection.GetClient<BuildHttpClient>();

// Fetch all builds, filtering by the project, pipeline, branch name, and build reason
List<Build> builds = await buildHttpClient.GetBuildsAsync(
                    project: azureDevopsProjectId,
                    definitions: new[] { azureDevopsPipelineId },
                    reasonFilter: BuildReason.IndividualCI,
                    branchName: branch);

// Make sure we have some builds
if (builds?.Count == 0)
{
    throw new Exception($"Error: could not find any builds for {branch}. " +
                        $"Are you sure you've merged the version bump PR?");
}

// Make sure the build has finished
List<Build> completedBuilds = builds
                        .Where(x => x.Status == BuildStatus.Completed)
                        .ToList();
if (!completedBuilds.Any())
{
    throw new Exception($"Error: no completed builds for {branch} were found. " +
                        $"Please wait for completion before running this workflow.");
}

// Check that we have a successful build
List<Build> successfulBuilds = completedBuilds
                        .Where(x => x.Result == BuildResult.Succeeded
                            || x.Result == BuildResult.PartiallySucceeded)
                        .ToList();
if (!successfulBuilds.Any())
{
    // likely not critical, probably a flaky test, so just warn (and push to github actions explicitly)
    Console.WriteLine($"There were no successful builds for {branch}. Attempting to find artifacts anyway");
}
If we get to here, we know we have a completed build, and we've warned if the build wasn't successful. I chose not to fail the workflow entirely if the build wasn't successful, as a flaky test may cause the build to occasionally fail but that shouldn't affect the build's ability to produce artifacts.
Finding artifacts associated with a build
The next stage is to find the artifacts associated with the build of the tag. Note that although we don't expect to have more than one build for the tag, we're handling that possibility just in case.
This stage assumes you know the name of the artifact you're looking for. In our case, the artifact name varies with the version, so must be provided as an argument
using Microsoft.TeamFoundation.Build.WebApi;

var artifactName = "1.28.2-release-artifacts";

Console.WriteLine($"Found {completedBuilds.Count} completed builds for {branch}. Looking for artifacts...");

BuildArtifact artifact = null;
// search latest builds first
foreach (Build build in completedBuilds.OrderByDescending(x => x.FinishTime))
{
    try
    {
        // If the artifact doesn't exist, the API will return a 404
        // and this will throw an ArtifactNotFoundException
        artifact = await buildHttpClient.GetArtifactAsync(
                    project: azureDevopsProjectId,
                    buildId: build.Id,
                    artifactName: artifactName);

        // if it didn't throw, we've found an artifact
        break;
    }
    catch (ArtifactNotFoundException)
    {
        Console.WriteLine($"Could not find {artifactName} artifact for build {build.Id}. Skipping");
    }
}

// Oh dear, no artifacts for you!
if (artifact is null)
{
    throw new Exception($"Error: no artifacts available for {branch}");
}
If we get to the end of this block, then we have a BuildArtifact which contains the details we need to download the files that make up the artifact.
Downloading the artifact contents
Theoretically, I think you should be able to download the artifact contents using BuildHttpClient.GetArtifactContentZipAsync(), but I would get an exception whenever I tried to use this method. Instead, I resorted to old faithful HttpClient. The following code downloads the artifact contents (as a zip file) to the local directory.
using System.IO;
using System.Net.Http;
using Microsoft.TeamFoundation.Build.WebApi;

var zipPath = "artifact.zip";
Console.WriteLine($"Found artifacts. Downloading to {zipPath}...");

// Use HttpClient to download the artifact
using var tempClient = new HttpClient();

// Send request to the DownloadUrl specificed in the BuildArtifact
string resourceDownloadUrl = artifact.Resource.DownloadUrl;
HttpResponseMessage response = await tempClient.GetAsync(resourceDownloadUrl);

if (!response.IsSuccessStatusCode)
{
    // Something went wrong, shouldn't happen
    throw new Exception($"Error downloading artifact: {response.StatusCode}:{response.ReasonPhrase}");
}

// Save the stream to a file
await using (Stream file = File.Create(zipPath))
{
    await response.Content.CopyToAsync(file);
}

// All done!
Console.WriteLine($"{artifactName} downloaded");
And that's it! The API for interacting with Azure DevOps is actually quite nice, and makes a lot of sense, once you find the right NuGet and types, as well as the arbitrary IDs you need! It allowed us to cut out one of the steps from the release process, and reduce the chance of accidental errors.
Summary
In this post I described how you could interact with the the Azure DevOps REST API using the Microsoft.TeamFoundationServer.Client NuGet package. I described how to create a Personal Access Token for Azure DevOps, and where to find the various IDs required to interact with Azure DevOps Pipelines. Finally, I showed code to fetch all the builds for a given branch/tag, find the associated artifacts for the build, and how to download the artifact to a zip file. Hopefully you find this useful for automating your release processes too!