
ASP.NET Core Identity is a membership system that adds user sign in and user management functionality to ASP.NET Core apps. It includes many features out of the box and has basic support for storing a phone number for a user. By default, ASP.NET Core Identity doesn't try to verify ownership of phone numbers, but you can add that functionality yourself by integrating Twilio’s identity verification features into your application.
In this post you'll learn how you can prove ownership of a phone number provided by a user using Twilio Verify in an ASP.NET Core application using Razor Pages. This involves sending a code in an SMS message to the provided phone number. The user enters the code received and Twilio confirms whether it is correct. If so, you can be confident the user has control of the provided phone number.
You typically only confirm phone number ownership once for a user. This is in contrast to two-factor authentication (2FA) where you might send an SMS code to the user every time they login. Twilio has a separate Authy API for performing 2FA checks at login, but it won't be covered in this post.
Note that this post uses version 1 of the Twilio Verify API. Version 2.x of the API is currently in Beta.
Prerequisites
To follow along with this post you'll need:
- A Twilio account (sign up for a free Twilio account here)
- A Twilio Verify Application (create a new Verify application here)
- .NET Core 2.2 SDK (version 2.2.102 or greater)
- VS Code, Visual Studio 2017, or other editor
- A familiarity with Razor Pages (see a previous post for an introduction to Razor Pages)
You can find the complete code for this post on GitHub.
Creating the case study project
Using Visual Studio 2017+ or the .NET CLI, create a new solution and project with the following characteristics:
- Type: ASP.NET Core 2.2 Web Application (not MVC) with Visual C#
- Name: SendVerificationSmsDemo
- Solution directory
- Git repository
- https
- Authentication: Individual user accounts, Store user accounts in-app
ASP.NET Core Identity uses Entity Framework Core to store the users in the database, so be sure to run the database migrations in the project folder after building your app. Execute one of the following command line instructions to build the database:
.NET CLI
dotnet ef database update
Package Manager Console
update-database
The Twilio C# SDK and the Twilio Verify API
The Twilio API is a typical REST API, but to make it easier to work with Twilio provides helper SDK libraries in a variety of languages. Previous posts have shown how to use the C# SDK to validate phone numbers, and how to customize it to work with the ASP.NET Core dependency injection container.
Unfortunately, the C# SDK doesn't support the current version of the Twilio Verify API (v1.x), so you have to fall back to making "raw" HTTP requests with an HttpClient. The basic code required to do so is described in the documentation, but for conciseness it uses a bad practice: it creates an HttpClient manually in the code.
In ASP.NET Core 2.1 and above, you should use HttpClientFactory wherever possible. This class manages the lifetime of the underlying handlers and sockets for you, and so avoids performance issues you can hit at times of high load. You can learn about using HttpClientFactory with the Twilio SDK in a previous post on the Twilio blog.
Creating a Typed client for the Twilio Verify API
To make it easier to work with the Verify API, and to support HttpClientFactory, you will create a small Typed client. Create the TwilioVerifyClient.cs file in the root of your project, and replace the contents with the following code:
using System;
using System.Collections.Generic;
using System.Net.Http;
using System.Threading.Tasks;
using Microsoft.AspNetCore.WebUtilities;
using Newtonsoft.Json;

namespace SendVerificationSmsDemo
{
    public class TwilioVerifyClient
    {
        private readonly HttpClient _client;
        public TwilioVerifyClient(HttpClient client)
        {
            _client = client;
        }

        public async Task<TwilioSendVerificationCodeResponse> StartVerification(int countryCode, string phoneNumber)
        {
            var requestContent = new FormUrlEncodedContent(new[] {
                new KeyValuePair<string, string>("via", "sms"),
                new KeyValuePair<string, string>("country_code", countryCode.ToString()),
                new KeyValuePair<string, string>("phone_number", phoneNumber),
            });

            var response = await _client.PostAsync("protected/json/phones/verification/start", requestContent);

            var content = await response.Content.ReadAsStringAsync();

            // this will throw if the response is not valid
            return JsonConvert.DeserializeObject<TwilioSendVerificationCodeResponse>(content);
        }

        public async Task<TwilioCheckCodeResponse> CheckVerificationCode(int countryCode, string phoneNumber, string verificationCode)
        {
            var queryParams = new Dictionary<string, string>()
            {
                {"country_code", countryCode.ToString()},
                {"phone_number", phoneNumber},
                {"verification_code", verificationCode },
            };

            var url = QueryHelpers.AddQueryString("protected/json/phones/verification/check", queryParams);

            var response = await _client.GetAsync(url);

            var content = await response.Content.ReadAsStringAsync();

            // this will throw if the response is not valid
            return JsonConvert.DeserializeObject<TwilioCheckCodeResponse>(content);
        }

        public class TwilioCheckCodeResponse
        {
            public string Message { get; set; }
            public bool Success { get; set; }
        }

        public class TwilioSendVerificationCodeResponse
        {
            public string Carrier { get; set; }
            public bool IsCellphone { get; set; }
            public string Message { get; set; }
            public string SecondsToExpire { get; set; }
            public Guid Uuid { get; set; }
            public bool Success { get; set; }
        }
    }
}
The TwilioVerifyClient has two methods, StartVerification() and CheckVerificationCode(), which handle creating HTTP requests with the correct format and calling the Twilio Verify API. The typed client accepts an HttpClient in its constructor, which will be created by the HttpClientFactory automatically for you.
The responses for the method are implemented as simple POCO objects that match the response returned by the Twilio Verify API. For simplicity, these are implemented here as nested classes of the TwilioVerifyClient, but you can move these to another file if you prefer.
Configuring authentication for the typed client
HttpClientFactory is not part of the base ASP.NET Core libraries, so you need to install the Microsoft.Extensions.Http NuGet package (version 2.2.0 or later). You can use the NuGet Package Manager, Package Manager Console CLI, or edit the SendVerificationSmsDemo.csproj file. After using any of these methods the <ItemGroup> section of the project file should look like this (version numbers may be higher):
<ItemGroup>
  <PackageReference Include="Microsoft.AspNetCore.App" />
  <PackageReference Include="Microsoft.AspNetCore.Razor.Design" Version="2.2.0" PrivateAssets="All" />
  <PackageReference Include="Microsoft.Extensions.Http" Version="2.2.0" />
</ItemGroup>
To call the Twilio Verify API you'll need the Authy API Key for your Verify application (found in the Twilio Dashboard). When developing locally you should store this using the Secrets Manager so it doesn't get accidentally committed to your source code repository. You can read about how and why to do that in this post on the Twilio Blog. Your resulting secrets.json should look something like this:
{
  "Twilio": {
    "VerifyApiKey": "DBxxxxxxxxxxxxxxxxxxxxxxxxxxxxxxxx"
}
Finally, configure your TwilioVerifyClient with the correct BaseAddress and your API key by adding the following at the end of ConfigureServices in Startup.cs:
public void ConfigureServices(IServiceCollection services)
{
    // existing configuration

    var apiKey = Configuration["Twilio:VerifyApiKey"];

    services.AddHttpClient<TwilioVerifyClient>(client =>
    {
        client.BaseAddress = new Uri("https://api.authy.com/");
        client.DefaultRequestHeaders.Add("X-Authy-API-Key", apiKey);
    });
}
Don't let the authy base URL confuse you: version 1 of the Verify API followed an interface structure that preceded the creation of Verify as a separate product. The version 2 Verify API normalizes the URI.
With the typed client configuration complete, you can start adding the phone verification functionality to your ASP.NET Core Identity application.
Adding the required scaffolding files
In this post we're going to be adding some additional pages to the Identity area. Typically when you're adding or editing Identity pages in ASP.NET Core you should use the built-in scaffolding tools to generate the pages, as shown in this post. If you've already done that, you can skip this section.
Rather than adding all the Identity scaffolding, all you need for this post is a single file. Create the file _ViewImports.cshtml in the Areas/Identity/Pages folder and add the following code:
@using Microsoft.AspNetCore.Identity
@using SendVerificationSmsDemo.Areas.Identity
@namespace SendVerificationSmsDemo.Areas.Identity.Pages
@addTagHelper *, Microsoft.AspNetCore.Mvc.TagHelpers
This adds all the required namespaces and tag helpers required by your Razor Pages. It will also light up the IntelliSense in Visual Studio. If you've already scaffolded Identity pages you'll already have this file!
Sending a verification code to a phone number
The default ASP.NET Core Identity templates provide the functionality for storing a phone number for a user, but don't provide the capability to verify ownership of the number. In the post Validating Phone Numbers in ASP.NET Core Identity Razor Pages with Twilio Lookup you can learn how to validate a phone number by using the Twilio Lookup API. As noted in the post it’s a good idea to store the result formatted as an E.164 number.
In version 1 of the Verify API you must provide the country dialing code and phone number as separate parameters. Consequently, if you're using version 1 of the Verify API it may be best to store these values separately for the IdentityUser user, instead of (or as well as) storing an E.164 number.
For simplicity, this post will gloss over storing the values separately. You’ll create a form that lets the user enter the values separately. In practice, you would automatically use the values attached to the user, rather than allowing them to enter in a new number.
Create a new Razor Page in the Areas/Identity/Pages/Account folder called VerifyPhone.cshtml. In the code-behind file VerifyPhone.cshtml.cs add the following using statements to the top of the file:
using System.ComponentModel.DataAnnotations;
using Microsoft.AspNetCore.Authorization;
Next, replace the VerifyPhoneModel class with the following:
[Authorize]
public class VerifyPhoneModel : PageModel
{
    private readonly TwilioVerifyClient _client;

    public VerifyPhoneModel(TwilioVerifyClient client)
    {
        _client = client;
    }

    [BindProperty]
    public InputModel Input { get; set; }

    public class InputModel
    {
        [Required]
        [Display(Name = "Country dialing code")]
        public int DialingCode { get; set; }

        [Required]
        [Phone]
        [Display(Name = "Phone number")]
        public string PhoneNumber { get; set; }
    }

    public async Task<IActionResult> OnPostAsync()
    {
        if (!ModelState.IsValid)
        {
            return Page();
        }

        try
        {
            var result = await _client.StartVerification(Input.DialingCode, Input.PhoneNumber);
            if (result.Success)
            {
                return RedirectToPage("ConfirmPhone", new {Input.DialingCode, Input.PhoneNumber});
            }

            ModelState.AddModelError("", $"There was an error sending the verification code: {result.Message}");
        }
        catch (Exception)
        {
            ModelState.AddModelError("",
                "There was an error sending the verification code, please check the phone number is correct and try again");
        }

        return Page();
    }
}
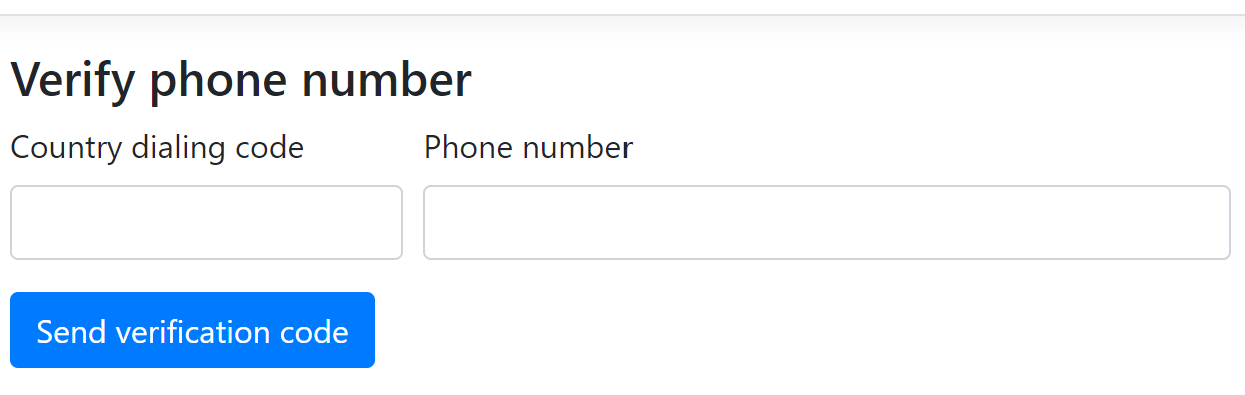
The InputModel for the page is used to bind a simple form (screenshot below) for collecting the country dialing code and phone number to verify. The code doesn’t include an OnGet handler as the framework provides one implicitly. The OnPost handler is where the verification process begins.
The code provides some basic validation using DataAnnotation attributes (see the post Validating Phone Numbers in ASP.NET Core Identity Razor Pages with Twilio Lookup to learn about performing robust validation) and, if successful, it uses the injected TwilioVerifyClient to start verification. If the Verify API call is successful, the user is redirected to the ConfirmPhone page, which you'll create shortly. If the Verify API indicates the request failed, or if an exception is thrown, an error is added to the ModelState, and the page is re-displayed to the user.
The form itself consists of two text boxes and a submit button. Replace the contents of VerifyPhone.cshtml with the following Razor markup:
@page
@model VerifyPhoneModel
@{
    ViewData["Title"] = "Verify phone number";
}

<h4>@ViewData["Title"]</h4>
<div class="row">
    <div class="col-md-8">
        <form method="post">
            <div asp-validation-summary="ModelOnly" class="text-danger"></div>
            <div class="form-row">
                <div class="form-group col-md-4">
                    <label asp-for="Input.DialingCode"></label>
                    <input asp-for="Input.DialingCode" class="form-control" />
                    <span asp-validation-for="Input.DialingCode" class="text-danger"></span>
                </div>
                <div class="form-group col-md-8">
                    <label asp-for="Input.PhoneNumber"></label>
                    <input asp-for="Input.PhoneNumber" class="form-control" />
                    <span asp-validation-for="Input.PhoneNumber" class="text-danger"></span>
                </div>
            </div>
            <button type="submit" class="btn btn-primary">Send verification code</button>
        </form>
    </div>
</div>

@section Scripts {
    <partial name="_ValidationScriptsPartial" />
}
When rendered, the form looks like the following:
To test the form, run your app, and navigate to /Identity/Account/VerifyPhone. Enter your country code and phone number and click Send verification code. If the phone number is valid, you’ll receive an SMS similar to the message shown below. Note that you can customize this message, including the language, terminology, and code length: see the Verify API documentation for details.
Your Twilio Verify API demo verification code is: 2933
Now you need to create the page where the user enters the code they receive.
Checking the verification code
The check verification code page contains a single text box where the user enters the code they receive. Create a new Razor Page in the Areas/Identity/Pages/Account folder called ConfirmPhone.cshtml. In the code-behind file ConfirmPhone.cshtml.cs add the following using statements to the top of the file:
using System.ComponentModel.DataAnnotations;
using Microsoft.AspNetCore.Authorization;
using Microsoft.AspNetCore.Identity;
Next replace the ConfirmPhoneModel class with the following:
[Authorize]
public class ConfirmPhoneModel : PageModel
{
    private readonly TwilioVerifyClient _client;
    private readonly UserManager<IdentityUser> _userManager;

    public ConfirmPhoneModel(TwilioVerifyClient client, UserManager<IdentityUser> userManager)
    {
        _client = client;
        _userManager = userManager;
    }

    [BindProperty(SupportsGet = true)]
    public InputModel Input { get; set; }

    public class InputModel
    {
        [Required]
        [Display(Name = "Country dialing code")]
        public int DialingCode { get; set; }

        [Required]
        [Phone]
        [Display(Name = "Phone number")]
        public string PhoneNumber { get; set; }

        [Required]
        [Display(Name = "Code")]
        public string VerificationCode { get; set; }
    }

    public async Task<IActionResult> OnPostAsync()
    {
        if (!ModelState.IsValid)
        {
            return Page();
        }

        try
        {
            var result = await _client.CheckVerificationCode(Input.DialingCode, Input.PhoneNumber, Input.VerificationCode);
            if (result.Success)
            {
                var identityUser = await _userManager.GetUserAsync(User);
                identityUser.PhoneNumberConfirmed = true;
                var updateResult =  await _userManager.UpdateAsync(identityUser);

                if (updateResult.Succeeded)
                {
                    return RedirectToPage("ConfirmPhoneSuccess");
                }
                else
                {
                    ModelState.AddModelError("", "There was an error confirming the verification code, please try again");
                }
            }
            else
            {
                ModelState.AddModelError("", $"There was an error confirming the verification code: {result.Message}");
            }
        }
        catch (Exception)
        {
            ModelState.AddModelError("",
                "There was an error confirming the code, please check the verification code is correct and try again");
        }

        return Page();
    }
}
As before, we can skip the OnGet handler, as that's provided implicitly by the framework. The InputModel has three parameters 1) the dialing code, 2) the phone number provided in the previous step, and 3) the verification code entered by the user.
For simplicity, the code passed the phone number and country code from the previous step to this page via the querystring. In practice, you would load these from the IdentityUser itself, as described earlier.
Calling the Twilio Verify API is simple thanks to the typed client. The dialing code and phone number from the previous step and the authentication code entered by the user are passed to the API. If the check is successful, the Verify API will returnresult.Success=true. You can store the confirmation result on the IdentityUser object directly by setting the PhoneNumberConfirmed property and saving the changes.
If everything completes successfully, you redirect the user to a simple ConfirmPhoneSuccess page (that you'll create shortly). If there are any errors or exceptions, an error is added to the ModelState and the page is redisplayed.
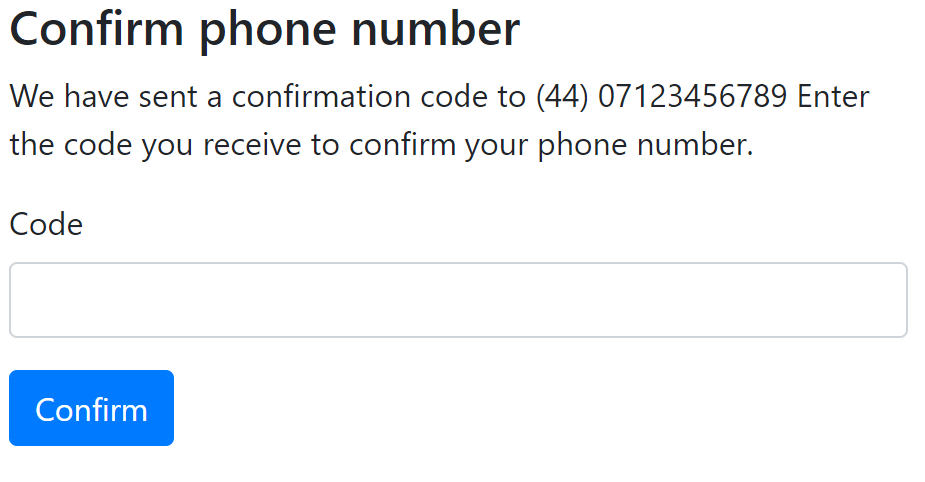
Replace the contents of ConfirmPhone.cshtml with the Razor markup below. For usability, the provided phone number is redisplayed in the page.
@page
@model ConfirmPhoneModel
@{
    ViewData["Title"] = "Confirm phone number";
}

<h4>@ViewData["Title"]</h4>
<div class="row">
    <div class="col-md-6">
        <form method="post">
            <p>
                We have sent a confirmation code to (@Model.Input.DialingCode) @Model.Input.PhoneNumber
                Enter the code you receive to confirm your phone number.
            </p>
            <div asp-validation-summary="All" class="text-danger"></div>
            <input asp-for="Input.DialingCode" type="hidden" />
            <input asp-for="Input.PhoneNumber" type="hidden" />

            <div class="form-group">
                <label asp-for="Input.VerificationCode"></label>
                <input asp-for="Input.VerificationCode" class="form-control" type="number" />
                <span asp-validation-for="Input.VerificationCode" class="text-danger"></span>
            </div>
            <button type="submit" class="btn btn-primary">Confirm</button>
        </form>
    </div>
</div>

@section Scripts {
    <partial name="_ValidationScriptsPartial" />
}
When rendered, this looks like the following:
Once the user successfully confirms their phone number you can be confident they have access to it and you can use it in other parts of your application with confidence.
Showing a confirmation success page
To create a simple "congratulations" page for the user, create a new Razor Page in the Areas/Identity/Pages/Account folder called ConfirmPhoneSuccess.cshtml. You don't need to change the code-behind for this page, just add the following markup to ConfirmPhoneSuccess.cshtml:
@page
@model ConfirmPhoneSuccessModel
@{
    ViewData["Title"] = "Phone number confirmed";
}

<h1>@ViewData["Title"]</h1>
<div>
    <p>
        Thank you for confirming your phone number.
    </p>
    <a asp-page="/Index">Back to home</a>
</div>
After entering a correct verification code, users will be redirected to this page. From here, they can return to the home page.

Trying out the Twilio Verify functionality
Try out what you’ve just built by running the app. Follow these steps to validate a user’s ownership of a phone number with Verify:
Navigate to https://localhost:44348/Identity/Account/VerifyPhone in your browser. Because this page is protected by ASP.NET Core Identity authorization, you’ll be redirected to the account log in page.
Register as a new user. You will be redirected to the /Identity/Account/VerifyPhone route and will see the rendered VerifyPhone.cshtml Razor page. At this point you can see the record for the user you created in the dbo.AspNetUsers table of the database aspnet-SendVerificationSmsDemo-<GUID>. Note that the phone number is null.
Enter a valid country code and phone number capable of receiving SMS text messages. Click Send verification code. You should be routed to a URI similar to /Identity/Account/ConfirmPhone?DialingCode=44&PhoneNumber=07123456789, where the DialingCode and PhoneNumber reflect the values you entered.
In a matter of moments you should receive an SMS message with a verification code. Note that the message reflects the name of the application you created in Twilio Verify.
At this point you can go to the Verify console at https://www.twilio.com/console/verify/applications. You should see a value of 1 in the SMS VERIFICATION STARTED column. Select the application matching the SMS message you received.
Enter the numeric code from the SMS message in the Code box on the Confirm phone number page and click Confirm. (Validation codes expire, so you need to do this within 10 minutes of receiving the code.)
If everything worked correctly you should be redirected to the /Identity/Account/ConfirmPhoneSuccess page. If you refresh the Verify Insights for your application in the Twilio Console you should see the successful validation reflected in statistics for the application.
Good work! You've successfully integrated Twilio Verify with ASP.NET Core 2.2 Identity.
Possible improvements
This post showed the basic approach for using version 1 of the Verify API with ASP.NET Core Identity, but there are many improvements you could make:
- Store the country dialing code and phone number on the
IdentityUser. This would be required for practical implementations, as you want to be sure that the phone number stored against the user is the one you are verifying! This would also simplify the code somewhat, as described previously. - Include a link the
VerifyPhonepage. Currently you have to navigate manually toIdentity/Account/VerifyPhone, but in practice you would want to add a link to it somewhere in your app. - Show the verification status of the phone number in the app. By default, ASP.NET Core Identity doesn't display the
IdentityUser.PhoneNumberConfirmedproperty anywhere in the app. - Only verify unconfirmed numbers. Related to the previous improvement, you probably only want to verify phone numbers once, so you should check for
PhoneNumberConfirmed=truein theVerifyPhonepage, as well as hide any verification links. - Allow re-sending the code. In some cases, users might find the verification code doesn't arrive. For a smoother user experience, you could add functionality to allow re-sending a confirmation code to the
ConfirmPhonepage.
Summary
In this post you saw how to use version 1 of the Twilio Verify API to confirm phone number ownership in an ASP.NET Core Identity application. You learned how to create a typed client for calling the API that uses best practices like HttpClientFactory, and how to use it from Razor Pages. This example took the simplistic route of asking users to re-enter their country dialing code and phone number, but in real applications you should store these in the IdentityUser directly.
You can find the complete sample code for this post on GitHub.