In this post I show how how to add authentication to a sample ASP.NET Core Blazor Server app. The default .NET templates show how to use ASP.NET Identity or Azure for authentication, but in this post I show how to use Auth0 for authentication.
Authentication in Blazor Server
Blazor server is a stateful service. In normal operation, the Blazor server application running on the server maintains a SignalR connection to the user's browser, and sends diff updates to the browser. However, authentication for SignalR occurs when the connection is established, so you typically need to perform your authentication outside of the normal Blazor Server workflow.
The default .NET templates for Blazor Server use Razor Pages and ASP.NET Core Identity to handle authentication. This is exactly the same as for a typical ASP.NET Core MVC or Razor Pages app, so whether you use Visual Studio or the .NET CLI templates (dotnet new blazorserver) you have all the normal options for authentication, namely:
- None: No authentication
- Individual: Individual authentication using ASP.NET Core Identity
- IndividualB2C: Individual authentication with Azure AD B2C
- SingleOrg: Organizational authentication (Microsoft account) for a single tenant
- MultiOrg: Organizational authentication (Microsoft account) for multiple tenants
- Windows: Windows authentication
For a recent project I was working on I needed accounts, but I didn't want to manage the user accounts myself, so I didn't want to use Individual auth. I also didn't want to require a Microsoft account or Windows, so those options were out. Azure AD B2C would have been feasible, but I decided to opt for an alternative identity provider, Auth0.
Using Auth0 for authentication
Auth0 is an identity provider that you can use to provide user management and authentication for your applications. By using an external login provider such as Auto0 (or Azure AD B2C), you delegate responsibility for the "login process" to a third party. That means you get benefits such as "paswordless" login, compromised password checks, social logins, and WebAuthn support. More importantly, you don't have to worry about losing user passwords, as you don't have them!
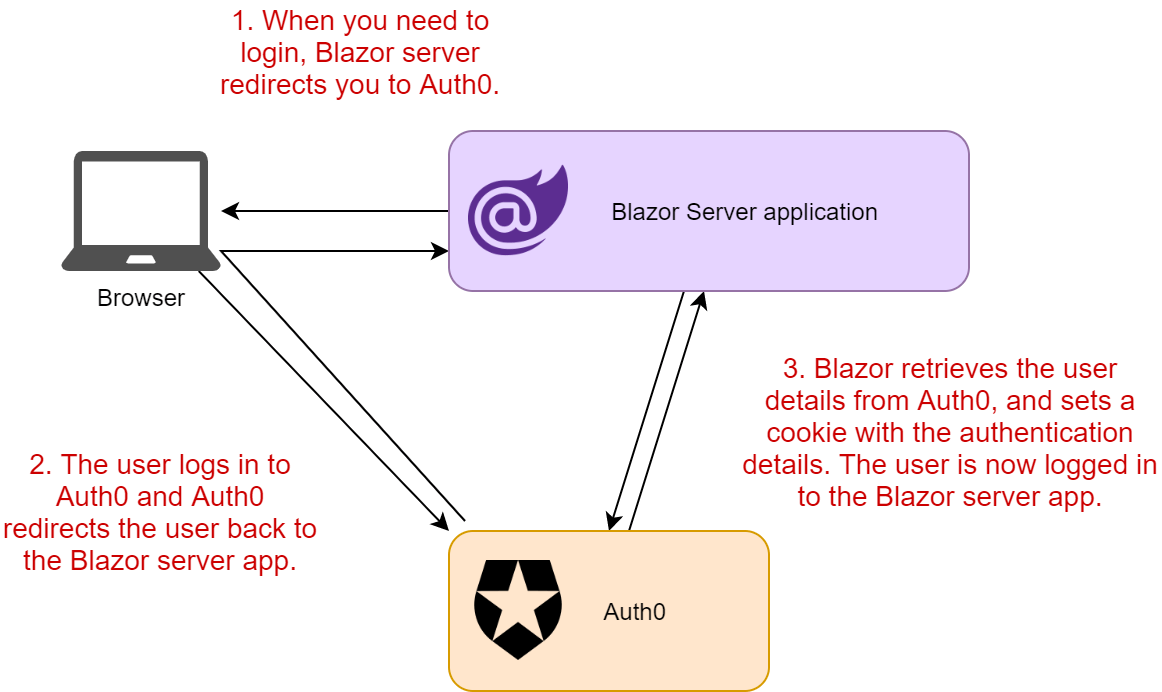
Using an external identity provider (such as Auth0) is relatively simple with ASP.NET Core, as long as the provider implements OpenId Connect (which most do). With this approach, whenever you need to login to your app, you redirect the user to Auth0 to do the actual sign-in. Once the user has signed in, they're redirected to a callback page in your app. Your app then talks directly to Auth0 to obtain the authentication details.
I have a (pretty old now) introduction to OpenID Connect—some of the ASP.NET Core parts in that post are out of date now, but the protocol and general flow are still valid.
Before we can configure the Blazor Server app to use Auth0, we need to create an Auth0 account.
Creating an Auth0 account
You can signup for Auth0 for free at https://auth0.com/signup. The free plan is valid for up to 7,000 active users, so is a great option for getting started. For features such as custom domains, role management, and more active users, you'll need to look at one of the paid plans.
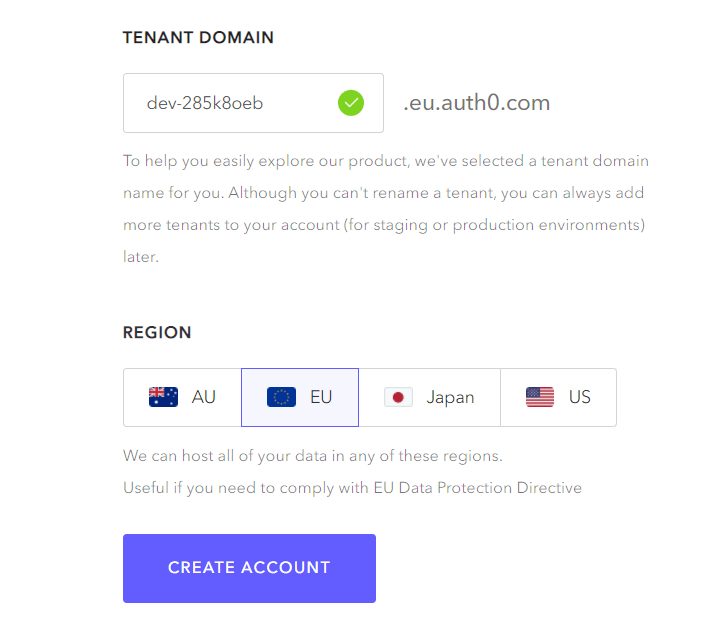
After entering a username and password for your new auth0 account, you'll need to choose a tenant domain and a region for your data
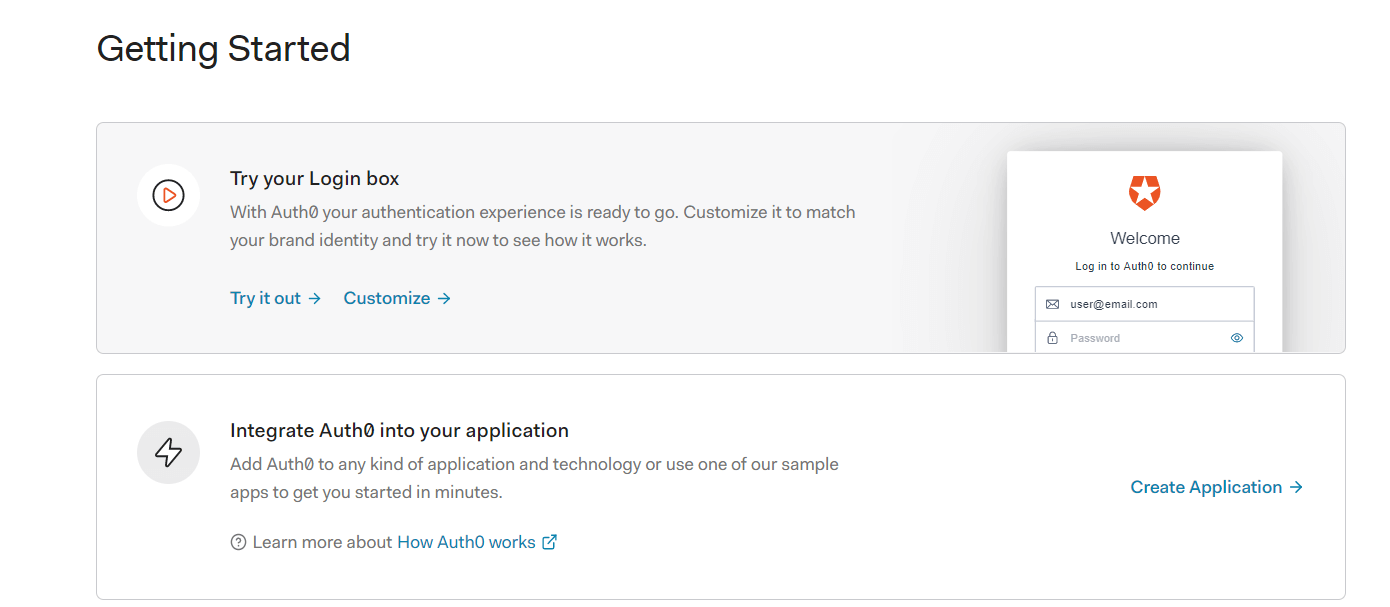
After creating your account, you're prompted with a Getting Started page, so you can quickly try out your login experience. Alternatively, you can click "Integration Auth0 into your application" to get started registering an application. Click the latter option, and we'll start setting up our Blazor Server app (which we'll create shortly)
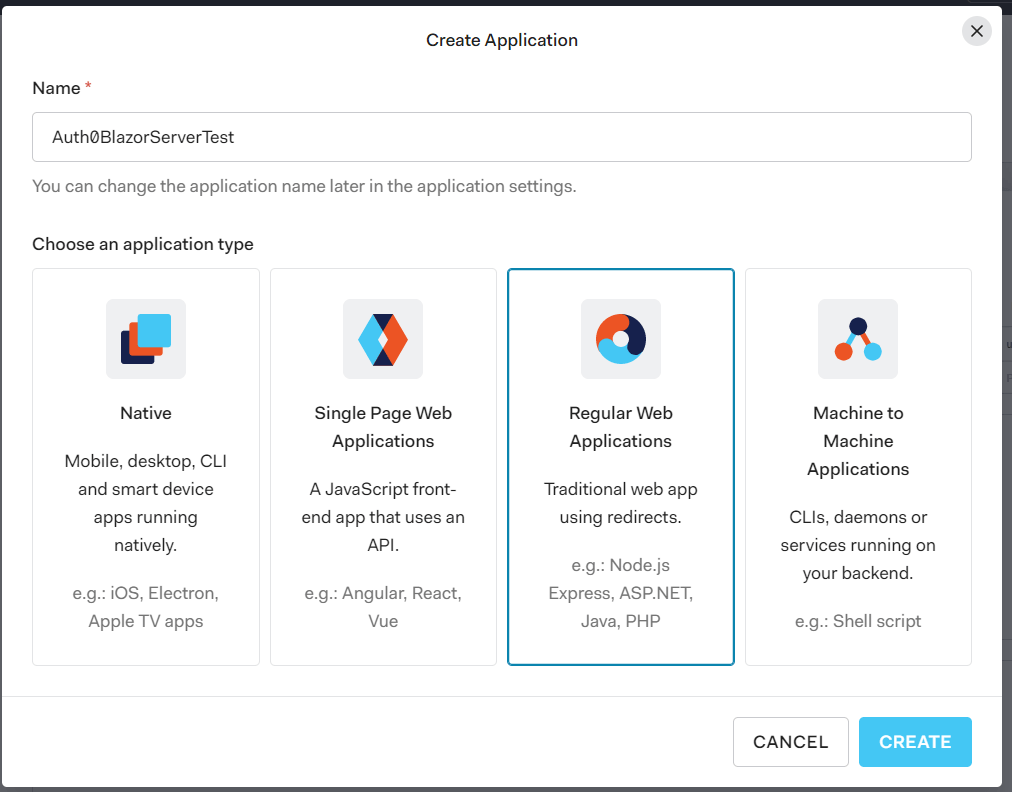
Add a name for your new application—I used Auth0BlazorServerTest. The name isn't important here, it's for your own organisational purposes. For "application type", choose "Regular Web Application". This is a "traditional" application, which has an "interactive" front-channel (the browser) and a back-channel for securely exchanging tokens, so uses an authorization code flow.
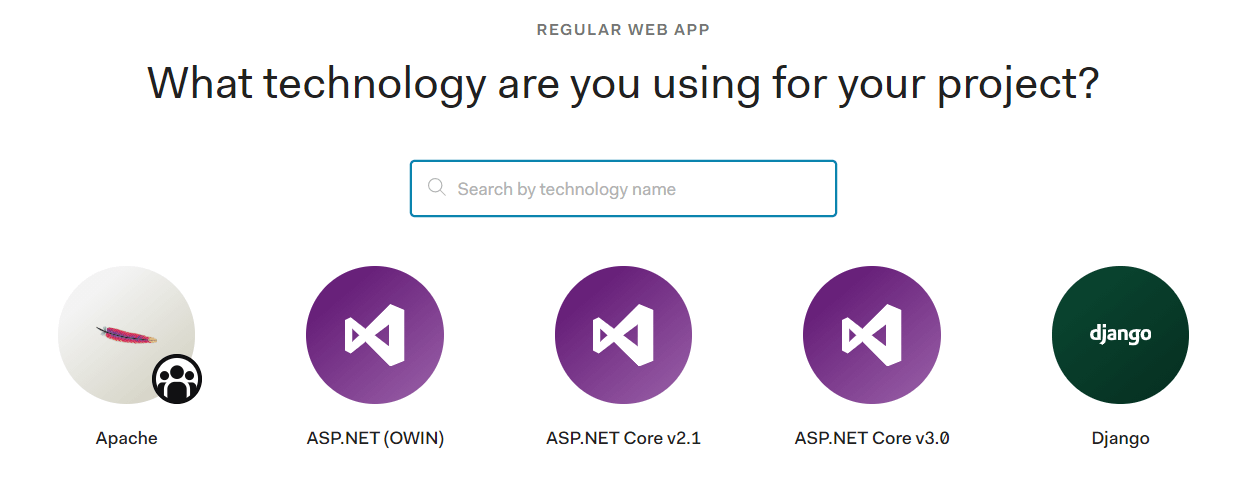
In the next step you can choose the technology you're using. This step is used to control which help text is shown at the next stage. I'm using .NET 5.0 in this example, so choose ASP.NET Core 3.0 (as that's close enough!)
The next screen shows your client configuration, including your important Client ID. It also provides a link to download a pre-configured sample ASP.NET Core application, as well as a link to the sample on GitHub.

I downloaded the sample, as I knew I would reuse a lot of the same pieces for my Blazor server application. When doing so, Auth0 advised me to configure my sample application's callback and logout URLs. These are the URLs that Auth0 is allowed to redirect to during login and logout. You have to explicitly provide them as part of configuration to avoid open redirect vulnerabilities.
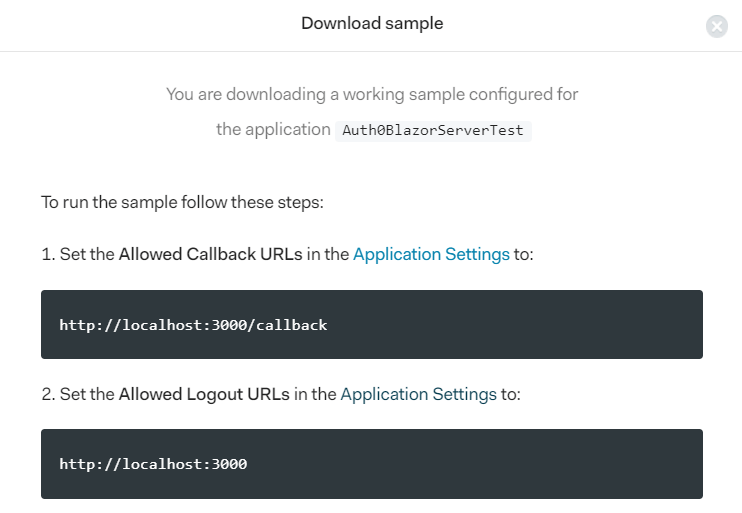
The sample app (and the popup) assumes you will run your test app on http://localhost:3000. However, we'll be using the default https configuration that runs on https://localhost:5001. Click the "Application Settings" link in Auth0, and add the following settings to the Auth0BlazorServerTest client configuration:
- Allowed Callback URLs: https://localhost:5001/callback
- Allowed Logout URLs: https://localhost:5001
While on the "Application Settings" page for your client, take a note of the
ClientId,ClientSecret, andDomain; you'll need these when configuring your app to use Auth0.
With the Auth0 client configured, we're ready to create our Blazor server application, and configure it to use Auth0 for login.
Configuring Blazor Server to use Auth0
Our first step is to create the sample Blazor Server app. There are three approaches we can use here:
- Start with the no-authentication Blazor Server sample and add necessary services and views for Auth0.
- Start with the Azure AD B2C sample, remove the B2C configuration, and add the Auth0 config.
- Start with the Auth0 sample, update it to .NET 5 and Blazor Server.
I chose to go with the first approach and to add the extra configuration and pages from the Auth0 sample.
1. Create the sample application
I started by creating my sample application using the .NET CLI:
dotnet new blazorserver -o Auth0BlazorServer
cd Auth0BlazorServer
dotnet run
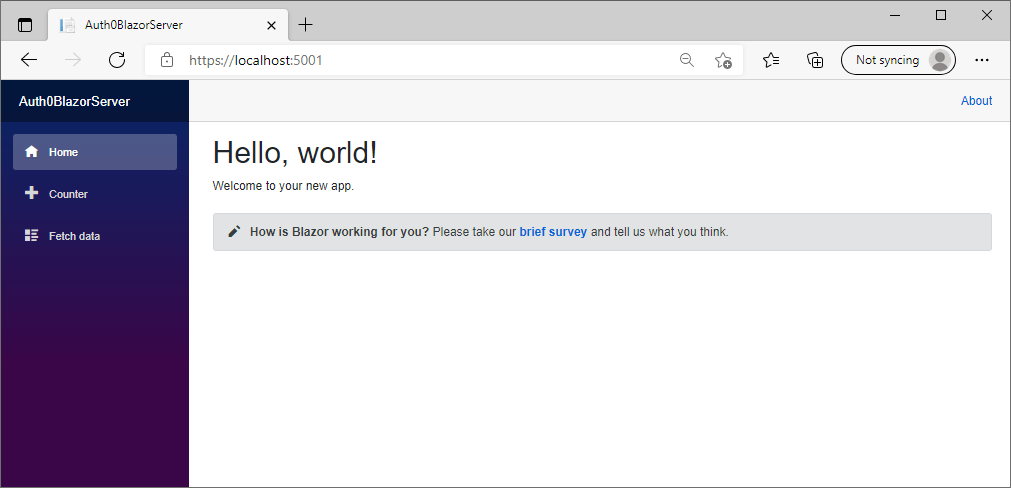
This creates a project called Auth0BlazorServer in a sub-directory, switches to the directory, and runs the application, to confirm we're starting with a working app. After the build is complete, you should be able to browse the application at https://localhost:5001/
Now it's time to configure the application for Auth0
2. Add necessary packages and configuration
As I mentioned previously, Auth0 uses OpenID Connect. ASP.NET Core includes a package for working with this protocol, so add it to your project using:
dotnet add package Microsoft.AspNetCore.Authentication.OpenIdConnect
This adds a <PackageReference> to your csproj file, similar to the following:
<PackageReference Include="Microsoft.AspNetCore.Authentication.OpenIdConnect" Version="5.0.7" />
Next, we'll add our Auth0 settings (from the Auth0 settings page) to our application. You should never commit those secrets to your repository, so we'll use user-secrets instead, but I like to create "stub" values in appsettings.json to indicate that there are "required" values to be filled in from other (secure) sources. Add an Auth0 section to your appsettings.json, similar to the example shown below:
{
  "Logging": {
    "LogLevel": {
      "Default": "Information",
      "Microsoft": "Warning",
      "Microsoft.Hosting.Lifetime": "Information"
    }
  },
  "AllowedHosts": "*",
  "Auth0": {
    "Domain": "",
    "ClientId": "",
    "ClientSecret": ""
  }
}
For testing locally, we need to store the Auth0 secrets somewhere, so we store those using the Secrets Manager. Using the .NET CLI, we can initialise our secret store for the app, and store our secrets:
dotnet user-secrets init
dotnet user-secrets set "Auth0:Domain" "some-domain.eu.auth0.com"
dotnet user-secrets set "Auth0:ClientId" "ABC123someClientId"
dotnet user-secrets set "Auth0:ClientSecret" "some_random_string_of_letters"
That's most of the configuration, it's time to start updating our app's Startup code
3. Update Startup.cs with authentication
We've set the prerequisites for using Auth0 in our app, but we still need to set up the authentication properly. We'll start by modifying Startup.cs to configure the required services, and add the authentication and authorization middleware.
Most of this code is copied straight from the Auth0 Sample app.
We'll start with the easy bit, updating the middleware pipeline. In Startup.Configure(), add UseAuthentication() and UseAuthorization() between the calls to UseRouting() and UseEndpoints(). Additionally, inside UseEndpoints, add a call to endpoints.MapRazorPages() (we will use Razor Pages to create log in and out endpoints).
public void Configure(IApplicationBuilder app, IWebHostEnvironment env)
{
    if (env.IsDevelopment())
    {
        app.UseDeveloperExceptionPage();
    }
    else
    {
        app.UseExceptionHandler("/Error");
    }

    app.UseHttpsRedirection();
    app.UseStaticFiles();

    app.UseRouting();

    app.UseAuthentication(); // <- Add this
    app.UseAuthorization();  // <- Add this

    app.UseEndpoints(endpoints =>
    {
        endpoints.MapRazorPages();  // <- Add this
        endpoints.MapBlazorHub();
        endpoints.MapFallbackToPage("/_Host");
    });
}
Now it's time to add the authentication configuration. This is the most complex part of the process, so I'm just going to dump the whole ConfigureServices() method below. This code:
- Adds the required authentication services, and configures some of the default authentication schemes.
- Adds cookie authentication, used to persist the authentication after you've logged in to Auth0
- Adds OpenID Connect authentication using the scheme name
"Auth0" - Configures the Auth0 scheme with the settings loaded from Secrets Manager, configures the callback path (
/callback, same as we registered with Auth0), saves tokens to the cookie, and handles logout, so we correctly logout of Auth0 when we log out of the app. - I added a couple of extra scopes—
profileandemail—so we get a few more claims after authentication.
In production, I would move a lot of this code to an extension method to avoid cluttering the
ConfigureServicesmethod. I've only shown the additional namespaces required on top of the default ones added.
using Microsoft.AspNetCore.Authentication.Cookies;
using Microsoft.IdentityModel.Protocols.OpenIdConnect;
using Microsoft.AspNetCore.Http;
using Microsoft.AspNetCore.Authentication.OpenIdConnect;

public void ConfigureServices(IServiceCollection services)
{
    services.AddRazorPages();
    services.AddServerSideBlazor();
    services.AddSingleton<WeatherForecastService>();

    services.AddAuthentication(options => {
        options.DefaultAuthenticateScheme = CookieAuthenticationDefaults.AuthenticationScheme;
        options.DefaultSignInScheme = CookieAuthenticationDefaults.AuthenticationScheme;
        options.DefaultChallengeScheme = CookieAuthenticationDefaults.AuthenticationScheme;
    })
    .AddCookie()
    .AddOpenIdConnect("Auth0", options => {
        options.Authority = $"https://{Configuration["Auth0:Domain"]}";

        options.ClientId = Configuration["Auth0:ClientId"];
        options.ClientSecret = Configuration["Auth0:ClientSecret"];

        options.ResponseType = OpenIdConnectResponseType.Code;

        options.Scope.Clear();
        options.Scope.Add("openid");
        options.Scope.Add("profile"); // <- Optional extra
        options.Scope.Add("email");   // <- Optional extra

        options.CallbackPath = new PathString("/callback");
        options.ClaimsIssuer = "Auth0";
        options.SaveTokens = true;

        // Add handling of lo
        options.Events = new OpenIdConnectEvents
        {
            OnRedirectToIdentityProviderForSignOut = (context) =>
            {
                var logoutUri = $"https://{Configuration["Auth0:Domain"]}/v2/logout?client_id={Configuration["Auth0:ClientId"]}";

                var postLogoutUri = context.Properties.RedirectUri;
                if (!string.IsNullOrEmpty(postLogoutUri))
                {
                    if (postLogoutUri.StartsWith("/"))
                    {
                        var request = context.Request;
                        postLogoutUri = request.Scheme + "://" + request.Host + request.PathBase + postLogoutUri;
                    }
                    logoutUri += $"&returnTo={ Uri.EscapeDataString(postLogoutUri)}";
                }

                context.Response.Redirect(logoutUri);
                context.HandleResponse();

                return Task.CompletedTask;
            }
        };
    });
}
Phew, that's a lot of code, but we're not done yet! We need to create the login, logout, and AccessDenied pages.
4. Create new pages and components.
The easiest way to create the necessary Razor Pages is to use the .NET CLI again, rather than Visual Studio. I've opted to use the "single file" approach for the Razor Pages, as they basically have no logic, and in two cases, no UI. We also need to create a "login display" Razor component for login and logout.
Your could also use controllers and views if you prefer, but Razor Pages is preferable in my opinion, especially as Blazor Server uses Razor Pages for hosting by default.
Create the required pages and component using:
dotnet new page -o Pages/Account -n Login -np
dotnet new page -o Pages/Account -n Logout -np
dotnet new page -o Pages/Account -n AccessDenied -np
dotnet new razorcomponent -o Shared -n LoginDisplay
Update Pages/Account/Login.cshtml to the following. This ensures when you hit the URL path /Account/Login, a ChallengeResult will be returned to the AuthenticationMiddleware which will cause a redirect to Auth0 if you're not signed in.
@page
@using Microsoft.AspNetCore.Authentication;
@using Microsoft.AspNetCore.Mvc;
@functions {
    public ChallengeResult OnGet(string returnUrl = "/")
    {
        return Challenge(new AuthenticationProperties() { RedirectUri = returnUrl }, "Auth0");
    }
}
Update Pages/Account/Logout.cshtml to the following. This signs you out of your app in Auth0, and removes your authentication cookie. The RedirectUri indicates where Auth0 should redirect to after you've signed out, and must match the URL you provided in Auth0 earlier in this post.
@page
@using Microsoft.AspNetCore.Authentication
@using Microsoft.AspNetCore.Authentication.Cookies
@using Microsoft.AspNetCore.Authorization
@attribute [IgnoreAntiforgeryToken]
@functions{
    public async Task OnPost()
    {
        await HttpContext.SignOutAsync("Auth0", new AuthenticationProperties { RedirectUri = "/" });
        await HttpContext.SignOutAsync(CookieAuthenticationDefaults.AuthenticationScheme);
    }
}
Update Pages/Account/AccessDenied.cshtml to the following (or some other HTML, it's up to you). This is shown if you attempt to access a page for which you're not authorized:
@page

<header>
  <h1 class="text-danger">Access Denied.</h1>
  <p class="text-danger">You do not have access to this resource.</p>
</header>
Update Shared/LoginDisplay.razor to the following. This shows the login and logout buttons, depending on the current authentication state of the user
<AuthorizeView>
    <Authorized>
        Hello, @context.User.Identity.Name!
        <form method="post" action="Account/LogOut">
            <button type="submit" class="nav-link btn btn-link">Log out</button>
        </form>
    </Authorized>
    <NotAuthorized>
        <a href="Account/Login">Log in</a>
    </NotAuthorized>
</AuthorizeView>
That covers all the new components, all that remains is to update existing components to use our new authentication components
5. Update existing components
First, we'll start with App.razor, the main entry point for your application. We need to make two changes to this component:
- Wrap everything in a
CascadingAuthenticationStatecomponent, so the authentication state can flow to all nested components - Change
RouteViewtoAuthorizeRouteView, to handle authorization requirements.
The final component should look something like this:
<CascadingAuthenticationState>
    <Router AppAssembly="@typeof(Program).Assembly" PreferExactMatches="@true">
        <Found Context="routeData">
            <AuthorizeRouteView RouteData="@routeData" DefaultLayout="@typeof(MainLayout)" />
        </Found>
        <NotFound>
            <LayoutView Layout="@typeof(MainLayout)">
                <p>Sorry, there's nothing at this address.</p>
            </LayoutView>
        </NotFound>
    </Router>
</CascadingAuthenticationState>
Next, update Shared/MainLayout.razor to add our new LoginDisplay.razor component, e.g.
@inherits LayoutComponentBase

<div class="page">
    <div class="sidebar">
        <NavMenu />
    </div>

    <div class="main">
        <div class="top-row px-4">
            <LoginDisplay /> <!-- Add this -->
            <a href="https://docs.microsoft.com/aspnet/" target="_blank">About</a>
        </div>

        <div class="content px-4">
            @Body
        </div>
    </div>
</div>
That's everything that we need to do, time to take the app for a spin!
Trying out the Blazor server app with Auth0 authentication
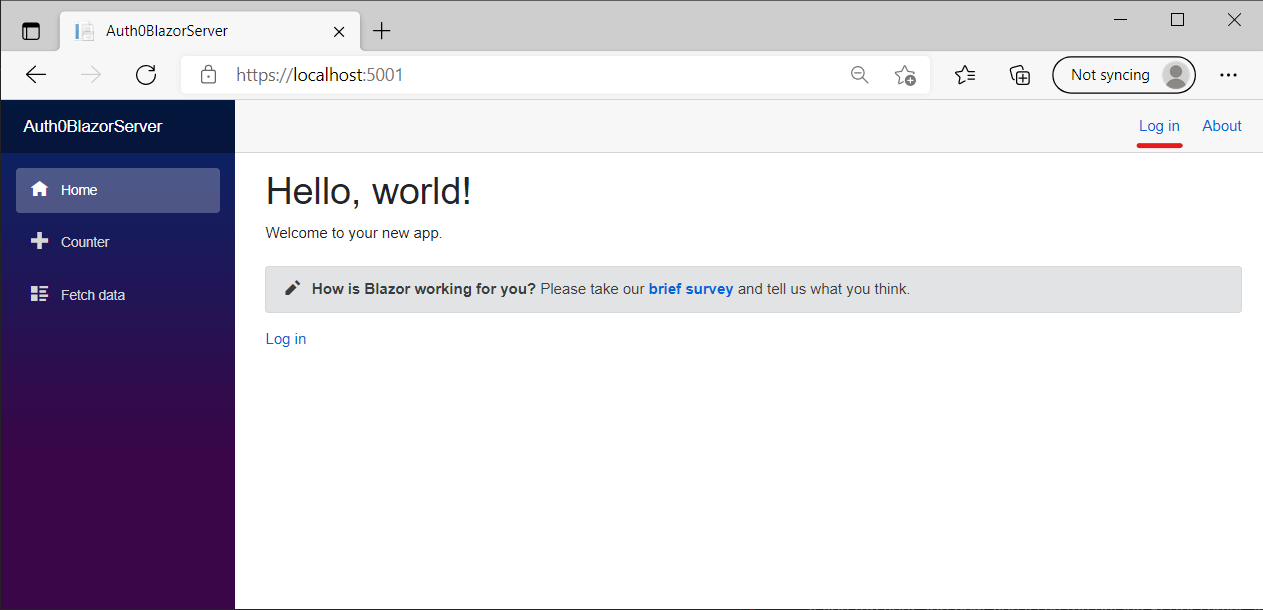
If you run your app now, you'll see the default Blazor server application, with one addition, the Login link in the top right of the page
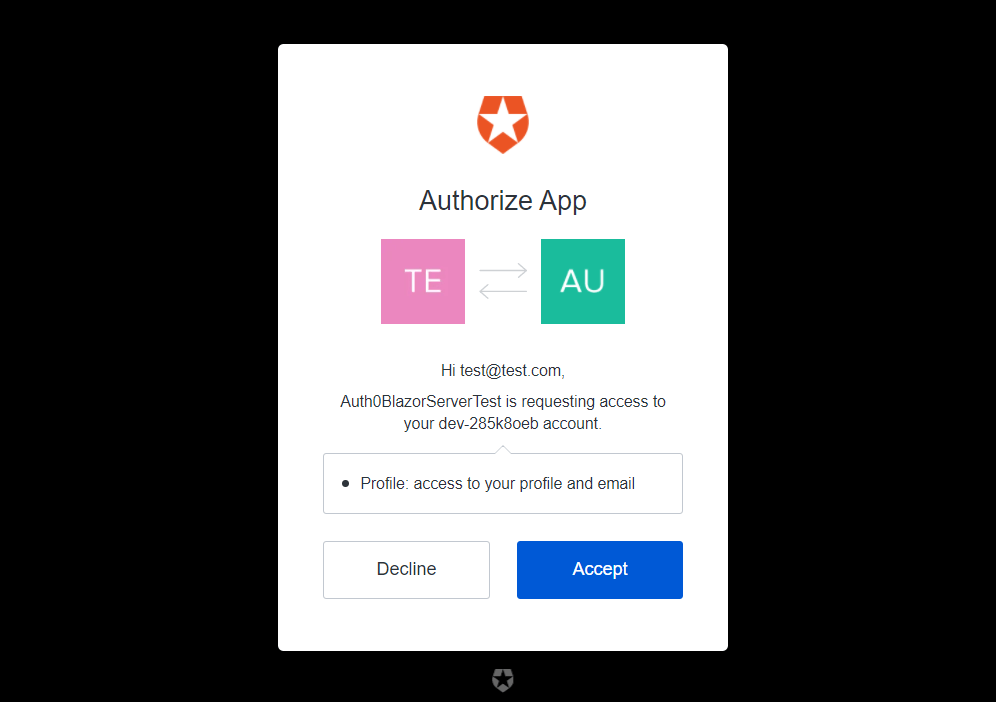
If you click that link, you'll be redirected to Auth0, where you can create a new account (or login with an existing account):

You'll be asked to provide consent for your Blazor app to access your email and profile details.
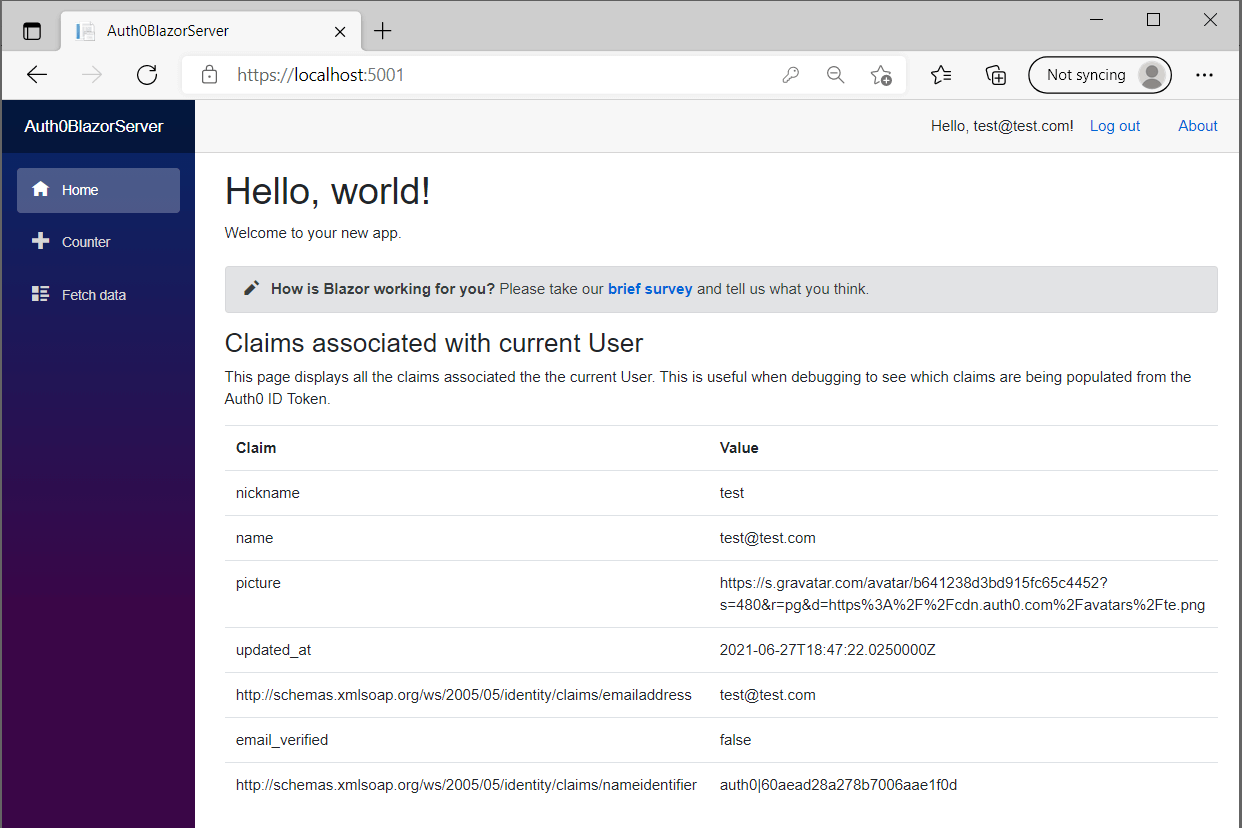
After clicking "Accept" you'll be redirected back to the Blazor application, but now you'll be logged in! In the screenshot below I listed out the claims associated with the identity just to prove it worked:
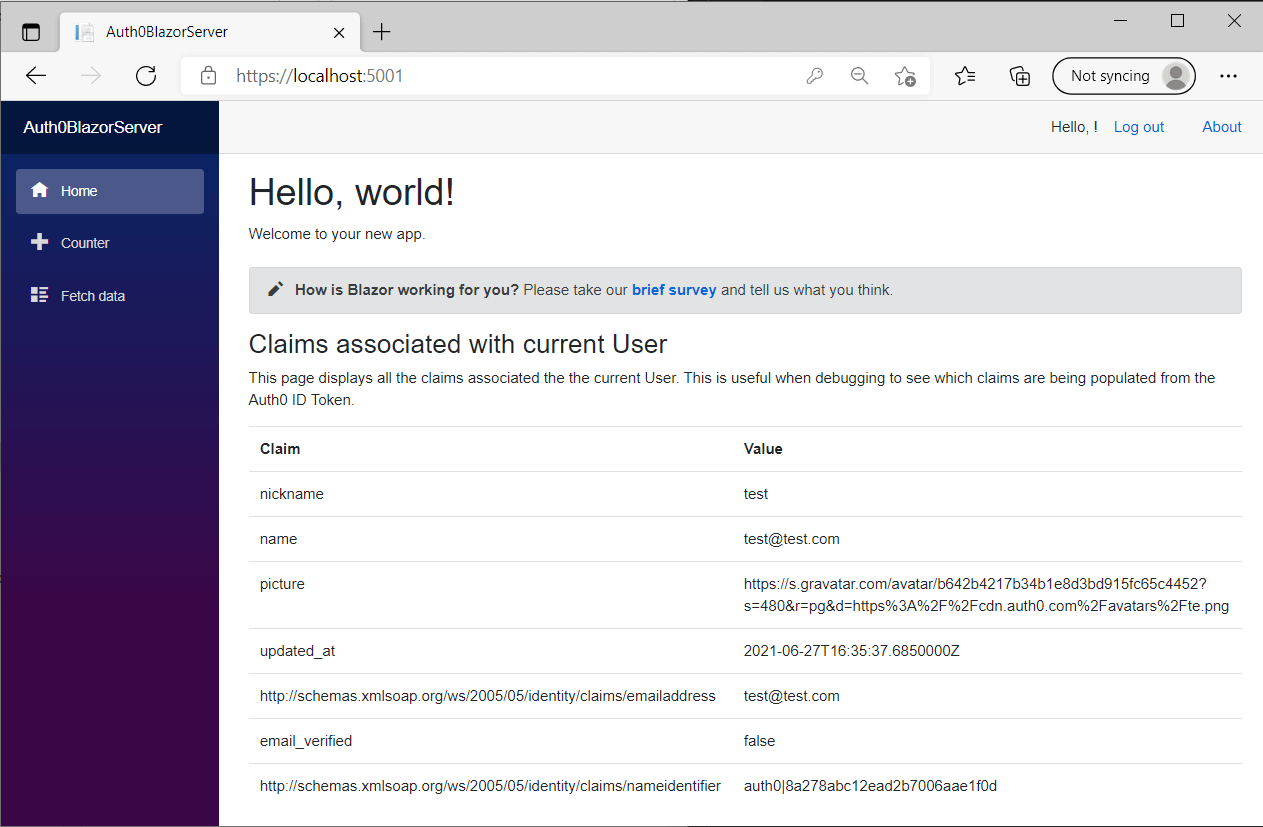
The sharp-eyed among you may notice one issue though—the LoginDisplay.razor component isn't displaying the name properly; it's just showing a blank string. The reason for this is that the default claim used by User.Identity.Name isn't one of the claims returned by Auth0.
Fixing the NameClaimType
By default, the default Name claim type is the value http://schemas.xmlsoap.org/ws/2005/05/identity/claims/name. This rather incongruous value is a throwback to the SOAP days. Unfortunately, in most cases, you'll need to change this to a more sensible value.
There's also a similarly awkward default value for the
Roleclaim:http://schemas.microsoft.com/ws/2008/06/identity/claims/role, but I tend to ignore that one, as I don't use roles often these days.
To change the Name claim to something more useful, set the TokenValidationParameters.NameClaimType property on the OpenIdConnectOptions object inside the call to AddOpenIdConnect():
public void ConfigureServices(IServiceCollection services)
{
    // other code not shown for brevity
    services.AddAuthentication(options)
        .AddCookie()
        .AddOpenIdConnect("Auth0", options => {
            // ... other config

            options.TokenValidationParameters = new()
            {
                NameClaimType = "name",
            };

            // ... other config
        });
}
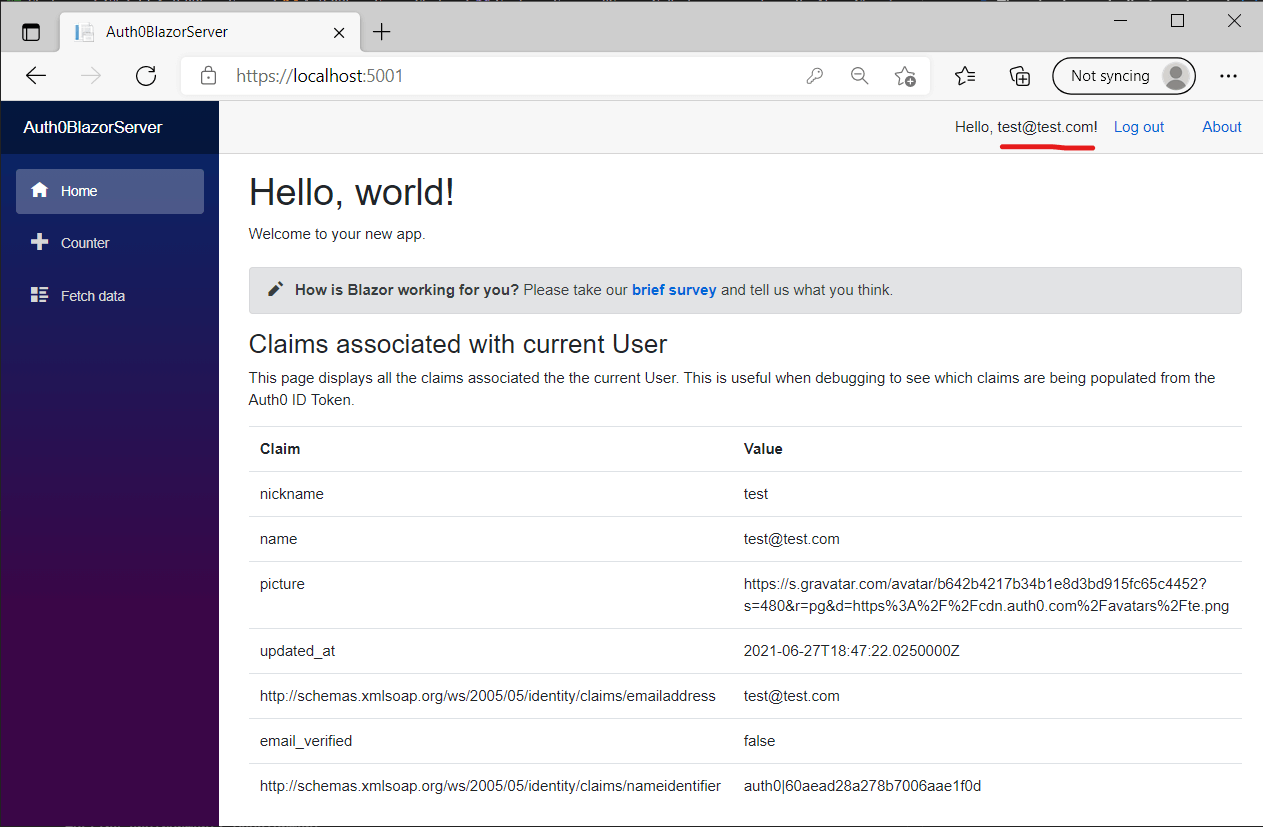
With this change, the name claim will be used when you call User.Identity.Name. For our app, that means the user's email is shown in the menu bar:
And that's it! We now have Blazor server, using Auth0 for authentication.
Next steps
This post only describes the first steps to a full identity solution. You'll likely also want to:
- Store the user ID/name in a database when registering new users. Even though you don't need the authentication related data in your app, you will likely still need to reference the user ID or email for example.
- Protect other APIs in your app with authorization attributes.
- Use claims for authorization.
Hopefully this post will get you on the way.
Summary
In this post, I discussed the authentication options in Blazor server, and described Auth0 as an identity solution. I then described the process of signing up for Auth0, and configuring a client application. Finally, I showed how to configure a Blazor Server application to use Auth0 for authentication.