This is the first post in a series on the humble StringBuilder. Rather than showing how to use StringBuilder (I'm sure most people will be familiar with its basic usage) I'm going to dig into the source code and see how it's implemented. This is a big class, so it will take several posts!
After looking at StringBuilder, we'll take a look at two internal optimisation classes used by the framework, and show how those can be used to further reduce allocations.
By sheer coincidence, Steve Gordon also started a deep dive series on
StringBuilderthis week! I strongly suggest reading his posts too, as they cover many extra things compared to my series!
Reducing allocations to improve performance
One of the big focuses in recent versions of .NET has been on performance, reducing allocations in particular. Whenever you create a new instance of a class, memory must be allocated for it, normally on the heap. Allocating memory doesn't cause performance issues in-and-of-itself—allocating memory is very fast—the problem is when you're finished with the object.
When an object is no longer referenced, it becomes eligible for Garbage Collection (GC). GC is an important part of any .NET application, and is fundamental to the .NET runtime. Eventually, when you allocate enough objects, the GC will need to clean up and remove the old objects from memory to make way for the new one. Doing so has a (variable) performance impact but the crux of the matter is: the more objects you create on the heap, the more work the GC has to do.
The latest versions of .NET (and ASP.NET Core) have put a lot of effort into reducing allocations wherever possible. One of the biggest recent changes was the addition of Span<T>, which allows working with chunks of memory without having to copy it around.
Span<T> is especially useful when used with Strings. Strings are a special type in .NET, in that they are allocated on the heap, but they're immutable. Any string operation you do in .NET that returns another string (e.g. Join, Split, Substring) will leave the original string(s) untouched, and return one (or more) new strings. This can put significant pressure on the GC, especially if you are creating lots of small strings, just to create a single large final string.
This isn't a new problem for .NET, so in .NET 1.1 the StringBuilder class was introduced. This lets you efficiently concatenate strings, characters, and other ToString()ed objects without creating a lot of intermediate strings.
StringBuilder is one of the first basic optimisations you learn when doing .NET development, but I thought it would be interesting to look behind the scenes, and see how StringBuilder works.
The design of the StringBuilder class
For the purposes of this post, I'm going to be looking at the latest (at time of writing) version of StringBuilder from the main branch on GitHub. This is roughly the same as the version built into .NET 5.
Before we get into the code of StringBuilder, we'll take a look at the general design of the StringBuilder class. This will make it easier to understand the code, as well as make it clear how the StringBuilder reduces allocations.
The biggest hint as to the design of StringBuilder is sat right at top of the class file:
// A StringBuilder is internally represented as a linked list of blocks each of which holds
// a chunk of the string.  It turns out string as a whole can also be represented as just a chunk,
// so that is what we do.
So there it is in a nutshell. The StringBuilder class is a glorified linked list. In summary, a singly linked list contains multiple nodes, where each node contains:
- Some data
- A pointer to the next/previous node (
nullfor the "final" node)

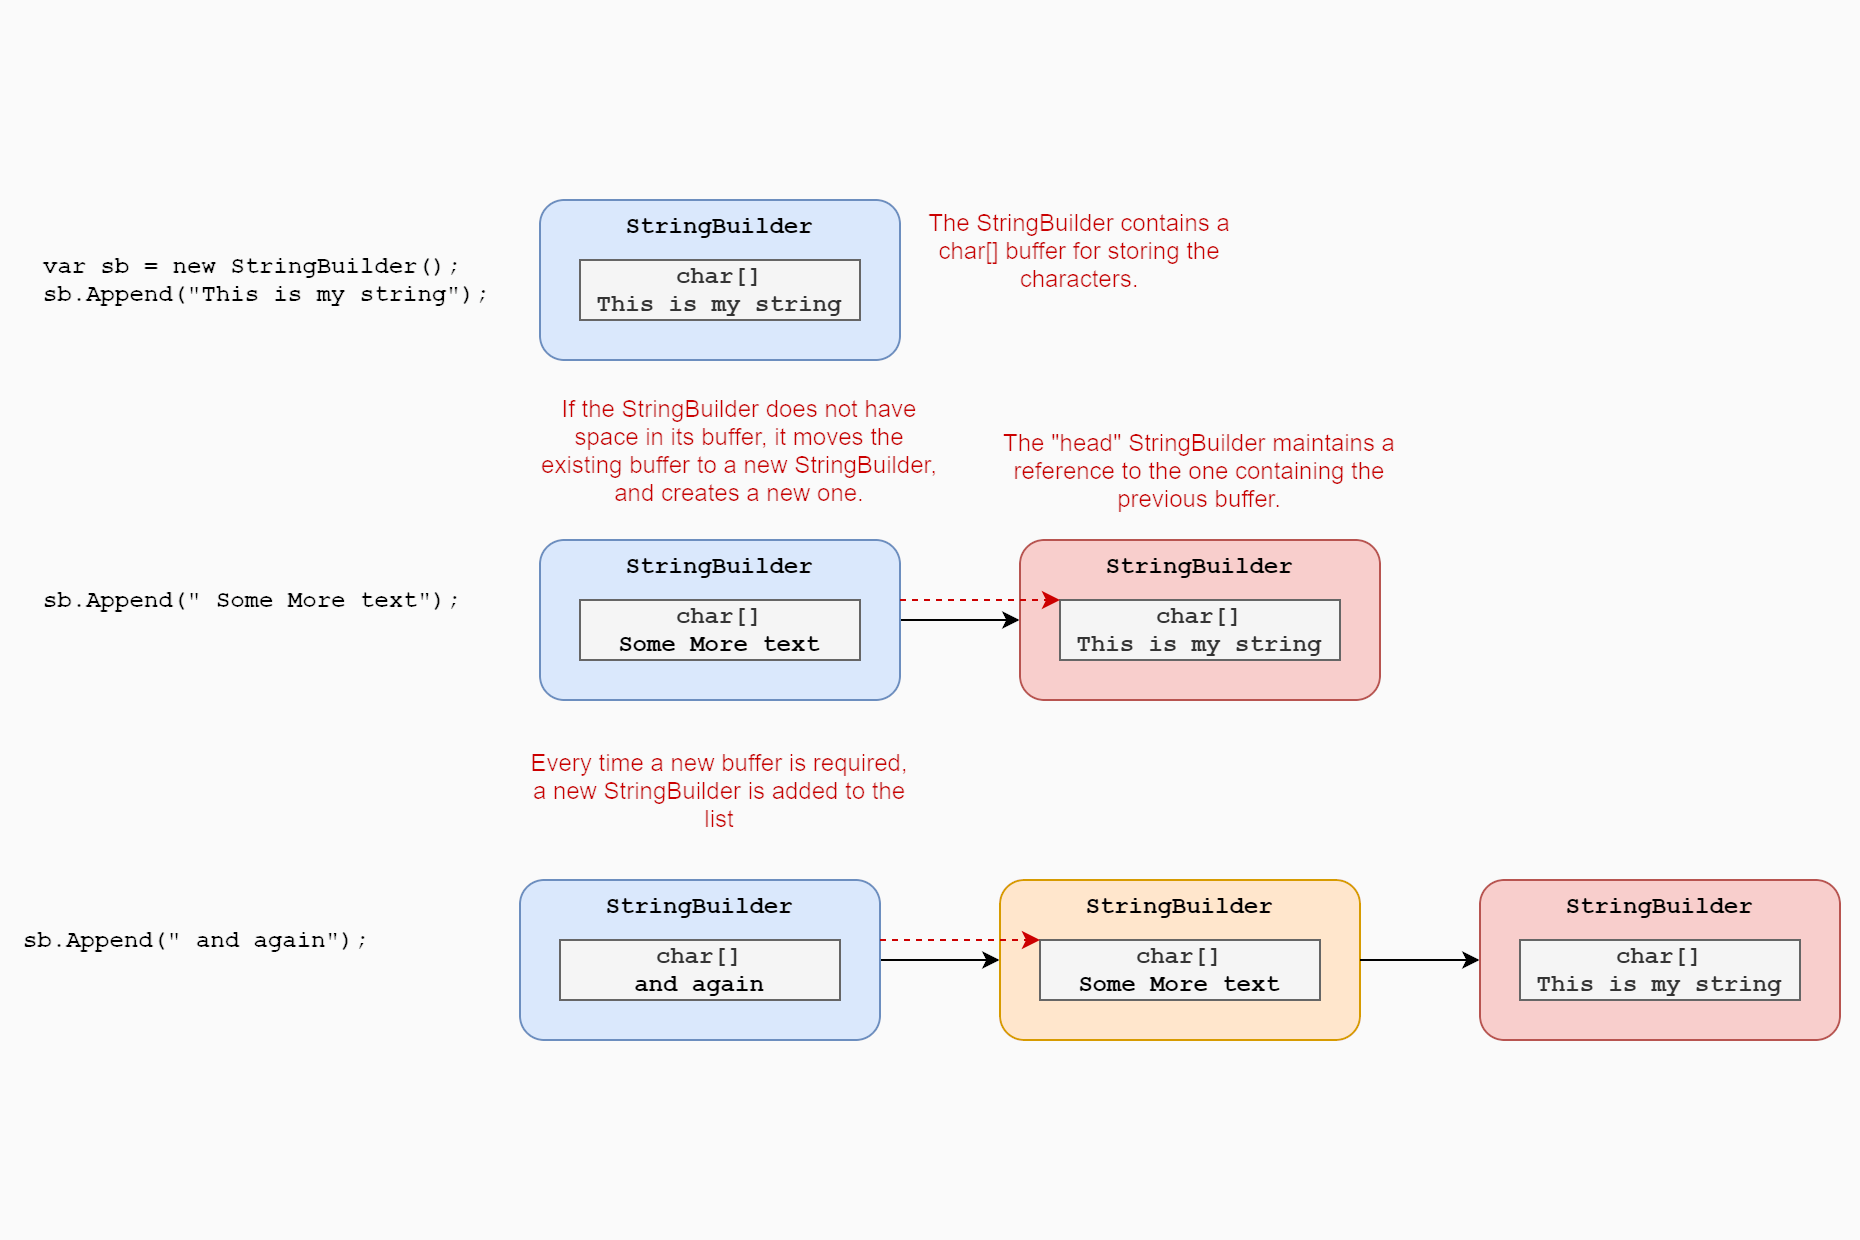
When you create a StringBuilder, you create the head node of the list. This node contains a buffer char[], which stores the characters that will make up part of the final string. When you add more characters to the StringBuilder than fit in the buffer, the StringBuilder moves the buffer to a new StringBuilder, adds a link to the other StringBuilder node, and creates a new buffer char[] in the head node.

While the overall
StringBuilderbehaves very much like a "normal" singly linked list, the above diagram shows that you always maintain a reference to the "head" of the linked list, which is effectively the "end" of the string.
StringBuilder is implemented as a linked list, but there are many nuances to the implementation, which make it interesting to look into. In the next section I'll describe some of the terminology used internally by the StringBuilder code, which will make it easier to follow.
StringBuilder Terminology
StringBuilder refers to each "node" in the complete linked list structure as a chunk. Each chunk is itself a StringBuilder, which may contain a reference to a previous chunk (StringBuilder).
I think the easiest way to understand this is to consider the internal "data" fields that each StringBuilder maintains. Below I list each of the fields present on a StringBuilder, along with a friendly description of it. These are mostly taken from the code comments:
char[] m_ChunkChars—The internal buffer of characters for the chunk, representing part of the overallstring.StringBuilder? m_ChunkPrevious—A reference to the previous chunk. This will be null until a new chunk is added.int m_ChunkLength—The number of characters that have been added to the array. Will always be between0andm_ChunkChars.Length.int m_ChunkOffset—The total number of characters in previous chunks. Will be0until a new chunk is added.int m_MaxCapacity—The maximum number of characters allowed in the string.
These fields are used internally, but aren't publicly exposed. Instead, several properties expose combinations of these values.
Capacity—The sum of the length of the currently allocated buffers. Given bym_ChunkChars.Length + m_ChunkOffset. Note that as more chunks are added, this value will increase.Length—The number of characters added to the builder. Given bym_ChunkLength + m_ChunkOffset. Note that this will be less than or equal toCapacity, and is the length of thestringyou will get when callingToString().MaxCapacity—The maximum capacity that a string can have, given bym_MaxCapacity.
I don't expect you to memorise these for the source code below, but I think it's helpful to give an idea of the various pieces involved. With that, let's look at some code!
Diving into the source code
I'm not going to go into detail about every method in StringBuilder. The implementation is 2500+ lines of C#, and would take far too long to step through. Instead, I'm going to look at how the design described above is implemented in code, looking at some of the important methods, and hand-waving over a lot of the duplication.
For clarity, I've removed most of the argument validation checks and Debug.Assert() statements. I also repeat the most pertinent fields used by each by method, so you shouldn't have to refer back and forth between sections too much.
Creating a StringBuilder
The first operation we'll look at is creating a new StringBuilder. There are various different overloads for creating a StringBuilder, but we're going to look at just 2, and see which internal fields are updated. We start with the default constructor:
public sealed partial class StringBuilder
{
    internal char[] m_ChunkChars;
    internal int m_MaxCapacity;
    internal const int DefaultCapacity = 16;

    public StringBuilder()
    {
        m_MaxCapacity = int.MaxValue;
        m_ChunkChars = new char[DefaultCapacity];
    }
}
The MaxCapacity of a StringBuilder is the largest string that it can be used to create. By default, this is 2,147,483,647 characters long! Even though we can create strings this large, the actual initial memory allocated in m_ChunkChars is far smaller, a mere 16 characters. This value balances being large enough to accommodate many common usages, while being small enough to not be wasteful.
m_ChunkCharscontains the characters that make up a single "chunk" of the final string.
Now let's look at another constructor, one in which we provide an initial value:
public sealed partial class StringBuilder
{
    internal char[] m_ChunkChars;
    internal int m_ChunkLength;
    internal int m_MaxCapacity;

    public StringBuilder(string? value, int startIndex, int length, int capacity)
    {
        if (value == null)
        {
            value = string.Empty;
        }

        m_MaxCapacity = int.MaxValue;
        capacity = Math.Max(capacity, length);

        m_ChunkChars = GC.AllocateUninitializedArray<char>(capacity);
        m_ChunkLength = length;

        value.AsSpan(startIndex, length).CopyTo(m_ChunkChars);
    }
}
In this constructor we do 4 things:
- Set the maximum capacity to
int.MaxValue, as for the default constructor. - Allocate an array for
m_ChunkCharswith the same length as the providedvalue, or with thecapacityprovided, whichever is larger. - Set
m_ChunkLengthto the size of the string. - Copy the contents of
valueintom_ChunkChars.
In contrast to the default constructor, we use a helper function GC.AllocateUninitializedArray<char>(capacity), to create the chunk char[]. This function optimises the creation of arrays, by not zeroing-out the backing memory on creation. The only risk associated with this is viewing "uninitialized" data if you try and read an array element before you write to it. That shouldn't happen with a correct implementation, hence its use in StringBuilder.
Note that
GC.AllocateUninitializedArrayactually reduces performance when allocating small arrays (less than ~2048 bytes), which is why it is not used in the default constructor.
After the m_ChunkChars array is created, the value is converted to a Span<char>, and is copied into the chunk buffer. The field m_ChunkChars, which represents how much of the chunk buffer has been used, is set to the length of the string.
There are a variety of other StringBuilder constructors, but most of them delegate to this latter method, so we'll move on to the meat of the StringBuilder: adding values.
Appending char to a StringBuilder
Now we have a StringBuilder, we can add something to it. We're going to start simple, adding a single char, but as you'll see shortly, even that can be more complex than you might expect!
Appending a single char
You can add a character to a StringBuilder instance using Append(). There are many different overloads for this method, but we're going to start by looking at the single-char overload.
internal char[] m_ChunkChars;
internal int m_ChunkLength;
internal int m_MaxCapacity;

public StringBuilder Append(char value)
{
    int nextCharIndex = m_ChunkLength;
    char[] chars = m_ChunkChars;

    if ((uint)chars.Length > (uint)nextCharIndex)
    {
        chars[nextCharIndex] = value;
        m_ChunkLength++;
    }
    else
    {
        Append(value, 1);
    }

    return this;
}
This method starts by calculating where we need to write the char value, which is conveniently the same as the current m_ChunkLength. The question is, is there space to write this character into the chunk array m_ChunkChars?
If the length of the array is greater than the index to write, then we're in a best case scenario. The char is written directly to the chunk array, and the m_ChunkLength (the number of chars in the chunk) is incremented.
However, if the chunk array is already full, then we can't do a simple write. Instead, we call a different Append overload which can handle this "edge" case.
Appending multiple chars
The Append(value, repeatCount) overload called at the end of the previous section is an overload that allows you to add a single char multiple times. This method is more complex as it handles the case where we need to create a new chunk to accommodate the new values.
internal char[] m_ChunkChars;
internal int m_ChunkLength;
internal int m_MaxCapacity;

public StringBuilder Append(char value, int repeatCount)
{
    int newLength = Length + repeatCount;
    if (newLength > m_MaxCapacity || newLength < repeatCount)
    {
        throw new ArgumentOutOfRangeException(nameof(repeatCount));
    }

    int index = m_ChunkLength;
    while (repeatCount > 0)
    {
        if (index < m_ChunkChars.Length)
        {
            m_ChunkChars[index++] = value;
            --repeatCount;
        }
        else
        {
            m_ChunkLength = index;
            ExpandByABlock(repeatCount);
            index = 0;
        }
    }

    m_ChunkLength = index;
    return this;
}
The first step in this method is a pre-condition check to ensure we're not going to exceed the maximum capacity m_MaxCapacity.
The check for
newLength < repeatCounthandles cases of integer overflow, in case you're running in anuncheckedcontext.
If the check is passed, the body of the method enters a while loop that repeatedly tries to set the next value in m_ChunkChars to the value. When there is sufficient capacity, this is largely the same logic as in the "single char" overload we walked through previously.
Once the m_ChunkChars array is full we drop into the else block. In this block, m_ChunkLength is set to the current index value (which will be m_ChunkChars.Length), and ExpandByABlock is called, requesting a block that's at least as big as the remaining number of characters, repeatCount.
ExpandByABlock() is used to create a new "chunk" in the linked list. It does this efficiently by primarily manipulating internal fields/pointers, and avoiding bulk copying operations.
internal char[] m_ChunkChars;
internal StringBuilder? m_ChunkPrevious;
internal int m_ChunkLength;
internal int m_ChunkOffset;
internal int m_MaxCapacity;

internal const int MaxChunkSize = 8000;

private void ExpandByABlock(int minBlockCharCount)
{
    int newBlockLength = Math.Max(minBlockCharCount, Math.Min(Length, MaxChunkSize));

    // Check for integer overflow (logical buffer size > int.MaxValue)
    if (m_ChunkOffset + m_ChunkLength + newBlockLength < newBlockLength)
    {
        throw new OutOfMemoryException();
    }

    // Allocate the array before updating any state to avoid leaving inconsistent state behind in case of out of memory exception
    char[] chunkChars = GC.AllocateUninitializedArray<char>(newBlockLength);

    // Move all of the data from this chunk to a new one, via a few O(1) pointer adjustments.
    // Then, have this chunk point to the new one as its predecessor.
    m_ChunkPrevious = new StringBuilder(this);
    m_ChunkOffset += m_ChunkLength;
    m_ChunkLength = 0;

    m_ChunkChars = chunkChars;
}
This method starts by choosing how big of a block to create. Ideally, it doubles the length of the existing string, but only if this is less than MaxChunkSize, and only if it also satisfies the minimum requested block size.
The
MaxChunkSizeis chosen to avoid the chunk array ending up on the large object heap, as objects in the LOH these tend to hang around for a long time, and are expensive for the GC to collect. However, the new chunk is always large enough to hold the remaining characters, so this can potentially still happen.
Once the new block size is chosen, and the result is checked for integer overflow, a new chunk is allocated. However, note that this array is initially assigned to a local variable; it isn't immediately assigned to m_ChunkChars. This is because we need to create a new StringBuilder, and slide it into the right place in the linked list, without impacting the caller (who maintains a reference to the current StringBuilder). This is the process I described in the diagram for earlier in the post:
This is achieved with the private new StringBuilder(this) constructor. This essentially creates a clone of the existing StringBuilder. No char data is copied, instead a pointer to the chunk array is copied across, along with other all other details.
private StringBuilder(StringBuilder from)
{
    m_ChunkLength = from.m_ChunkLength;
    m_ChunkOffset = from.m_ChunkOffset;
    m_ChunkChars = from.m_ChunkChars;
    m_ChunkPrevious = from.m_ChunkPrevious;
    m_MaxCapacity = from.m_MaxCapacity;
}
At this point the last two "chunks" in the StringBuilder "chain" both point to the same char array. The final part of ExpandByABlock sets the "current" StringBuilder's chunk array to our newly allocated block, increments the m_ChunkOffset (i.e. the sum of characters in all previous chunks), and resets the "used" count for the head chunk to 0 (m_ChunkLength). At this point, the current (head) StringBuilder now has an empty array, so we can return to the Append() method, and continue adding characters!
We've only covered 2 of the append methods so far, but this post is already huge, so we'll leave it there. In the next post we'll look at some more of the methods on StringBuilder!
Summary
In this post I described the design of StringBuilder as a singly linked list, and discussed some of the terminology involved. I then looked at the source code of two constructors, as well as the Append(char) method. As part of that look, we saw how the StringBuilder grows its capacity by allocating new char[] blocks and creating multiple chunks. In the next post, we'll look at some more of the StringBuilder methods.