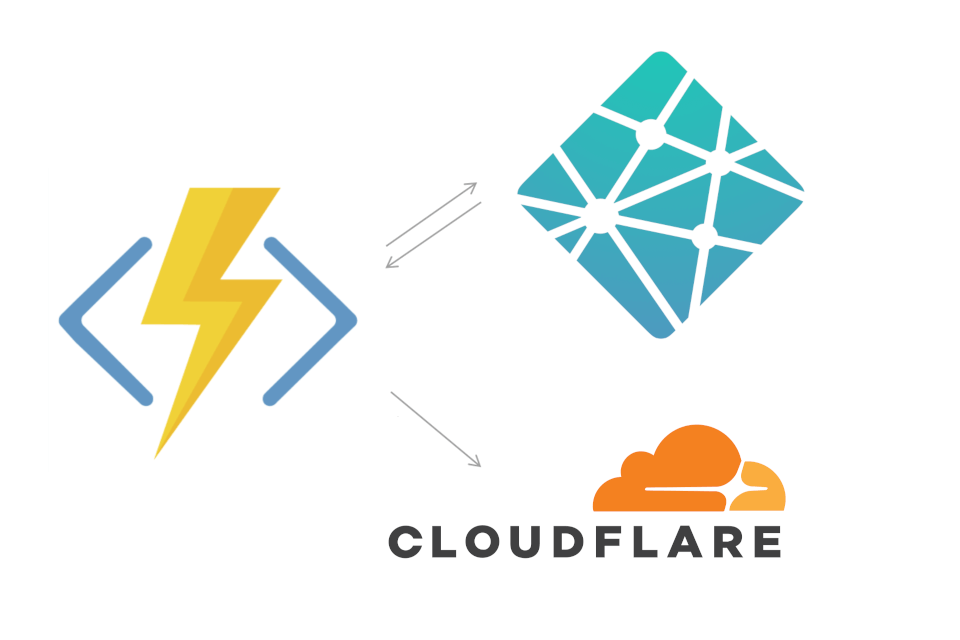
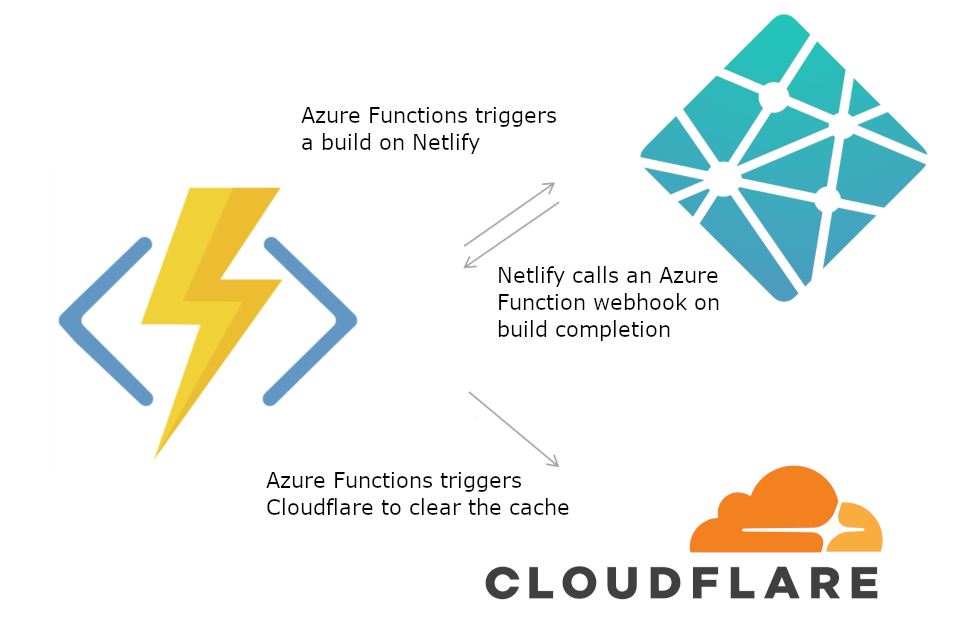
In this post I show how to create your first Azure Functions app, consisting of a timer that runs on a schedule to trigger a build on Netlify, and a WebHook that runs in response to an HTTP request which clears the cache for a website in Cloudflare.This post covers the background, installing the prerequisites for developing Azure Functions with Visual Studio, building, and testing the app.
Why use Azure functions?
Before getting into the meat of the post, I thought I'd give a quick overview of why I decided to use Azure Functions. Serverless computing is all the rage these days, but I haven't used it much up to this point. However, I recently had a perfect use-case when I converted my blog from Ghost to a statically-generated site. I'll probably write a post in the future as to how and why I made that change, but for now I'll focus on a key feature I needed: post scheduling.
My new static-site blog uses a git-based workflow, and is hosted on Netlify. I write posts as markdown files, which are committed to git and pushed to the remote repository. Each post has YAML frontmatter which defines properties such as the title, tags, and the date the post should be published. Whenever a push to master happens Netlify regenerates the static-site, filtering out posts with a future publish date, and deploys it to production.
This is almost all you need to schedule new posts ahead of time. However, by default, the site is only regenerated when you push to master. That means for a scheduled post to appear, you need to trigger another build after it's scheduled date passes.
Azure Functions provided a way for me to automate that process - I didn't want to be logging in to Netlify to trigger a build every Tuesday and Thursday (I publish a blog post every Tuesday, and sometimes Thursdays as well). Instead, I could use an Azure function that runs on a timer to trigger that build for me.
In addition, I'm still using Cloudflare with Netlify. That's probably unnecessary but I've been using Cloudflare for years, and I just like what they do, so I wanted to keep that in place. That means that every time I publish a new post I need to clear Cloudflare's cache. Luckily Cloudflare has an API that allows you to do this, and Netlify allows you to call a WebHook on successful builds. I used an Azure Function to easily connect these two pieces, so that whenever a Netlify build succeeded, it would clear the cache on Cloudflare.
One of the best pieces about using Azure Functions is that it's essentially free for simple cases like this! Azure Functions uses a "consumption" based model, which means you only get charged when your function is running. You can read the pricing details here, but with a free quota of 1 million executions a month, you can go a long way for free. I strongly recommend reading Troy Hunt's various posts on how he can run a popular website and API extremely cheaply using Azure Functions.
So that's the background for my example, a timer function to trigger a build in Netlify, and a WebHook to listen for completed builds, and trigger Cloudflare to clear its cache. In the next section I'll describe how to get started writing Azure Functions with Visual Studio.
Installing the prerequisites
According to the documentation to get started building Azure Functions locally, you should install the Azure development workload from the Visual Studio 2017 installer:
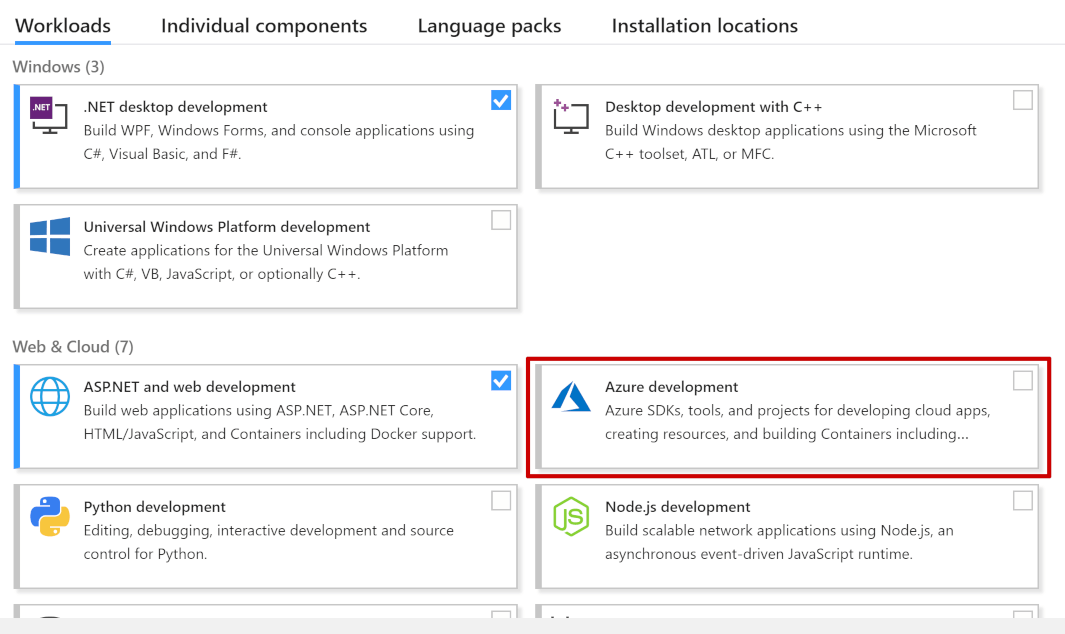
Feel free to do that, it's the easiest way to get started, and if you're going to be doing more Azure development other than Functions it likely makes sense. But it actually adds a lot more than you need to just build Azure Functions.
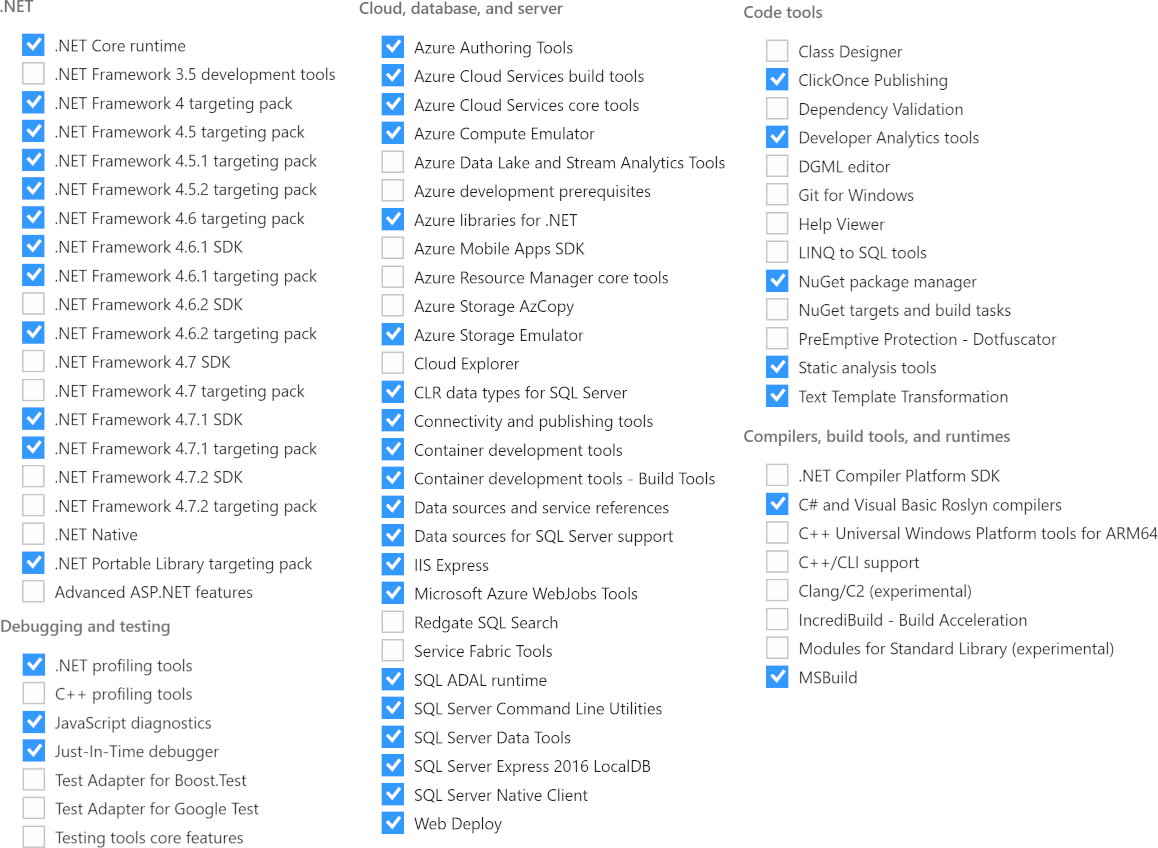
Visual Studio is slow enough starting up as it is, so I didn't want to add more GB to its installation size than necessary. I decided to try and trim it down, by selecting individual components. Unfortunately, there's a lot of inter-dependencies between components, so I'm not sure what the minimum set of components is. Key ones seem to be Azure libraries for .NET, Azure Cloud Services build tools, Azure Storage Emulator, and Microsoft Azure WebJobs Tools, plus their dependencies. I've included a list of some of my installed components below for reference, but don't take that as gospel. Still, I managed to shave off nearly 2GB compared to the Azure development workload.
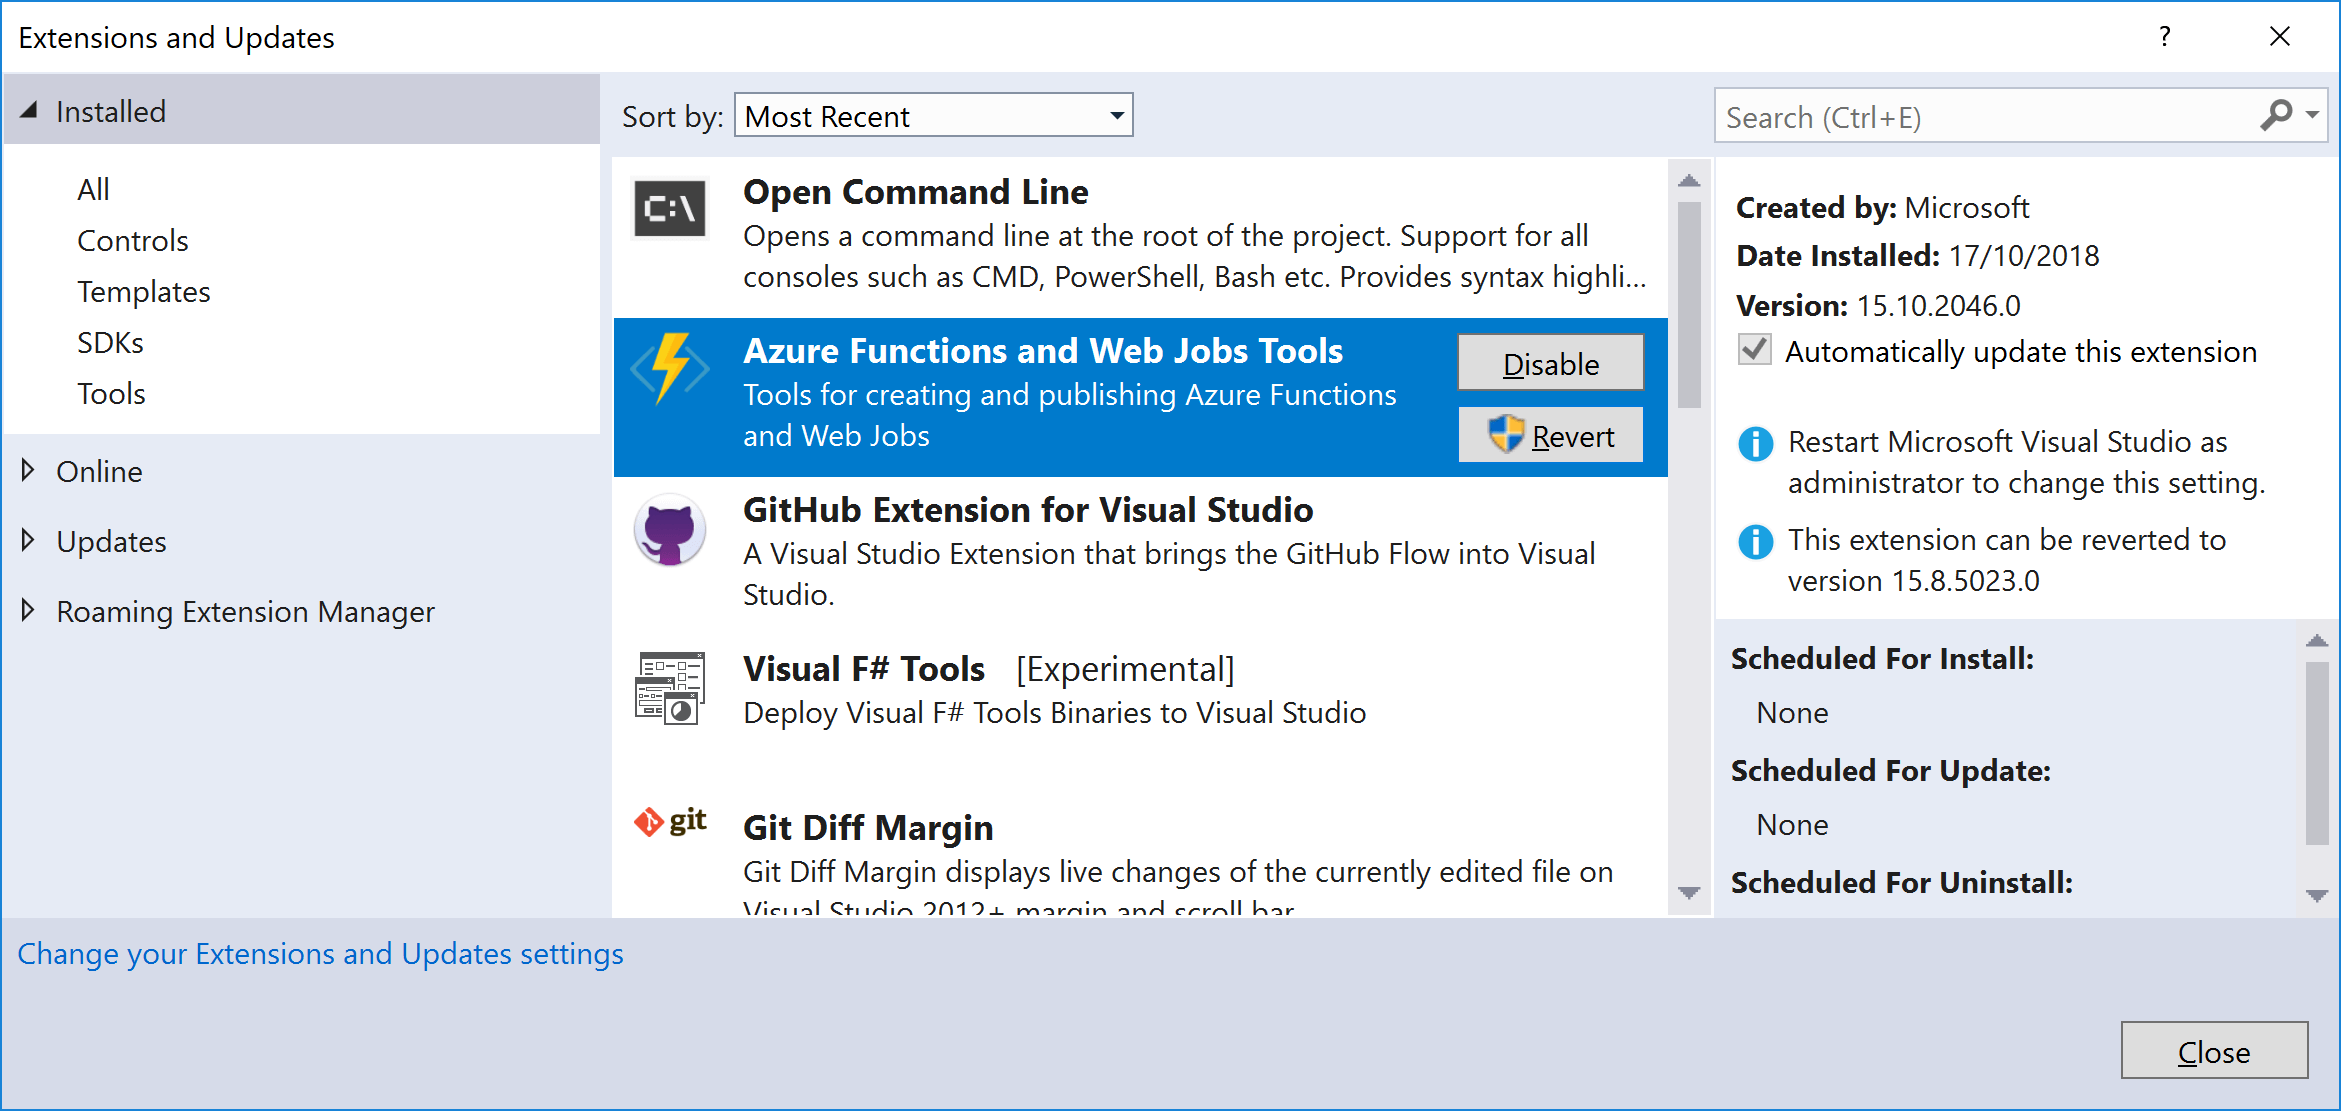
Once you've installed the required components, restarted Visual Studio (and possibly your machine 🙁) you need to install the Azure Functions tools. These provide the templates we're going to use to build the app. From inside Visual Studio, click Tools > Extensions and Updates > Updates, and update the Azure Functions and Web Job Tools. If you don't see an update available, make sure the tools are installed, and if so you're good to go.
As an optional extra, you can install the Microsoft Azure Storage Explorer. It's a cross-platform (Electron) app that lets you inspect your Azure storage (think, filesystem) associated with you Azure subscriptions. It also lets you explore the storage emulator you'll use when developing locally. I've found it handy occasionally, but it's not essential.
That's everything installed, lets start building some functions!
Building your first Azure function app
There's two main ways to create Azure Functions: you can author them directly with an in-browser editor, or you can build them locally as a project, and publish them to Azure. I experimented with both, and I Strongly recommend you go with the latter. Getting the full Visual Studio IntelliSense experience is so valuable when you're not familiar with the APIs. It's clearly the right choice from a long-term / CI / maintainability point of view too.
Start by creating an Azure Functions (v2) app. Azure Functions recently released version 2.0, which seems to add a bunch of new things, though as I haven't used v1, I can't really comment! The introductory blog post explains it all well. The main point that caught my eye was that you can use .NET Core 2.1, with all the associated performance benefits.
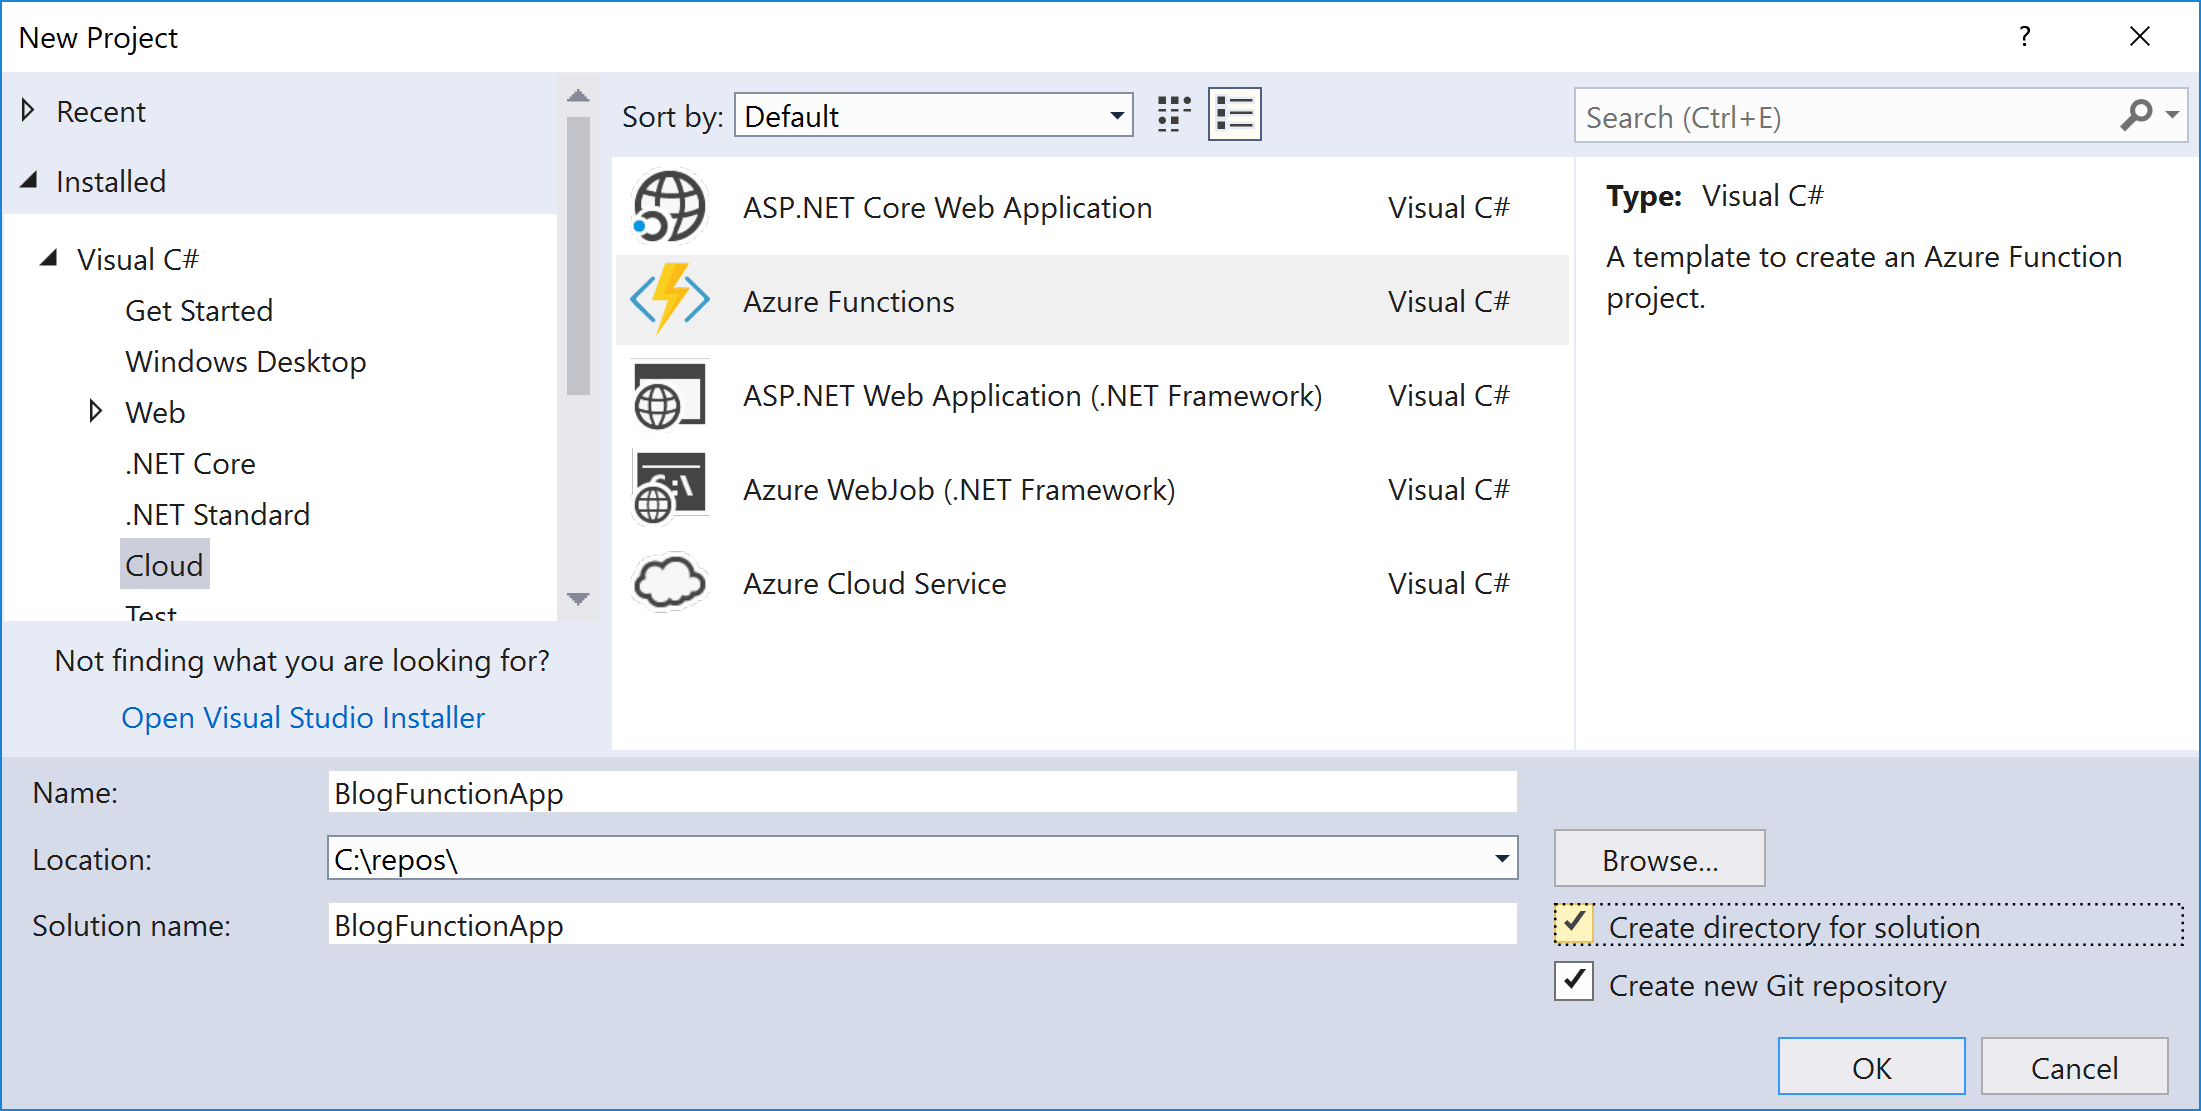
To create an Azure Functions app, choose File > New Project > Cloud > Azure Functions and provide a name for your app:
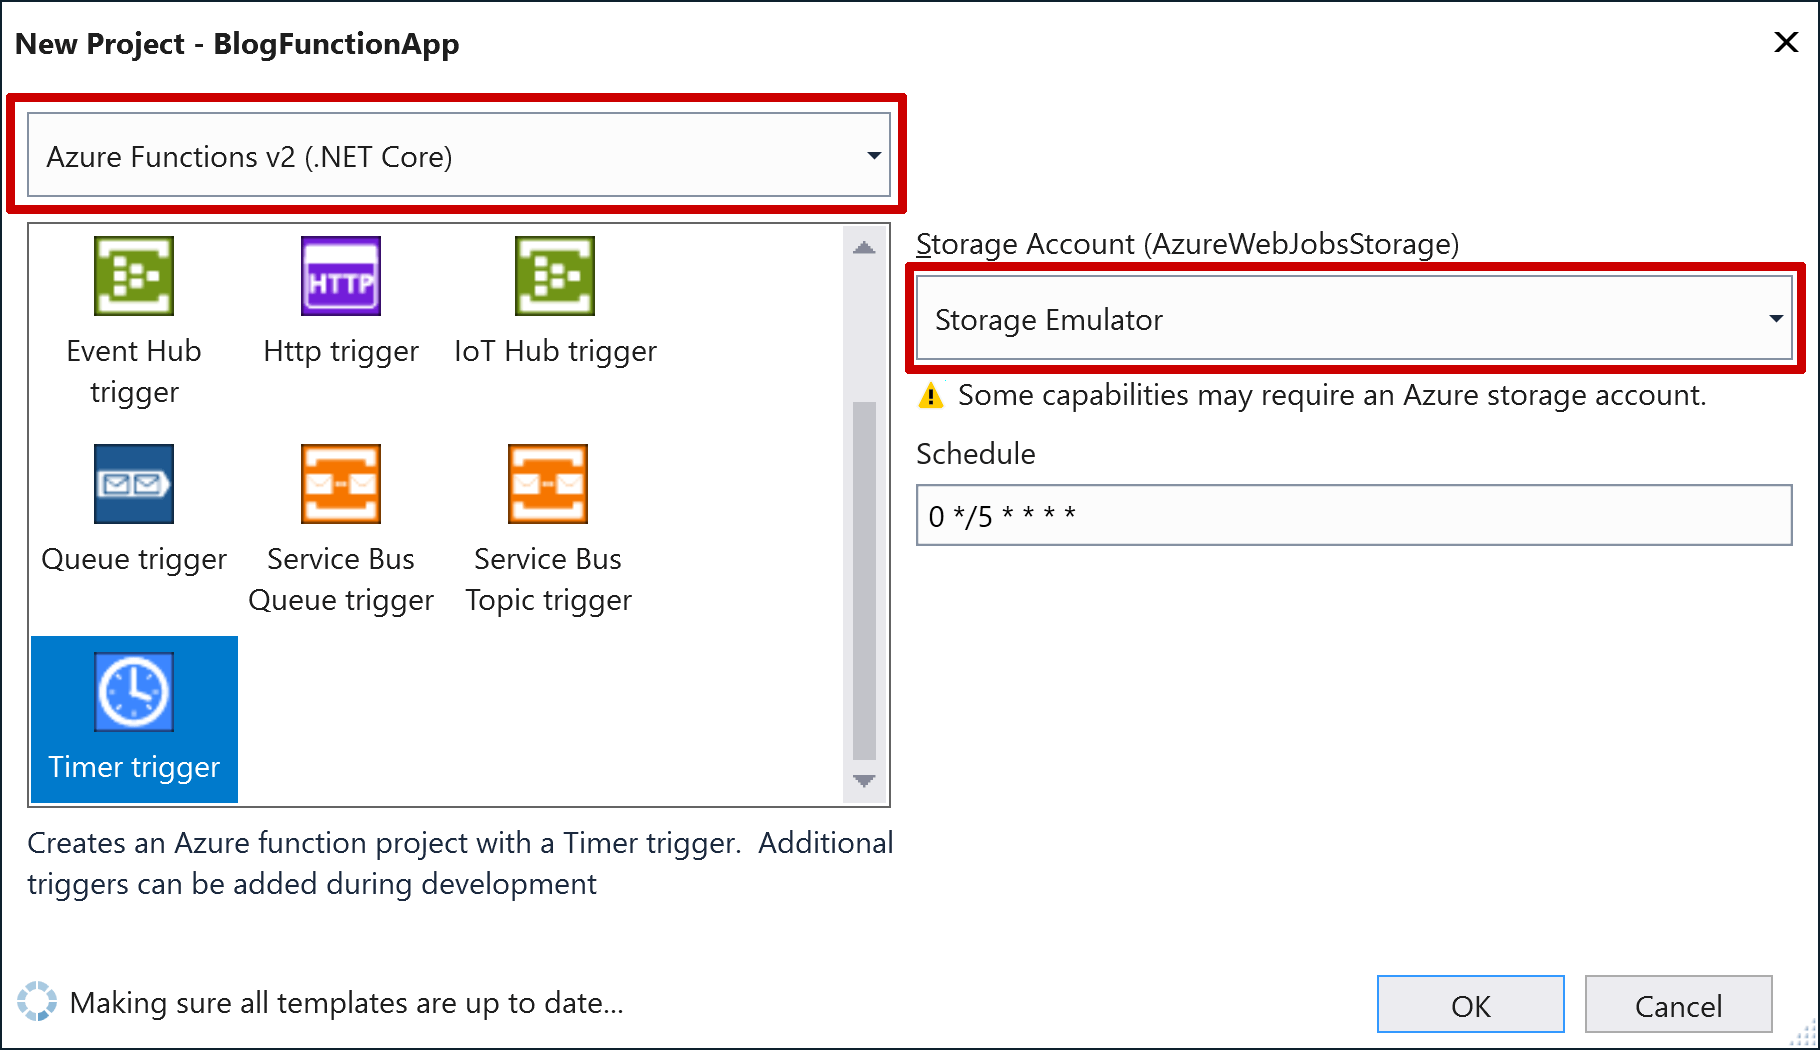
After clicking OK, you'll be presented with the New Project screen. We'll start by creating a timer trigger to trigger a build on Netlify. Select the Timer trigger, ensure that you're using the v2 version of functions, and the Storage Emulator for storage. Don't worry about the Schedule for now, we'll configure that later.
After clicking OK, you'll be presented with your Azure Functions app, which contains 3 files (in addition to the usual git, project, and solution files):
- Function1.cs - The Azure Function timer trigger. We'll update and rename this shortly
- host.json - contains global configuration options that affect all functions for a function app. For our app, it's pretty sparse:
{
    "version": "2.0"
}
- local.settings.json - Contains app settings, for things like your storage account ID. This file is not committed to your git repo; at runtime, you'll use Application Settings set in the Azure portal itself to provide configuration.
{
  "IsEncrypted": false,
  "Values": {
    "AzureWebJobsStorage": "UseDevelopmentStorage=true",
    "FUNCTIONS_WORKER_RUNTIME": "dotnet"
  }
}
If you hit F5 and Debug your app, you'll see the Azure functions logo popup in a command window, and your app starts. If you're familiar with ASP.NET Core, then the log output will look remarkably familiar:
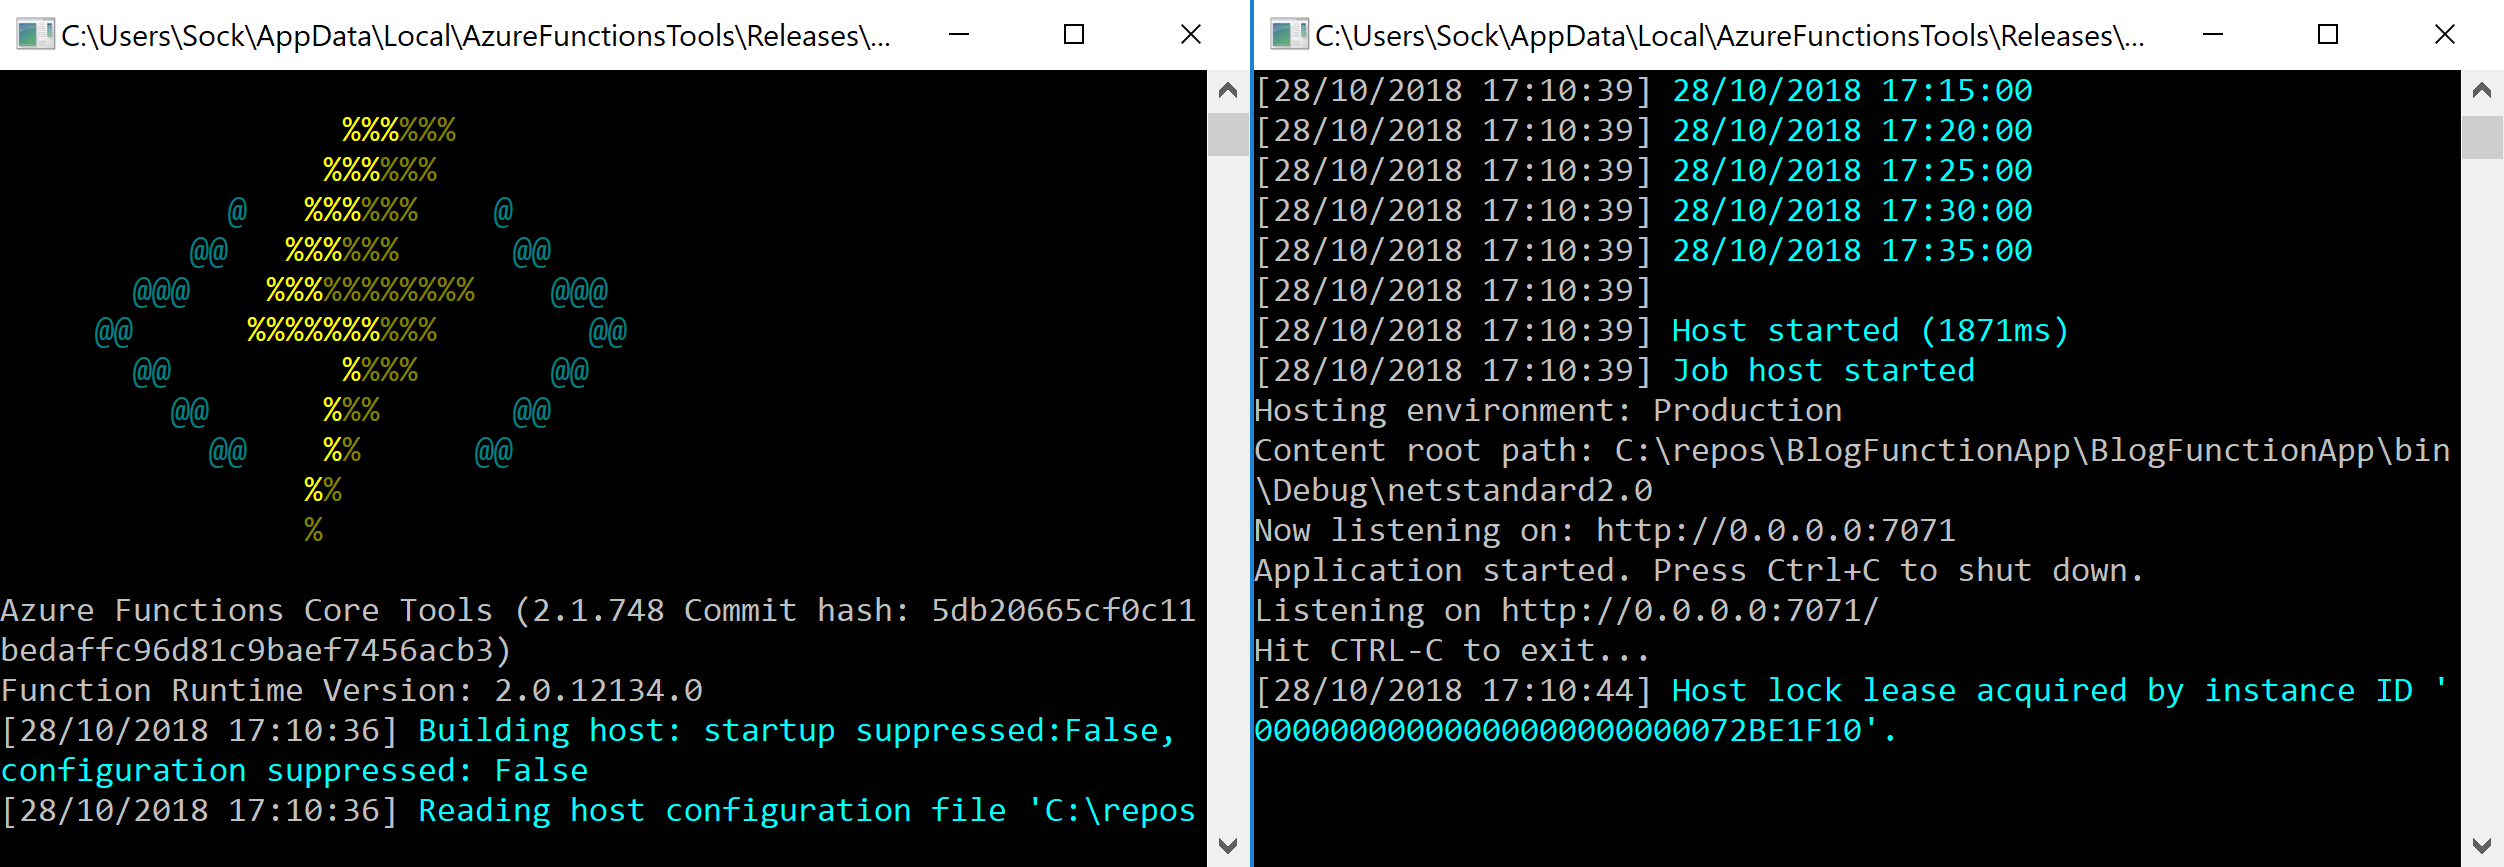
The functions app will just sit there now. The app contains a single timer that will run every 5 minutes, and write to the console. In the next section, we'll remove this trigger, and create the function that calls Netlify to trigger a build.
Creating the timer trigger
Azure Functions all have an "input binding" which controls when the function will run. The most basic bindings are the timer and HTTP triggers we're using in this post, which run on a schedule or in response to a web request. There are also bindings for things like Blob storage events, Queue events. You can also have "output bindings" which simplifies things like writing to blob storage, or sending a message with Twilio. They're not necessary for this post however, all we need to do is make a simple HTTP request to Netlify.
Replace the Function1 function with the following:
public static class CallBuildWebhook
{
    // {second=0} {minute=15} {hour=10} {day} {month} {day-of-week=(2=Tuesday)}
    private const string TimerSchedule = "0 15 10 * * 2";
    private static HttpClient _client = new HttpClient();

    [FunctionName("CallBuildWebhook")]
    public static async Task RunAsync([TimerTrigger(TimerSchedule)]TimerInfo myTimer, ILogger log)
    {
        log.LogInformation($"Tiggering Blog rebuild at: {DateTime.Now}");

        var buildHookUrl = Environment.GetEnvironmentVariable("BuildHookUrl");

        await _client.PostAsJsonAsync(buildHookUrl, "{}");

        log.LogInformation($"Blog rebuild triggered successfully at: {DateTime.Now}");
    }
}
If we just look at the body of the function for now, there's not much to this function! We start by logging the function call using the ASP.NET Core ILogger abstraction provided as a method argument. We then retrieve the required "BuildHookUrl" as a string from environment variables. When running locally, the values from local.settings.json are available as Environment Variables. Once you publish your app to Azure, the app's Application Settings will be available instead.
Next, we make a request to the provided URL, using the static HttpClient instance. It's important to use a static HttpClient instance (as Troy Hunt found out recently). Finally, we log the completed request. And that's it!
Now we come to the functions-specific aspects. First the [FunctionName] attribute. The name you provide here is used to globally identify the function in your app, so you have to use a unique name per function. Once deployed, this will control the URL that HTTP functions are exposed at, so you should pick something meaningful.
The [TimerTrigger attribute decorating the TimerInfo parameter defines the "input binding" for this function. It's what makes this a "timer" function. The [TimerTrigger] attribute takes a CRON expression that defines a schedule for when the function should run. CRON expressions are very flexible, but also pretty horrendous to understand if you're not familiar with them.
The example schedule I've used says to trigger the function every Tuesday at 10:15 am. The docs include a more thorough description of the required CRON expression, as well as examples. Jsut be careful when copying CRON expressions randomly from Stack Overflow, as some examples omit the (required) second parameter!
The last thing to do is to add the "BuildHookUrl" to local.settings.json under the Values node, and pass in the required build hook URL.
{
  "IsEncrypted": false,
  "Values": {
    "AzureWebJobsStorage": "UseDevelopmentStorage=true",
    "FUNCTIONS_WORKER_RUNTIME": "dotnet",
    "BuildHookUrl": "https://api.netlify.com/build_hooks/1234567890abcdef"
  }
}
If you're building with Netlify, you need to enable incoming webhooks for your app.
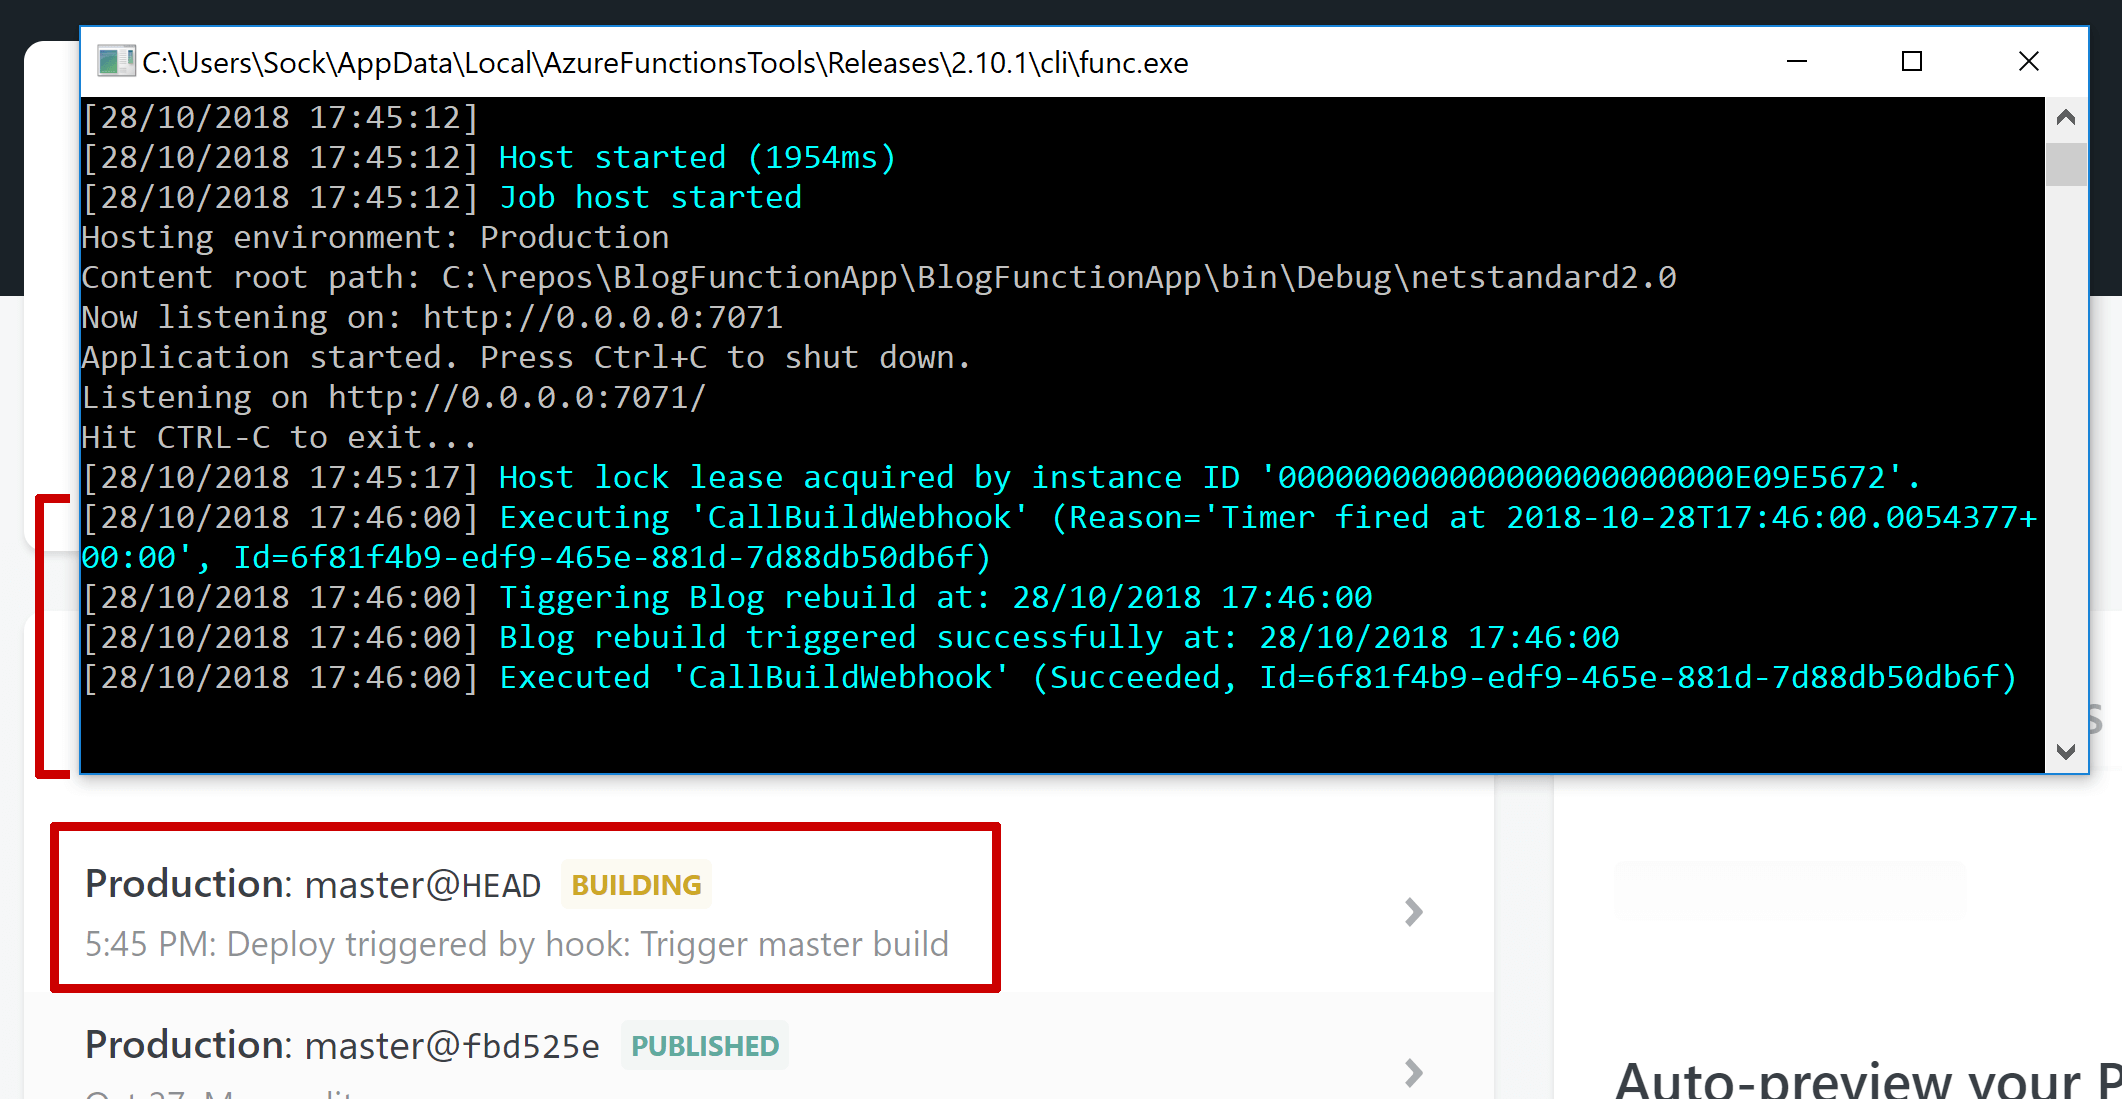
You can now test out your function. Unless you happen to be building the app at 10:15 on a Tuesday, you'll want to temporarily set schedule to something more frequent so you can check the function works, e.g. once every 5 minutes: "0 */5 * * * *". If the functions runs correctly, you should see a build triggered in the console log, and on Netlify:
That's the timer trigger complete. On to the HTTP trigger!
Creating the HTTP trigger
We have a timer function triggering a build on Netlify on a set schedule. We now want to create an HTTP trigger that Netlify can call when the build is complete, which will clear Cloudflare's cache for your site. This is slightly more involved as you need to obtain your credentials from Cloudflare to call the API. For now, we'll just look at the function itself:
    public static class ClearCloudflareCache
    {
        private static HttpClient _client = new HttpClient
        {
            BaseAddress = new Uri("https://api.cloudflare.com"),
        };

        [FunctionName("ClearCloudflareCache")]
        public static async Task<IActionResult> Run(
            [HttpTrigger(AuthorizationLevel.Function, "post", "get" Route = null)] HttpRequest req, ILogger log)
        {
            var zoneId = Environment.GetEnvironmentVariable("ZoneId");
            var xAuthEmail = Environment.GetEnvironmentVariable("X-Auth-Email");
            var xAuthKey = Environment.GetEnvironmentVariable("X-Auth-Key");

            var path = $"/client/v4/zones/{zoneId}/purge_cache";
            var body = new { purge_everything = true };

            _client.DefaultRequestHeaders.Accept.Clear();
            _client.DefaultRequestHeaders.Add("X-Auth-Email", xAuthEmail);
            _client.DefaultRequestHeaders.Add("X-Auth-Key", xAuthKey);

            var response = await _client.PostAsJsonAsync(path, body);

            if (response.IsSuccessStatusCode)
            {
                return new OkObjectResult("Cloudflare CDN Cleared");
            }

            return new BadRequestObjectResult("Cloudflare rejected clear-cache request");
        }
    }
There's more code to this function, but there's not actually many moving parts. As before, I'll start with the function body, and we'll come back to the triggers later. We start by fetching settings for accessing the Cloudflare API from EnvironmentVariables. To find these values for your account, follow the instructions at the start of this post to find them from your Cloudflare account.
Once we've retrieved the settings, we construct the necessary URL for purging the cache, and set the authorization headers. I've chosen (for simplicity) to purge the whole cache, by providing the JSON object { purge_everything: true } in the body of the POST. Again, we use a static HttpClient to send the request (this time, pre-configured to use the Cloudflare API base address). We can inspect the response to verify the function call was valid using IsSuccessStatusCode and return an OkObjectResult or BadRequestObjectResult, just as you would in an ASP.NET Core MVC controller;
The [HttpTrigger] attribute applied to an HttpRequest object in the function parameters is what makes this an HTTP trigger. You define three key things about the function in this attribute:
AuthorizationLevel- This controls who can invoke the function. See the documentation for details.Methods- The HTTP methods that this function will be triggered by. In this case, a POST or a GETRoute- a custom route template for defining the URL used to invoke the function. I've left it null so it uses the name of the function.
For authorization, I've chosen AuthorizationLevel.Function. That means the caller (Netlify) must provide a known key specific to this function for it to be authorized. If the key isn't provided, the function won't run. You can provide the key either in an x-functions-key header, or as a code query parameter.
When you hit F5 to run your app, you're provided with a URL to call the HTTP endpoint. If you hit this endpoint, the function will execute; you don't need to worry about authorization when running locally. Setup the required settings inn your local.settings.json file, and give it a try:
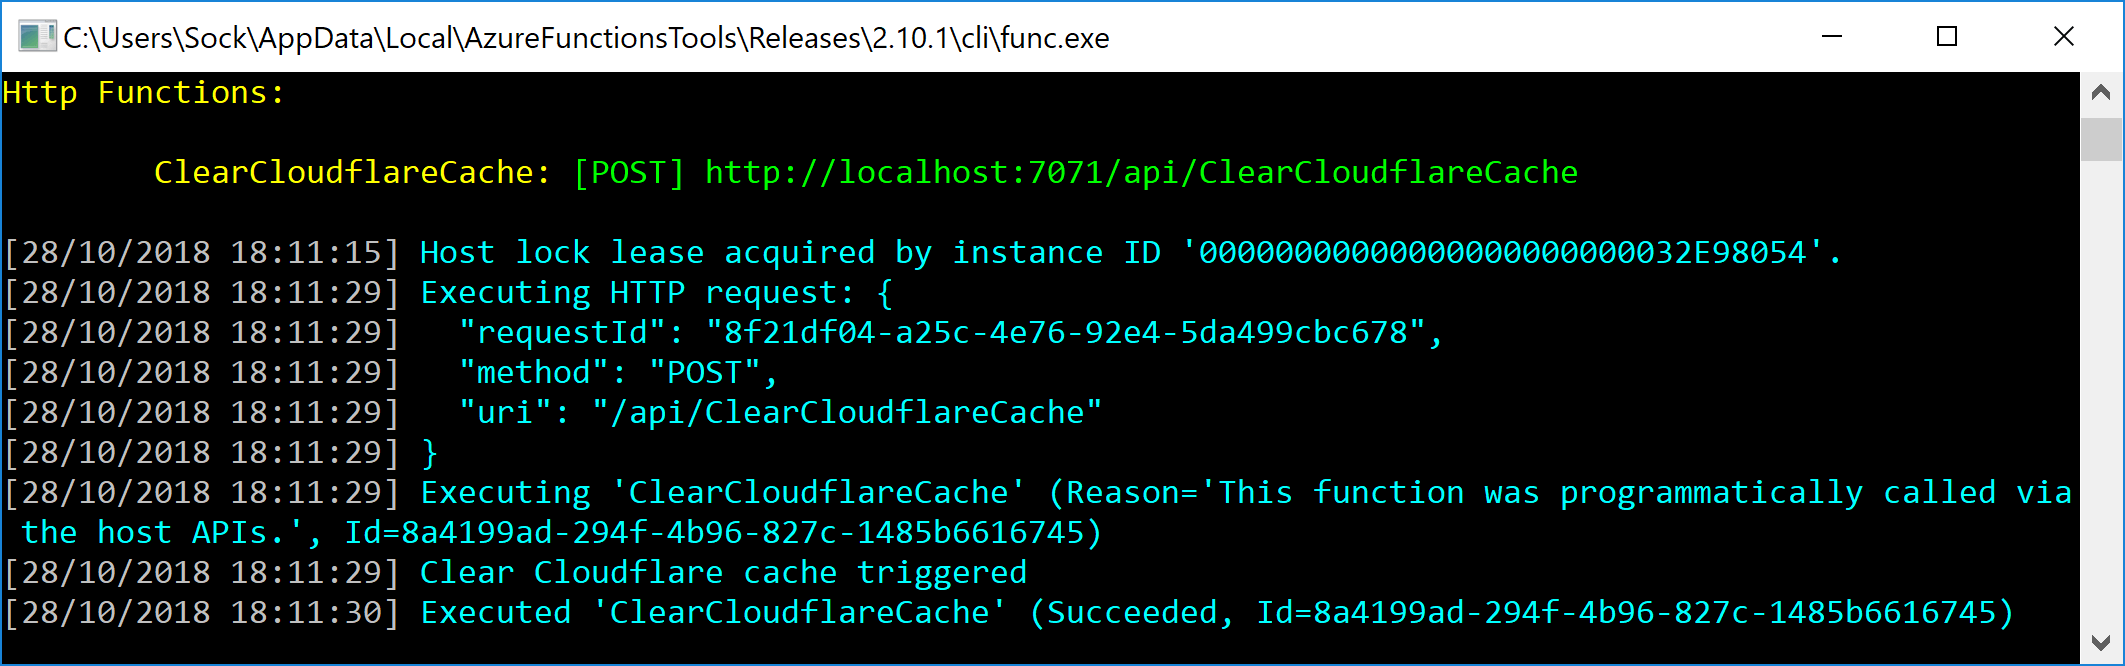
Another success!
Summary
Azure Functions is a great mechanism for providing custom integrations with third-party services. In this post I showed the basics of getting started with Azure Functions, including installing the prerequisites and creating a new timer and HTTP trigger using Visual Studio.