
In this post I describe one way to run coding agents locally safely while still using "YOLO" or "dangerous" mode, by using Docker Sandboxes.
Powerful agents, but they need a lot of hand holding
It's pretty safe to assume that if you're reading this, you're probably using some sort of coding agent these days, whether that's Claude Code, Codex, Copilot, or something else. I have a whole bunch of ethical, environmental, and sustainability concerns about the technology, but the fact is that in 2026, they've got so much better than they were even 6 months ago.
I am massively conflicted about the role of AI in software engineering (let alone other areas of life), but I'm not going to address that in this post. For better or worse, it feels like working with coding agents is practically becoming a job requirement, so learning how to do it safely seems important..
I've been very impressed with how effective Claude Code can be at adding new features, maintenance, and problem solving, but there's one thing that's infuriating… the dreaded tool-call permissions.

The real problem is that Claude asks this for endless things. Want to use grep? Confirm permission. Want to use sed? Confirm permission. Want to use cd because Claude Code doesn't understand Windows? Confirm permission.
This is an absolute killer for productivity. Using the tools like this becomes exhausting, constantly switching between terminal windows to find the agent that's managed to run into a wall again 🙄
In this post I'm focusing on Claude Code as that's what I have the most experience with, but everything pretty much works the same for other agents as I understand it too.
Live dangerously, if you dare
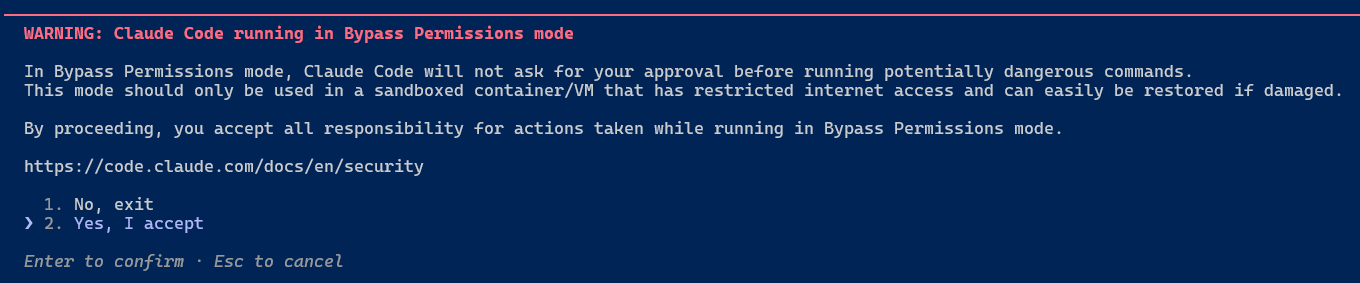
Of course, there is a solution, but it's not for the feint-hearted. Claude Code has the flag --allow-dangerously-skip-permissions, which adds a "bypass permissions" mode to the standard "plan" and "accept edit" modes.
This flag means "bypass permissions" mode is available, but it doesn't start in that mode. If you want to start in that mode, you can use
--permission-mode bypassPermissionsor--dangerously-skip-permissionsinstead.
If you start claude code using:
claude --allow-dangerously-skip-permissions
Then you'll get a warning:
and you can select bypass permissions on demand by cycling through modes with Shift+Tab

The trouble is, then you won't get any permission tool requests. If Claude decides to run something stupid that deletes your User folder then sorry, that's you hosed. It's right there in the warning…this is dangerous😅
And yet…
The experience in bypass permissions mode is just so much better when you want the agent to just go and do something (or even if you just want it to create a plan). It doesn't bother you about every little thing, it just does the task. That's a hard experience to give up, but there are options that can get you pretty close to this, safely.
Live safely, in a sandbox
Docker recently released Docker Sandboxes. It might surprise you that this actually isn't built on containers, but rather on isolated microVM sandboxes. This has some security advantages:
- Unlike containers, which share the host kernel, each sandbox has its own kernel
- The microVM runs a separate docker engine inside so you can build and run containers without having to mount your host docker socket
- The network in the microVM is isolated from the host. A network proxy runs on the host side, intercepting traffic, blocking access to the host's localhost, and automatically injecting authentication headers (so that the sandbox doesn't have access to them).

With all this isolation, the idea is that you can just let your agents run amok, without having to babysit them. Sounds ideal, right?
Docker sandboxes are experimental. Until recently, it was shipping with Docker Desktop and you ran commands like
docker sandbox run. However, they recently switched to shipping a dedicatedsbxtool that doesn't require docker desktop.
For the rest of this post I'll discuss the basics of getting started with sandboxes, and my brief experience with them.
Getting started with sbx sandbox
Due to the experimental nature of the sbx tool and Docker Sandboxes in general, this post is going to be relatively light on details and will focus on the basics, as I expect it will go out of date rapidly. Instead, I recommend you check the docs for more advanced usages.
Installing the sbx tool
To get started, you'll first need to install the sbx tool. Only macOS (arm64) and Windows (x86_64, Windows 11) are currently supported, and I'm going to provide the instructions for Windows seeing as that's what I'm using.
First, you'll need to make sure you have the HypervisorPlatform feature enabled. This is different (but related to) the full Hyper-V feature. It's used by WSL2, so it's very likely you already have this enabled anyway, but just in case, run the following in an administrator PowerShell prompt:
Enable-WindowsOptionalFeature -Online -FeatureName HypervisorPlatform -All
Next, install the sbx tool using WinGet, or by downloading the MSI from the Github releases page:
winget install -h Docker.sbx
You'll need to open a new terminal window to make sure the tool is available.
Signing in and configuring the defaults
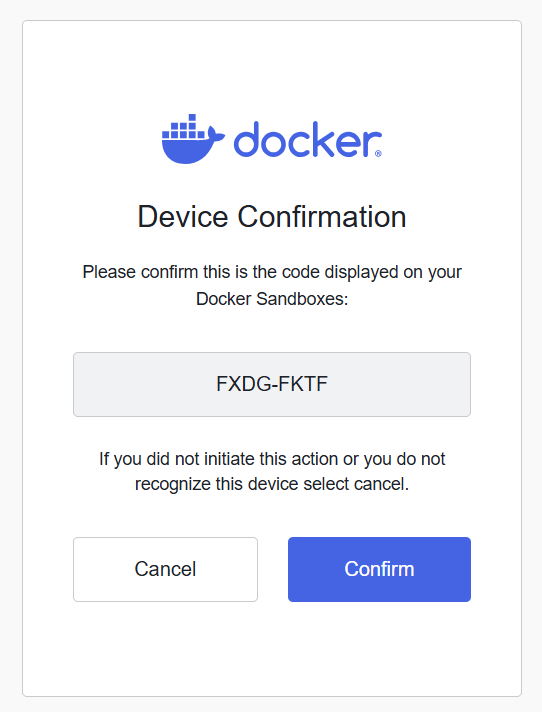
Once you've installed (and opened a new terminal window), you have to sign-in to use docker sandboxes, so start by running sbx login (or just sbx, it'll do the same thing):
❯ sbx
You are not authenticated to Docker. Starting the sign-in flow...

Your one-time device confirmation code is: FXDG-FKTF
Open this URL to sign in: https://login.docker.com/activate?user_code=FXDG-FKTF

By logging in, you agree to our Subscription Service Agreement. For more details, see https://www.docker.com/legal/docker-subscription-service-agreement/

Waiting for authentication...
This pops up a login window, where you first confirm, and then login to docker:
You're then provided with a choice of how to configure your network:
Signed in as andrewlock.
Daemon started (PID: 52268, socket: \\.\pipe\docker_kaname_sandboxd)
Logs: C:\Users\sock\AppData\Local\DockerSandboxes\sandboxes\state\sandboxd\daemon.log

Select a default network policy for your sandboxes:

     1. Open         — All network traffic allowed, no restrictions.
     2. Balanced     — Default deny, with common dev sites allowed.
     3. Locked Down  — All network traffic blocked unless you allow it.

  Use ↑/↓ or 1–3 to navigate, Enter to confirm, Esc to cancel.
The descriptions here are relatively self-evident, and it depends on how locked down you want your sandbox to be. All communication from the sandbox goes through a proxy, so it's really this proxy you're configuring.
The network policies are a new feature since I started working with the sandboxes, so I haven't experimented with these myself yet. I tried out Balanced, and used sbx policy ls to describe the policies, and it configured the following as allowed domains; all other network requests will be blocked:
| Name | Resources |
|---|---|
| default ai services | **.chatgpt.com:443, **.oaistatic.com:443, **.oaiusercontent.com:443, **.openai.com:443, api.anthropic.com:443, api.perplexity.ai:443, cdn.openaimerge.com:443, chatgpt.com:443, gemini.google.com:443, generativelanguage.googleapis.com:443, models.dev:443, nanoclaw.dev:443, platform.claude.com:443, play.googleapis.com:443, statsig.anthropic.com:443 |
| default package managers | **.bun.sh:443, **.gradle.org:443, **.packagist.org:443, **.yarnpkg.com:443, apache.org:443, astral.sh:443, bootstrap.pypa.io:443, bun.sh:443, cocoapods.org:443, cpan.org:443, crates.io:443, dot.net:443, dotnet.microsoft.com:443, eclipse.org:443, files.pythonhosted.org:443, golang.org:443, goproxy.io:443, gradle.org:443, haskell.org:443, hex.pm:443, index.crates.io:443, java.com:443, java.net:443, maven.org:443, metacpan.org:443, nodejs.org:443, nodesource.com:443, npm.duckdb.org:443, npmjs.com:443, npmjs.org:443, nuget.org:443, packagist.com:443, packagist.org:443, pkg.go.dev:443, proxy.golang.org:443, pub.dev:443, pypa.io:443, pypi.org:443, pypi.python.org:443, pythonhosted.org:443, registry.npmjs.org:443, repo.maven.apache.org:443, ruby-lang.org:443, rubygems.org:443, rubyonrails.org:443, rustup.rs:443, rvm.io:443, sh.rustup.rs:443, spring.io:443, static.crates.io:443, static.rust-lang.org:443, sum.golang.org:443, swift.org:443, tuf-repo-cdn.sigstore.dev:443, yarnpkg.com:443, ziglang.org:443 |
| default code and containers | **.business.githubcopilot.com:443, **.docker.com:443, **.docker.io:443, **.gcr.io:443, **.github.com:443, **.githubusercontent.com:443, **.gitlab.com:443, **.production.cloudflare.docker.com:443, bitbucket.org:443, dhi.io:443, docker-images-prod.6aa30f8b08e16409b46e0173d6de2f56.r2.cloudflarestorage.com:443, docker.com:443, docker.io:443, gcr.io:443, ghcr.io:443, github.com:443, gitlab.com:443, k8s.io:443, launchpad.net:443, mcr.microsoft.com:443, ppa.launchpad.net:443, production.cloudflare.docker.com:443, public.ecr.aws:443, quay.io:443, registry.k8s.io:443, sourceforge.net:443 |
| default cloud infrastructure | **.amazonaws.com:443, **.googleapis.com:443, **.googleusercontent.com:443, **.gstatic.com:443, **.gvt1.com:443, **.public.blob.vercel-storage.com:443, **.visualstudio.com:443, apis.google.com:443, app.daytona.io:443, azure.com:443, binaries.prisma.sh:443, challenges.cloudflare.com:443, clerk.com:443, csp.withgoogle.com:443, dev.azure.com:443, dl.google.com:443, fastly.com:443, figma.com:443, hashicorp.com:443, jsdelivr.net:443, json-schema.org:443, json.schemastore.org:443, login.microsoftonline.com:443, mise-versions.jdx.dev:443, mise.run:443, packages.microsoft.com:443, play.google.com:443, playwright.azureedge.net:443, supabase.com:443, unpkg.com:443, vercel.com:443, visualstudio.com:443, www.google.com:443 |
| default os packages | **.debian.org:443, alpinelinux.org:443, apt.llvm.org:443, archive.ubuntu.com:443, archlinux.org:443, centos.org:443, debian.org:443, dl-cdn.alpinelinux.org:443, fedoraproject.org:443, packagecloud.io:443, ports.ubuntu.com:443, ports.ubuntu.com:80, security.ubuntu.com:443, ubuntu.com:443 |
As you can see, this includes pretty much everything you might need for building applications, but it's notably missing things like documentation sites, so if your agent needs to go out to Microsoft learn (for example), it's going to be stuck. I think that could be a big gap in the balanced mode, so I switched to "open" mode instead by running sbx policy reset and choosing again.
Creating a sandbox
Once you've chosen your network policy, you can create your first sandbox. Navigate to your project folder, and run sbx run claude:
cd .\NetEscapades.EnumGenerators
sbx run claude
This downloads a docker image for the selected agent, and creates a sandbox named after the current working directory. Once downloaded, sbx uses the image to spin up a microVM and runs your agent of choice in YOLO/dangerously skip permissions mode:
Creating new sandbox 'claude-NetEscapades.EnumGenerators'...
aeacf85cf4c8: Download complete
4f33085e2ac1: Download complete
6b4ac13f7bd1: Download complete
Digest: sha256:aeacf85cf4c8e40f5d1a3709ed7f2a7f466f78787e56780ec321f0db6bc1a53a
Status: Downloaded newer image for docker/sandbox-templates:claude-code
✓ Created sandbox 'claude-NetEscapades.EnumGenerators'
  Workspace: D:\repos\oss\NetEscapades.EnumGenerators (direct mount)
  Agent: claude

To connect to this sandbox, run:
  sbx run claude-NetEscapades.EnumGenerators

Starting claude agent in sandbox 'claude-NetEscapades.EnumGenerators'...
Workspace: D:\repos\oss\NetEscapades.EnumGenerators
 ▐▛███▜▌   Claude Code v2.1.90
▝▜█████▛▘  Sonnet 4.6 · API Usage Billing
  ▘▘ ▝▝    /d/repos/oss/NetEscapades.EnumGenerators

  ↑ Opus now defaults to 1M context · 5x more room, same pricing

───────────────────────────────────────────────────────────────────────────────────────────
❯
───────────────────────────────────────────────────────────────────────────────────────────
  ⏵⏵ bypass permissions on (shift+tab to cycle)
And you're off to the races! You can hack away and know that the sandbox only has access to your working directory, so yes, it could delete your git repo (and there are ways to avoid that too), but that's basically the extent of the damage it can do.
Docker sandboxes currently have support for Claude Code, Codex, Copilot, Gemini, Kiro, OpenCode, and Docker Agent.
You can now set Claude to work, and it runs in --dangerously-skip-permissions mode, without needing to prompt you everytime it needs to use a tool. So at this point, you probably need to review and push/reject those changes. So it's worth thinking about how git works with sbx.
Committing changes to a git repository
There's basically 2 ways you can use sbx sandboxes:
- Direct mode
- Branch mode
In direct mode, the agent just edits files in your working directory, and commits directly to the git repository in that directory. This is the easiest to use and understand, but be aware that it has access to the whole git history, so technically the agent could end up breaking your git repo. I've never seen it, but it's important to be aware it could happen😅
In branch mode, the sbx sandbox creates a git worktree in a .sbx/ sub-folder in your root directory, and starts the agent in that sub-folder. The agent still has access to the root directory, but it means you can continue to work in the "main" working directory, or you could start additional agents working in other worktrees.
To start a sandbox in branch mode, pass the --branch flag. For example:
# agent creates a worktree at .sbx/<sandbox-name>-worktrees/my-feature
sbx run claude --branch my-feature

# agent generates its own name for the branch + worktree
sbx run claude --branch auto
Now, it's important to note that this creates the folder inside your git working directory:
├── .sbx/
│   └── claude-NetEscapades.EnumGenerators-worktrees/
│       └── my-feature/
│           ├── build/
│           ├── docs/
│           ├── samples/
│           ├── src/
│           │   ├── NetEscapades.EnumGenerators/
│           │   ├── NetEscapades.EnumGenerators.Attributes/
│           │   ├── NetEscapades.EnumGenerators.Generators/
│           │   ├── NetEscapades.EnumGenerators.Interceptors/
│           │   ├── NetEscapades.EnumGenerators.Interceptors.Attributes/
│           │   └── NetEscapades.EnumGenerators.RuntimeDependencies/
│           ├── tests/
│           │   ├── NetEscapades.EnumGenerators.Tests/
│           │   ├── NetEscapades.EnumGenerators.IntegrationTests/
│           │   ├── NetEscapades.EnumGenerators.Interceptors.IntegrationTests/
│           │   ├── NetEscapades.EnumGenerators.Benchmarks/
│           └── NetEscapades.EnumGenerators.sln
├── build/
├── docs/
├── samples/
├── src/
│   ├── NetEscapades.EnumGenerators/
│   ├── NetEscapades.EnumGenerators.Attributes/
│   ├── NetEscapades.EnumGenerators.Generators/
│   ├── NetEscapades.EnumGenerators.Interceptors/
│   ├── NetEscapades.EnumGenerators.Interceptors.Attributes/
│   └── NetEscapades.EnumGenerators.RuntimeDependencies/
├── tests/
│   ├── NetEscapades.EnumGenerators.Tests/
│   ├── NetEscapades.EnumGenerators.IntegrationTests/
│   ├── NetEscapades.EnumGenerators.Interceptors.IntegrationTests/
│   ├── NetEscapades.EnumGenerators.Benchmarks/
└── NetEscapades.EnumGenerators.sln
That's a bit of a pain in general, because that whole working directory shows up in the git diff:
❯ git status
On branch my-feature
Untracked files:
  (use "git add <file>..." to include in what will be committed)
        .sbx/

nothing added to commit but untracked files present (use "git add" to track)
That means you need to add this directory to your project's .gitignore file. Or, a neater way, is to add the folder to the gitignore globally on your machine. The following PowerShell script reads the core.excludesFile setting (if it's set) and either adds the .sbx/ folder to this file, or adds it to the default location at $HOME/.config/git/ignore.
# Get the path to the default ignore file
$path = git config --global core.excludesFile
if (-not $path) { $path = "$HOME/.config/git/ignore" }

# Create the parent directory
New-Item -ItemType Directory -Force -Path (Split-Path $path) | Out-Null

# Add .sbx/ to the file
Add-Content -Path $path -Value ".sbx/"
This seems to work pretty well, but again, be aware that the agent could still screw up your git directory, because it fundamentally has access to it. So make sure you have a backup (e.g. you've pushed to a remote repository), just in case. Or alternatively, work on an entirely separate clone of the repo.
⚠️ One git workflow that won't work is creating a worktree yourself, and then running a sandbox directly in this folder. In this scenario, the agent doesn't have access to the "parent" git repository, so it won't be able to commit any changes, which is a great way to confuse both it and you 😅.
I mentioned earlier that Docker Sandboxes don't just run docker containers, they run in microVMs. However, that also means you can't get an overview of your sandboxes using docker or docker desktop. So how do you know what's going on with your sandboxes?
Getting an overview with a TUI dashboard
sbx ships with several commands for viewing and managing sandboxes:
❯ sbx --help
Docker Sandboxes creates isolated sandbox environments for AI agents, powered by Docker.

Run without a command to launch interactive mode, or pass a command for CLI usage.

Usage:
  sbx.exe
  sbx.exe [command]

Available Commands:
  completion  Generate the autocompletion script for the specified shell
  create      Create a sandbox for an agent
  exec        Execute a command inside a sandbox
  help        Help about any command
  login       Sign in to Docker
  logout      Sign out of Docker
  ls          List sandboxes
  policy      Manage sandbox policies
  ports       Manage sandbox port publishing
  reset       Reset all sandboxes and clean up state
  rm          Remove one or more sandboxes
  run         Run an agent in a sandbox
  save        Save a snapshot of the sandbox as a template
  secret      Manage stored secrets
  stop        Stop one or more sandboxes without removing them
  version     Show Docker Sandboxes version information
but there's also a neat "dashboard" view, which you can start by running sbx without any arguments (once you login for the first time):
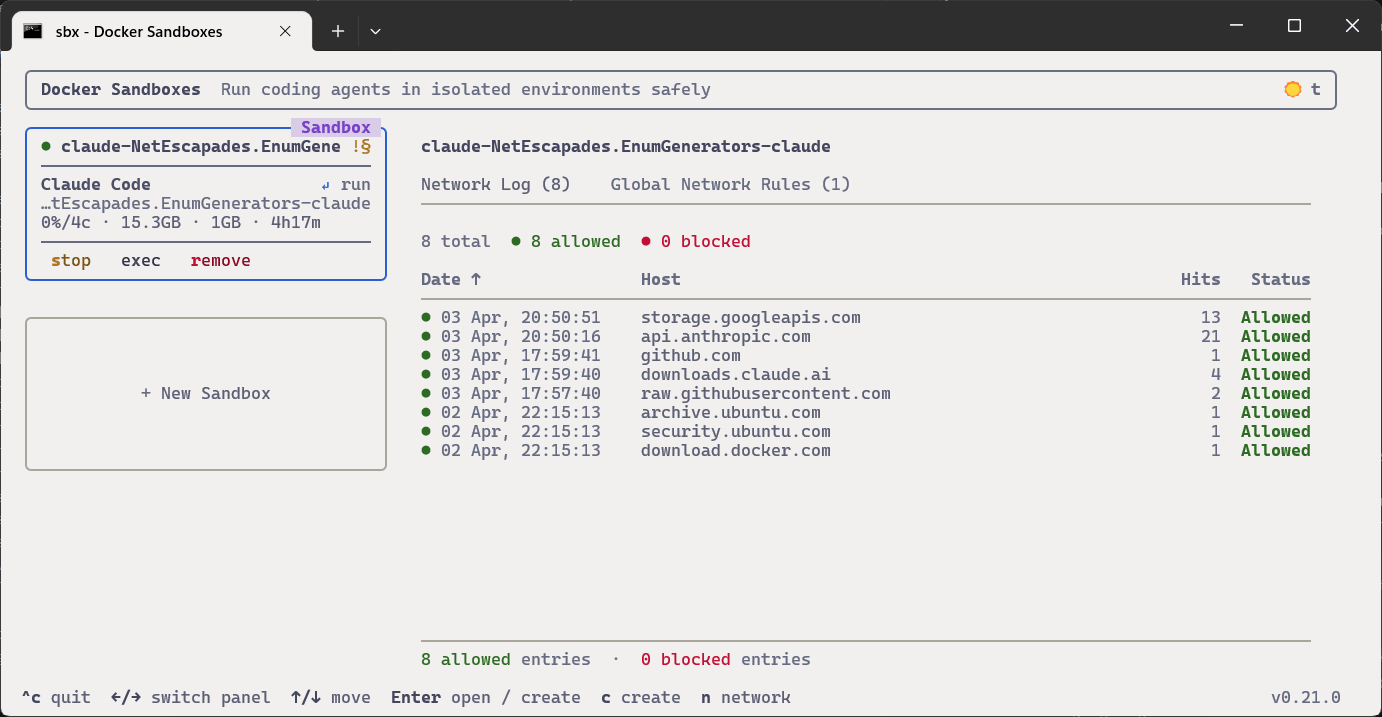
This dashboard shows each of your running sandboxes, the resources they're using, the network requests they're making, and the global network rules. It's a neat little TUI you can use to get an overview of your sandboxes!
With that, you should have most of the basics ready for working safely with agents in a sandbox! In the next post I'll look at how you can run custom templates in your sandbox instead of the default template, but before we leave, it's worth highlighting some of the limitations.
So what's the catch?
Before the release of sbx, there was a Docker Desktop based version of Docker Sandbox that worked pretty much the same way as sbx in many ways. But it had a massive limitation; it was limited to using a maximum of 4GB of memory, and was not configurable. For large projects, this proved to be a big issue, making it virtually unusable for me. Luckily, that's not the case with sbx, which has a --memory option to control this, and defaults to 50% of host memory.
One thing I haven't figured out yet is how to get commit signing work. I use 1Password to sign my commits, which runs an ssh-agent.exe for commit signing. But I haven't worked out how to share that into the sandbox. As a workaround, I've settled for letting the sandbox create unsigned commits. Then, once it's all finished, on the host side I do a simple rebase, which then signs all the commits. It's a bit annoying, but not the end of the world. If you know of a workaround, I'd love to hear about it!
Another tricky point is the network policies. It looks like a nice way to limit the blast radius of a rogue agent, but I feel like I'd always be running into limitations, trying to curate the policies. Seems like a useful "organisation policy" level control, but frankly I'm probably just going to run it in open mode. The sandbox ensures the agent can't mess up my system, and as it doesn't have access to any of my keys or private data, I'm not too worried about what sites it tries to access.
The final issue is performance, which has, unfortunately, been the deal breaker for me in many cases. Even for simple projects, I've found that the performance hit from running in a sandbox can be crippling. I only recently ran into this issue (I swear it wasn't so much of an issue a couple of weeks ago), so I'm hoping it's something that will be addressed soon😬
Summary
In this post I described how to use the docker sandbox tool sbx to run AI coding agents in a sandbox. Using a sandbox means you can run the tools in yolo or --dangerously-skip-permissions mode, so you don't have to babysit it constantly. I've found this greatly increases velocity, and running in a sandbox removes the sense of uneasiness that I get whenever I choose to live dangerously on my machine! This post describes how to set up the sbx tool, discusses the network policy architecture, and how to commit to git. In the next post I'll describe how to create custom templates, which can be useful if you have specific tools you need installed in the sandbox for the agent to work with.