
ASP.NET Core Identity is a membership system that adds login and user functionality to ASP.NET Core apps. It includes many features out of the box and has basic support for storing a phone number for a user. You can improve the robustness of ASP.NET Core’s phone number validation and provide a better user experience by integrating Twilio’s telephony features in your application.
By default the phone number in ASP.NET Core Identity is validated with a regular expression, but that's too basic to confirm whether the number is really valid, whether it includes the country dialling code, or whether it can receive SMS messages. You could implement improved validation using the library libphonenumber-csharp, as described in a previous Twilio blog post. Alternatively you could use various Twilio APIs to thoroughly validate the phone number, lookup details about the number (such as carrier or type), and prove ownership of the phone with a text or voice verification message.
Multiple stages of validation are required to determine if a phone number can be associated with an application user for a specific purpose, but I'll only be looking at the first step in this post: ensuring a number is valid for a specific country and determining if it is likely to be able to receive text messages. Twilio's Lookup API can provide this functionality in a Razor Pages app that uses ASP.NET Core Identity for user management.
Prerequisites
To follow along with this post you'll need
- A Twilio account (sign up for a free Twilio account here)
- .NET Core 2.2 SDK (version 2.2.102 or greater)
- VS Code, Visual Studio 2017, or other editor
- A familiarity with Razor Pages (see my previous post for an introduction to Razor Pages)
You can find the complete code for this post on GitHub.
Data validation in ASP.NET Core Razor Pages
Razor Pages is a new aspect of ASP.NET Core MVC that was introduced in ASP.NET Core 2.0. It's very similar to the traditional Model-View-controller (MVC) pattern commonly used in ASP.NET Core, but uses a "page-based" approach. See my previous post for an introduction on Razor Pages, and how they differ from ASP.NET Core MVC.
Razor Pages uses the same model binding and model validation processes as MVC, but applies them to a "Page Model" instead of action method parameters. For example, [Required], and [EmailAddress] are validation attributes that check the value of the InputModel.Email property is correct.
public partial class IndexModel : PageModel
{
    [BindProperty]
    public InputModel Input { get; set; }

    public class InputModel
    {
        [Required]
        [EmailAddress]
        public string Email { get; set; }
    }
}
These attributes are found in the System.ComponentModel.DataAnnotations namespace, which includes a [Phone] attribute for validating phone numbers. Unfortunately, this attribute is simplistic and doesn't take into account the highly complex set of rules and exceptions that apply to phone numbers.
For better validation you could use the open source library that Google created and uses for validating phone numbers: libphonenumber. There's a C# port of the library, libphonenumber-csharp, that you can install in your application using the NuGet package. This post on the Twilio blog shows how to use it in your applications.
Alternatively, you could use the Twilio Lookup API to validate phone numbers. This uses the same libphonenumber validation library behind the scenes, but it can also provide extra details such as carrier information (in the US), the type of the phone number (landline/mobile/VOIP), or details of suspected fraud associated with the number.
In this post I'll show how you can use the Twilio Lookup API in a new Razor Pages app to validate the optional phone number provided by users. We'll validate that the number the user entered is valid for their selected country, that it can likely receive SMS messages, and, if so, we'll save the number in the standard E.164 format.
Customizing ASP.NET Core Identity Razor Pages
In older versions of ASP.NET Core, creating a new MVC or Razor Pages app using the ASP.NET Core Identity templates would dump thousands of lines of code into your app. That changed in ASP.NET Core 2.1 with the introduction of Razor Class Libraries.
Razor Class Libraries allow you to bundle views, Razor Pages, and View Components into a NuGet package. To include the UI elements in an app, you simply reference the NuGet package. All of the Razor Pages from the library will then be available in your app with no additional work required on your side.
This is how ASP.NET Core Identity ships now. When you create a new ASP.NET Core app with Identity, your project directory will be virtually empty instead of having thousands of files. That's generally a good thing—you don't have to manage the infrastructure code or keep it up to date.
The obvious downside is that if you want to customize the default experience, for example to improve phone validation like we are, you can't just start updating the code. Luckily, Razor Class Libraries let you override any of the included views or Razor Pages by placing a Page at the same path in your application.
ASP.NET Core provides tools for scaffolding these "override" files for ASP.NET Core Identity. The Identity scaffolder is built into Visual Studio 2017, or there is a cross-platform global tool dotnet-aspnet-codegenerator you can run from the command line. I'll show how to use the global tool to scaffold the /Identity/Account/Manage page that we need to customize.
Creating the case study project
Using Visual Studio 2017+ or the .NET CLI, create a new solution and project with the following characteristics:
- Type: ASP.NET Core 2.2 Web Application (not MVC) with Visual C#
- Name: ValidatePhoneNumberDemo
- Solution directory
- Git repository
- https
- Authentication: Individual user accounts, Store user accounts in-app
ASP.NET Core Identity uses Entity Framework Core to store the users in the database, so be sure to run the database migrations after building your app:
dotnet ef database update
Using the .NET CLI to scaffold Identity pages
Install the aspnet-codegenerator global tool. Note that there is a bug in the latest version of the tool at the time of writing (2.2.0), so the following installs the last known good version (2.1.6).
dotnet tool install -g dotnet-aspnet-codegenerator --version 2.1.6
The Microsoft.VisualStudio.Web.CodeGeneration.Design NuGet is required by the aspnet-codegenerator global tool so, install it in to into your project using the NuGet Package Manager, Package Manager Console CLI, or by editing the the ValidatePhoneNumberDemo.csproj file. Be sure to set the PrivateAssets attribute to All, so that the package is used only during development.
<PackageReference Include="Microsoft.VisualStudio.Web.CodeGeneration.Design" Version="2.2.1" PrivateAssets="All" />
Open a console window inside your app's project folder (not the solution folder). Run the scaffolding tool to generate the Account.Manage.Index Razor Page. As well as listing the files to generate, you need to specify the full name of the EF Core DB Context for your project.
dotnet aspnet-codegenerator identity --files Account.Manage.Index -dc ValidatePhoneNumberDemo.Data.ApplicationDbContext
The scaffolder should complete in a few seconds, and afterwards you'll see new files in your project. The scaffolder generates the requested file, plus layout view files and partials.
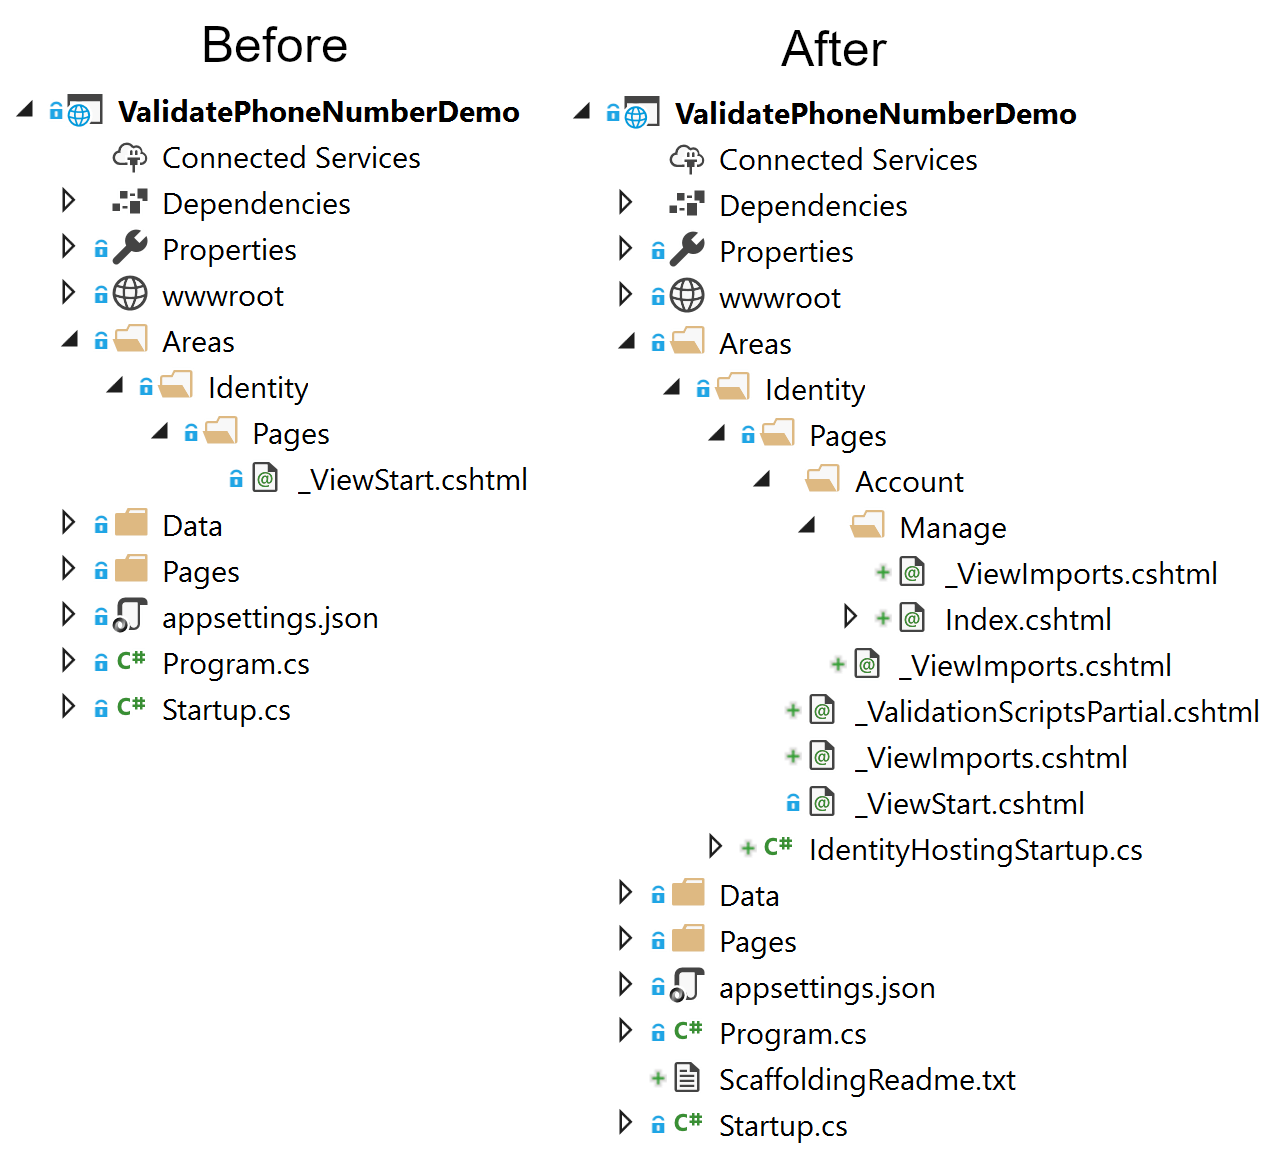
You can view a list of all possible pages to generate using dotnet aspnet-codegenerator identity --listFiles.
Once your app is running, explore the existing phone number validation for users in ASP.NET Core Identity
- Register a new user by clicking Register from the menu bar
- Enter an email and password
- Click Hello <email>! from the menu bar to see the profile/manage account page, or navigate to
/Account/Manage - Try saving various phone numbers to see what's valid. Hint:
0is apparently a valid phone number!
Initializing the Twilio API
We'll be using the Twilio helper library to simplify calling the Twilio HTTP API. Install the Twilio NuGet package (version 5.22.0 or later) using the NuGet Package Manager, Package Manager Console CLI, or by editing the ValidatePhoneNumberDemo.csproj file. After using any of these methods the <ItemGroup> section of the project file should look like this (version numbers may be higher):
<ItemGroup>
  <PackageReference Include="Microsoft.AspNetCore.App"/>
  <PackageReference Include="Microsoft.AspNetCore.Razor.Design" Version="2.2.0" PrivateAssets="All" />
  <PackageReference Include="Microsoft.VisualStudio.Web.CodeGeneration.Design" Version="2.2.1" PrivateAssets="All" />
  <PackageReference Include="Twilio" Version="5.22.0" />
</ItemGroup>
To call the Twilio API you'll need your Twilio Account Sid and Auth Token (found in the Twilio Dashboard). When developing locally these should be stored using the Secrets Manager so they don't get accidentally committed to your source code repository. You can read about how and why to do that in this post on the Twilio Blog. Your resulting Secrets.json should look something like this:
"TwilioAccountDetails": {
  "AccountSID": "ACxxxxxxxxxxxxxxxxxxxxxxxxxxxxxxxx",
  "AuthToken": "your_auth_token"
}
The Twilio helper libraries use a singleton instance of the Twilio client, which means you only need to set it up once in your app. The best place to configure things like this are in the Startup.cs file. Add using Twilio; at the top of Startup.cs, and add the following at the end of ConfigureServices:
public void ConfigureServices(IServiceCollection services)
{
    // existing configuration

    var accountSid = Configuration["TwilioAccountDetails:AccountSID"];
    var authToken = Configuration["TwilioAccountDetails:AuthToken"];
    TwilioClient.Init(accountSid, authToken);
}
This sets up the static Twilio client using your credentials using the ASP.NET Core configuration system. If you need to customize the requests made to Twilio (e.g. using a proxy server), or want to make use of HttpClientFactory features introduced in ASP.NET Core 2.1, see my previous post on the Twilio blog for an alternative approach.
An inconvenient truth: phone numbers are hard
As any developer who has had the (dis-)pleasure of working with time zones will know; time zones are hard. Unfortunately, phone numbers are hard too! There's a great number of misconceptions that developers have to tackle when they really start working with phone numbers. This document from the libphonenumber library on Falsehoods Programmers Believe About Phone Numbers is a great introduction.
One such problem is that different countries have different rules about what constitutes a valid phone number. So to unambiguously validate a phone number you need to know the country in which it was issued. See the falsehoods document linked above for some examples of why that's necessary.
In order to correctly validate the provided phone number, we need users to choose the issuing country at the same time. That means when we validate the phone number with Twilio we can include the 2-digit ISO 3166 country code, and confirm whether the phone number is valid specifically for that country.
Adding a country code dropdown
We'll add a dropdown of countries to the ASP.NET Core Identity management page to make it easy for users to choose the appropriate country code.
To build the dropdown, we'll load this list of countries from a JSON file countries.json stored in the project folder. A snippet of the file is shown below; you can find a complete file in the sample here.
Ellipsis (“...”) in code blocks represents a section redacted for brevity.
[
    {
        "Text": "United States of America",
        "Value": "US"
    },
    {
        "Text": "United Kingdom of Great Britain and Northern Ireland",
        "Value": "GB"
    },
    {
        "Text": "Canada",
        "Value": "CA"
    },
...
]
Next, we'll create a service to load the JSON file, and convert it into a List<SelectListItem>. Create the CountryService.cs file in the root of your project and add the following code:
using System;
using System.Collections.Generic;
using System.IO;
using Microsoft.AspNetCore.Hosting;
using Microsoft.AspNetCore.Mvc.Rendering;
using Newtonsoft.Json;

namespace ValidatePhoneNumberDemo
{
    public class CountryService
    {
        private readonly IHostingEnvironment _environment;
        private readonly Lazy<List<SelectListItem>> _countries;

        public CountryService(IHostingEnvironment environment)
        {
            _environment = environment;
            _countries = new Lazy<List<SelectListItem>>(LoadCountries);
        }

        public List<SelectListItem> GetCountries()
        {
            return _countries.Value;
        }

        private List<SelectListItem> LoadCountries()
        {
            var fileInfo = _environment.ContentRootFileProvider.GetFileInfo("countries.json");

            using (var stream = fileInfo.CreateReadStream())
            using (var streamReader = new StreamReader(stream))
            using (var jsonTextReader = new JsonTextReader(streamReader))
            {
                var serializer = new JsonSerializer();
                return serializer.Deserialize<List<SelectListItem>>(jsonTextReader);
            }
        }
    }
}
This service uses Lazy<> to provide lazy initialization, an optimization that only loads the countries from the JSON file once, when they’re needed, in a thread-safe manner. It also uses the streaming support of Newtonsoft.Json to deserialize the contents directly to a List<SelectListItem>, instead of loading it as a string first. The deserialized list of countries is exposed via the GetCountries() method.
In order to use the CountryService you must register it with the app's dependency injection (DI) container. Open up Startup.cs and add the following line at the end of the ConfigureServices method:
services.AddSingleton<CountryService>();
This registers the service with the DI container as a singleton so we can inject it into our Razor Page. Open the code behind for the account management Razor Page at Areas\Identity\Pages\Account\Manage\Index.cshtml.cs, add using Microsoft.AspNetCore.Mvc.Rendering; at the top of the file, and inject an instance of CountryService into the constructor. Create a new property AvailableCountries on your page model and use the injected CountryService to assign the list of countries. Note that if you're using Visual Studio, you need to expand the Index.cshtml file node in Solution Explorer to see the code-behind file, Index.cshtml.cs.
namespace ValidatePhoneNumberDemo.Areas.Identity.Pages.Account.Manage
{
    public partial class IndexModel : PageModel
    {
        public IndexModel(
            UserManager<IdentityUser> userManager,
            SignInManager<IdentityUser> signInManager,
            IEmailSender emailSender,
            CountryService countryService)
        {
            _userManager = userManager;
            _signInManager = signInManager;
            _emailSender = emailSender;
            // Load the countries from the service
            AvailableCountries = countryService.GetCountries();
        }

        public List<SelectListItem> AvailableCountries { get; }
        ...
    }
}
Our page model now has the list of available countries so we can populate the dropdown, but we also need somewhere to store the user's selection. Update the nested InputModel and add the PhoneNumberCountryCode property:
namespace ValidatePhoneNumberDemo.Areas.Identity.Pages.Account.Manage
{
    public partial class IndexModel : PageModel
    {
        public class InputModel
        {
            [Required]
            [EmailAddress]
            public string Email { get; set; }

            [Phone]
            [Display(Name = "Phone number")]
            public string PhoneNumber { get; set; }

            // The country selected by the user.
            [Display(Name = "Phone number country")]
            public string PhoneNumberCountryCode { get; set; }
        }
    }
}
Finally, add the following Razor to Areas\Identity\Pages\Account\Manage\Index.cshtml, just above the Razor code for the phone number input.
<div class="form-group">
    <label asp-for="Input.PhoneNumberCountryCode"></label>
    <select asp-for="Input.PhoneNumberCountryCode" asp-items="Model.AvailableCountries" class="form-control"></select>
    <span asp-validation-for="Input.PhoneNumberCountryCode" class="text-danger"></span>
</div>
This Razor uses the Select Tag Helper to generate a <select> element populated with the values in the AvailableCountries property, which binds to the Input.PhoneNumberCountryCode property on form POST. If you run your app now and navigate to the account management page, you should see the country dropdown displayed above the phone number option.
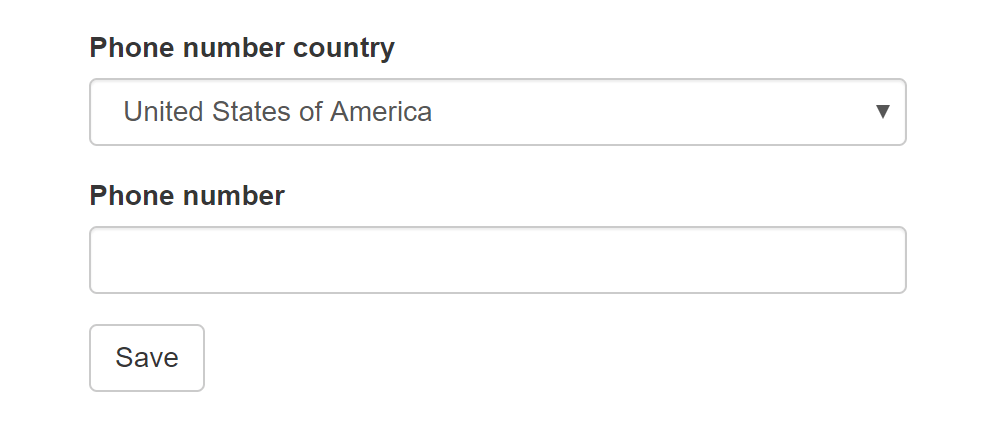
In this example, we don't have a "none" or "unselected" option in the <select> element. Consequently, the first item is selected and sent back to the user. That's OK for our purposes, but a more comprehensive approach might be to select the default country based on the user's location.
Adding phone number validation using the Twilio Lookup API
At this point we have everything in place to add our extra validation; we have the Twilio client configured, the CountryService loading our list of country codes, and our dropdown for the user to select their country. Now we'll add the validation call to the Twilio API.
Open Index.chstml.cs and add the following namespace using statements:
using Twilio.Exceptions;
using Twilio.Rest.Lookups.V1;
Now replace the following code found inside OnPostAsync:
...
var phoneNumber = await _userManager.GetPhoneNumberAsync(user);
if (Input.PhoneNumber != phoneNumber)
{
    var setPhoneResult = await _userManager.SetPhoneNumberAsync(user, Input.PhoneNumber);
    if (!setPhoneResult.Succeeded)
    {
        var userId = await _userManager.GetUserIdAsync(user);
        throw new InvalidOperationException($"Unexpected error occurred setting phone number for user with ID '{userId}'.");
    }
}
...
with our updated validation code. Take care to preserve the code both above and below the snippet that you're replacing:
...
var phoneNumber = await _userManager.GetPhoneNumberAsync(user);
if (Input.PhoneNumber != phoneNumber)
{
    try
    {
        var numberDetails = await PhoneNumberResource.FetchAsync(
            pathPhoneNumber: new Twilio.Types.PhoneNumber(Input.PhoneNumber),
            countryCode: Input.PhoneNumberCountryCode,
            type: new List<string> { "carrier" });

        // only allow user to set phone number if capable of receiving SMS
        var phoneNumberType = numberDetails.GetPhoneNumberType();
        if (phoneNumberType != null
            && phoneNumberType == PhoneNumberResource.TypeEnum.Landline)
        {
            ModelState.AddModelError($"{nameof(Input)}.{nameof(Input.PhoneNumber)}",
                $"The number you entered does not appear to be capable of receiving SMS ({phoneNumberType}). Please enter a different value and try again");
            return Page();
        }

        var numberToSave = numberDetails.PhoneNumber.ToString();
        var setPhoneResult = await _userManager.SetPhoneNumberAsync(user, numberToSave);
        if (!setPhoneResult.Succeeded)
        {
            var userId = await _userManager.GetUserIdAsync(user);
            throw new InvalidOperationException($"Unexpected error occurred setting phone number for user with ID '{userId}'.");
        }
    }
    catch (ApiException ex)
    {
        ModelState.AddModelError($"{nameof(Input)}.{nameof(Input.PhoneNumber)}",
            $"The number you entered was not valid (Twilio code {ex.Code}), please check it and try again");
        return Page();
    }
}
...
That's a lot of code to digest, so I'll walk through it below.
Before we do anything with the phone number, we load the existing number for the Identity user and check whether it's changed. If the number hasn't changed, there's no need to validate it, call the Twilio API, or update the value.
var phoneNumber = await _userManager.GetPhoneNumberAsync(user);
if (Input.PhoneNumber != phoneNumber)
{
    // Phone number has changed, so validate and save it
}
If the number has changed, we need to validate the value using the Twilio Lookup API. We use the PhoneNumberResource helper to make an asynchronous call to the Twilio API, passing in the PhoneNumber and PhoneNumberCountryCode from the InputModel. We wrap the call in a try-catch block, as it will throw an exception if it's invalid. In that case we display a generic error and redisplay the form. You could also log the exception, but be wary of storing personally identifiable information (PII) in log messages.
try
{
    var numberDetails = await PhoneNumberResource.FetchAsync(
        pathPhoneNumber: new Twilio.Types.PhoneNumber(Input.PhoneNumber),
        countryCode: Input.PhoneNumberCountryCode,
        type: new List<string> { "carrier" });

    // validation successful
}
catch (ApiException ex)
{
    ModelState.AddModelError($"{nameof(Input)}.{nameof(Input.PhoneNumber)}",
            $"The number you entered was not valid (Twilio code {ex.Code}), please check it and try again");
    return Page();
}
Note that we've added the error as a property error by including the field name in the call to AddModelError(). That means the error will be shown next to the phone number field, as well as in the Validation Summary Tag Helper by default. I've also included the Twilio code in the error message for demonstration purposes. In practice you probably won't want to expose that to users, but you may well want to use it for logging and metric purposes.
As well as validating the number, in this example we also requested the carrier information for the number by passing "carrier" to the type parameter of FetchAsync(). This is not necessary for the validation itself, but it can provide some useful additional information for some business use-cases. Including the "carrier" also returns the likely phone number type of the number.
We extract the phone number type from the response, taking care to handle nulls and missing values. The phone number type has one of three string values: landline, mobile, or voip. We use that value to try and determine if the number can receive SMS. If it can't, we redisplay the form and make the user enter a different value.
// only allow user to set phone number if capable of receiving SMS
var phoneNumberType = numberDetails.GetPhoneNumberType();
if (phoneNumberType != null
    && phoneNumberType == PhoneNumberResource.TypeEnum.Landline)
{
    ModelState.AddModelError($"{nameof(Input)}.{nameof(Input.PhoneNumber)}",
        $"The number you entered does not appear to be capable of receiving SMS ({phoneNumberType}). Please enter a different value and try again");
    return Page();
}
This behavior may be undesirable in many cases; a better approach might be to return a warning, but still save the number. In any case, the only way to be sure whether the number can receive SMS or voice is to try to message or call it, using the Twilio Verify API for example.
Once we've validated the phone number with Twilio's API and confirmed it's not a landline number, we save the phone number to the Identity user. This code is essentially the same as before we added our customizations with one exception—instead of saving the number as it was entered by the user, we store the number formatted in E.164 format. This has the benefit of not requiring us to store the country code (as it's contained in the formatted number).
var numberToSave = numberDetails.PhoneNumber.ToString();
var setPhoneResult = await _userManager.SetPhoneNumberAsync(user, numberToSave);
if (!setPhoneResult.Succeeded)
{
    var userId = await _userManager.GetUserIdAsync(user);
    throw new InvalidOperationException($"Unexpected error occurred setting phone number for user with ID '{userId}'.");
}
With this code in place you can test out the validation in your own app. When a number fails Twilio's validation, you will see the error message shown below on the top left. When it passes validation but is a landline, you'll see the error message on the bottom left. Finally, when it passes all validation and is not a landline, you'll see the number is updated to the E.164 format (the +1 format) as shown on the right.

The extension method for extracting the phone number type from the PhoneResource object is shown below. It handles nulls, as well as cases where you may not have requested the type using the "carrier" argument.
using Twilio.Rest.Lookups.V1;

namespace ValidatePhoneNumberDemo
{
    public static class PhoneNumberResourceExtensions
    {
        public static PhoneNumberResource.TypeEnum GetPhoneNumberType(this PhoneNumberResource phoneNumber)
        {
            if (phoneNumber?.Carrier != null
                && phoneNumber.Carrier.TryGetValue("type", out string rawType))
            {
                // implicitly convert from string to PhoneNumberResource.TypeEnum
                return rawType;
            }

            return null;
        }
    }
}
It's important to remember that validating a number using libphonenumber or the Twilio Lookup API (as we did in this post) is typically only the first step in a multi stage process to verify a user controls a phone number. Before using the phone number for business purposes you should confirm the user has access to the device either by sending a verification message/phone call, using the Twilio Verify API for example.
Summary
In this post I showed how you can improve the phone number validation in ASP.NET Core Identity by using the Twilio Lookup API. I showed how to scaffold ASP.NET Core Identity pages so they can be customized using the dotnet-aspnet-codegenerator global tool, and how to load countries for a dropdown list from a JSON file. It's important to include the country when validating phone numbers as different countries have different rules.
The Twilio Lookup API uses the libphonenumber library to check the phone number is valid, but it can also return additional information like the carrier, phone number type, or fraud details. For thorough verification that the user has control of the phone number, you should consider using the Twilio Verify API to send a message/call to the phone number.
Additional Resources
For an introduction to Razor Pages, see my previous post, or the excellent resource, https://www.learnrazorpages.com/. For more information on phone numbers and why they're difficult, see The Falsehoods Programmers Believe About Phone Numbers. For a post on using the libphonenumber directly in your ASP.NET Core application, see this post on the Twilio blog.