In this post I describe why I decided to create a GitHub app, and how I built and tested a "Hello World" app using Probot and create-probot-app.
The problem and the plan
I don't have a huge number of open source projects on GitHub, but it's still tricky to keep track of them all sometimes. One thing I've found annoying is "losing" issues. It typically goes something like this:
- Someone files an issue against one of my repositories,
- I get an email notification on my phone
- I think, "hmmm, yes that's valid, I'll address that later"
- …many days pass
- Doh, totally forgot about that issue!
The problem for me is that there's nowhere to see all of the issues filed against my repos. I can see all the issues I've created from the top-level "issues" menu, or issues I've been assigned, but there's nowhere that lists all the issues I haven't responded to yet.
After (yet again) forgetting to respond to an issue I decided something had to be done. The simplest solution I could come up with was to create a GitHub app that automatically assigns me to any issues raised in my repositories. That way they'll show up by using the assigned filter in the GitHub dashboard.
A GitHub app seemed like a good solution, but on the other hand, I've never made one or really have a clue how they work. Luckily there's a handy framework designed for people just like me: Probot.
Building your first GitHub app with Probot and create-probot-app
Probot is a framework for building GitHub apps using Node.js. There's other ways to create a GitHub app, but Probot handles a lot of things for you like validating WebHooks, and authentication. It makes getting started relatively simple. For the rest of this post I'll describe how I created my first app to auto-assign issues to the repository owner.
Generally speaking I just followed the guide from the Probot docs. This post just fills in some of the gaps!
1. Install the prerequisites
Probot apps use Node.js, so the first thing to do is install Node. I'm using version 10.12.0 currently, but be aware that I ran into an issue scaffolding my app. It's not a big deal, but it did threw me off initially, so just be aware there may be issues with versions of Node.
As an extra bonus, I use Node Version Manager (nvm) for Windows to manage my Node installs. I highly recommend it - it lets you do side-by-side installs of Node (though only one version of Node can be active at a time).
Once you have Node installed, create a new folder for your app, and initialise a new (empty) Git repo by running git init.
2. Execute create-probot-app
We're going to be using the create-probot-app tool to scaffold out our GitHub app. This tool lets you select from some pre-defined templates for GitHub apps to get your started quickly.
The create-probot-app tool is an npx package. npx is a package runner for npm. Instead of having to install a tool from npm in order to use it, npx allows you to download and immediately run command line tools. It's useful when you want to run one-off commands.
Execute the create-probot-app tool, and provide the name of the folder to generate the app in. My app is called auto-assign-issues so I typed:
npx create-probot-app auto-assign-issues
You'll have to wait a little while while npm downloads the create-probot-app program and executes it. Once the app executes, You'll be presented with a series of questions, that are used to generate the template. Don't worry if you get anything wrong, you can always do a find-and-replace in your app later if needs be! I left "Homepage" blank for example, as I haven't created a website for the app.
npx: installed 213 in 36.364s

Let's create a Probot app!
Hit enter to accept the suggestion.

? App name: auto-assign-issues
? Description of app: An app to auto-assign any issues raised in a repository to specific users
? Author’s full name: Andrew Lock
? Author’s email address: [email protected]
? Homepage:
? GitHub user or org name: andrewlock
? Repository name: probot-auto-assign-issues
? Which template would you like to use?
  basic-js
  checks-js
  git-data-js
  deploy-js
> basic-ts
Most of the questions are self explanatory, but the final question threw me a bit. You're asked to pick a template, without being told what any of them do! I did a bit of spelunking through the create-probot-app GitHub repo to figure out what's-what:
basic-js: (default). Scaffold an app that runs in response to GitHub WebHooks. When a new issue is created, the app adds a comment saying:Thanks for opening this issue!Built using JavaScript.checks-js: Scaffold an app that runs a GitHub check, for example for checking code quality or running tests. Built using JavaScript.git-data-js: Scaffold an app that uses the GitHub Git data API to create a branch, a file, and a PR. Built using JavaScript.deploy-js: Uses the GitHub Deployments API to allow you to create hooks for external cloud providers. Built using JavaScript.basic-ts: Scaffold an app that runs in response to GitHub WebHooks, with the same functionality asbasic-js. Built using TypeScript.
I chose the final option, basic-ts, as I wanted an app that would run in response to WebHooks, and I wanted to use TypeScript because, well, who wouldn't prefer that to JavaScript. 😉
Unfortunately, as I hinted earlier, whenever I ran create-probot-app I found the process would hang without completing. Files were generated, but an npm restore was never run. I filed an issue here - it looks like it's something to do with running on Windows, with different issues on different versions of Node. Yay.
3. Tweaking the templates
The template generated by create-probot-app isn't bad, but it needs a couple of tweaks:
- The template doesn't add a .gitignore file, though it's supposed to. You can copy the template file directly from the GitHub repository here (or use the example below). If you copy the template be sure to remove the entry for package-lock.json as that file should be committed.
node_modules
npm-debug.log
*.pem
.env
# This file **should** be committed
# See https://github.com/npm/npm/blob/v5.0.0/doc/files/package-lock.json.md
# package-lock.json
coverage
lib
- Fix the repository, bugs, and homepage entries in package.json. It misses out the organisation/user name in the GitHub URLs, and added some double
//. - You might want to add a tslint.json file and tweak the tsconfig.json to your liking.
4. Install the dependencies
The create-probot-app is supposed to automatically install your npm dependencies but I found that it didn't work with any version of npm that I used. Open a terminal in your project directory and install the dependencies by running:
npm i
This might update the dependencies in your package.json, and depending on the version of node you're using, may generate a package.json.lock file, to lock the package versions and give you reproducible builds.
5. Register your app with GitHub
Once you've installed the dependencies, you can test out your app by running
npm run dev
This starts up your app and provides a URL for you to navigate to to view your new GitHub app!
> nodemon --exec "npm start"
[nodemon] 1.18.9
[nodemon] to restart at any time, enter `rs`
[nodemon] watching: *.*
[nodemon] starting `npm start`
> [email protected] start C:\repos\andrewlock\probot-auto-assign-issues
> probot run ./lib/index.js
19:27:02.013Z INFO probot: Listening on http://localhost:3000
19:27:02.552Z INFO probot:
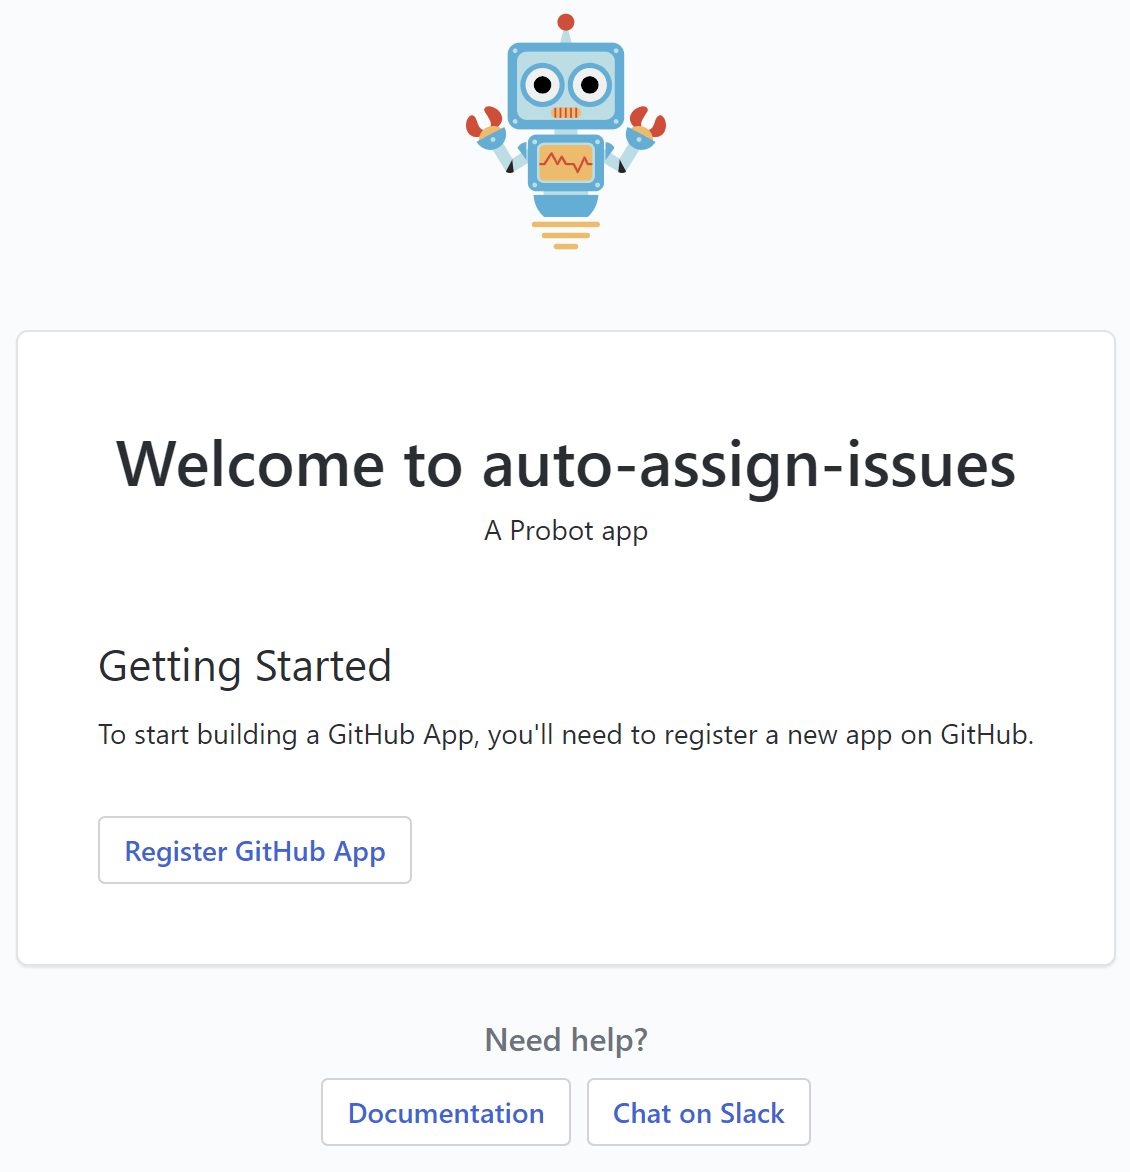
Welcome to Probot! Go to http://localhost:3000 to get started.
When you navigate to http://localhost:3000, you're presented with a welcome screen that walks you through registering your app with GitHub. Click the "Register GitHub App" button:
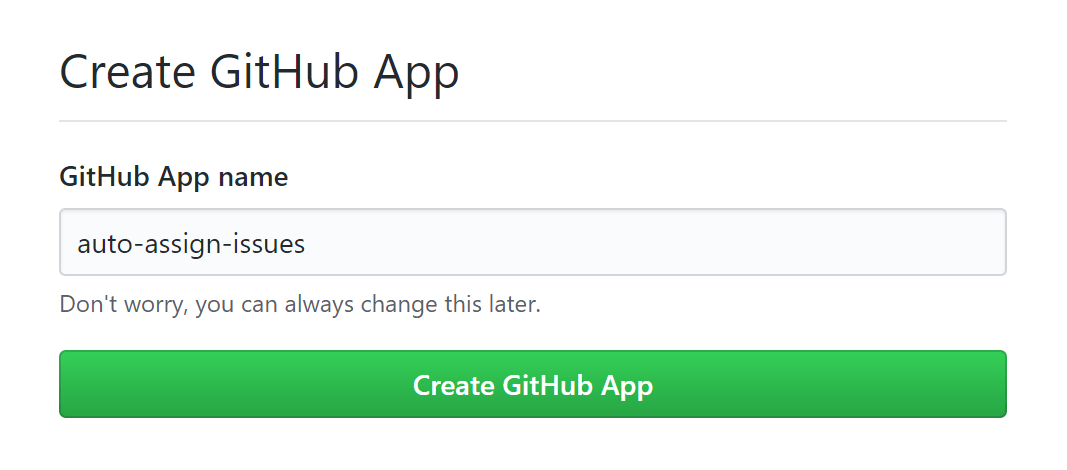
Choose a name for your new app. As the prompt says, you can always change it later, so don't agonise too long
After providing a name, GitHub will prompt you to install your new app onto your user account or onto an organisation. For obvious reasons I suggest installing into your own account first:
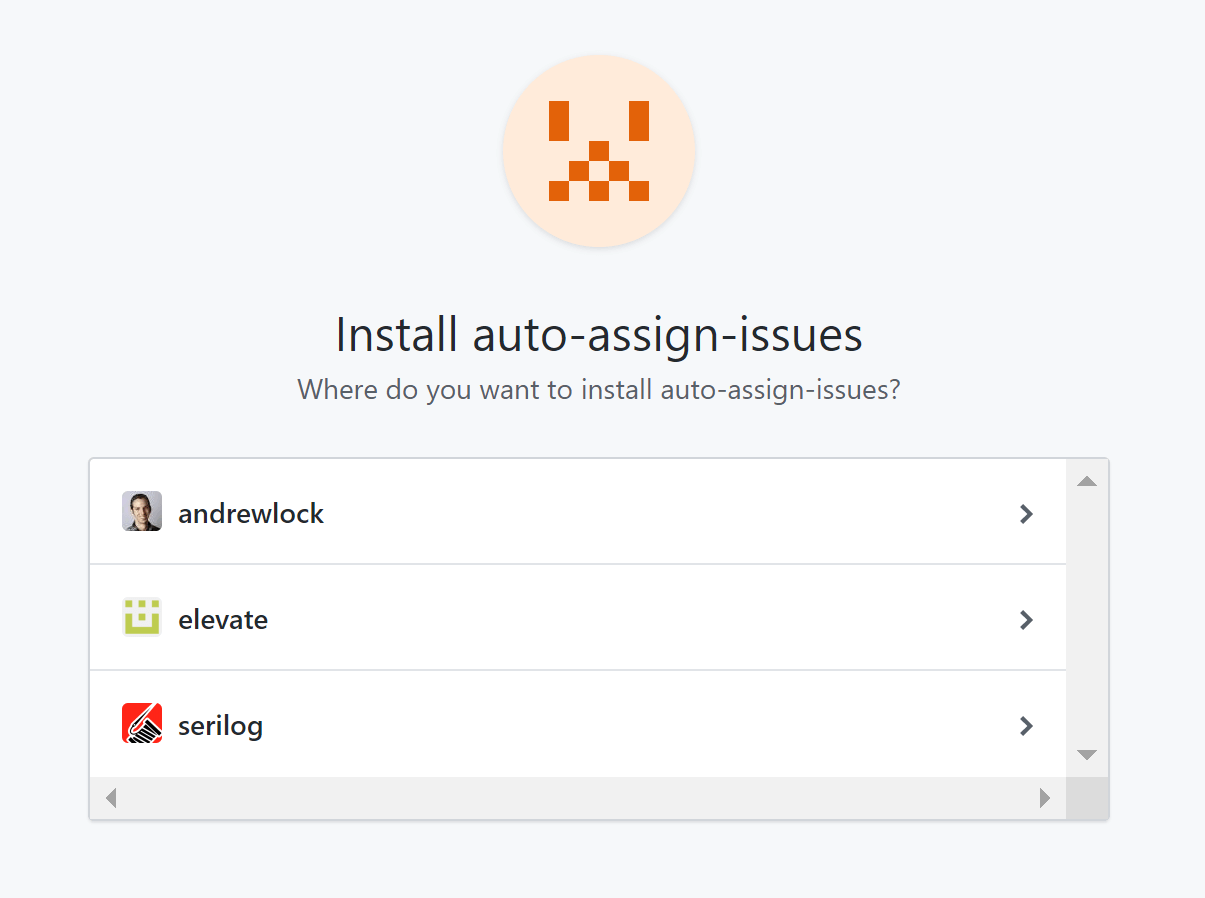
The next screen lets you choose which repositories to install the app in. You could choose to install in all repositories, but for obvious reasons I suggest installing into a small test repo initially while you're building out your app.
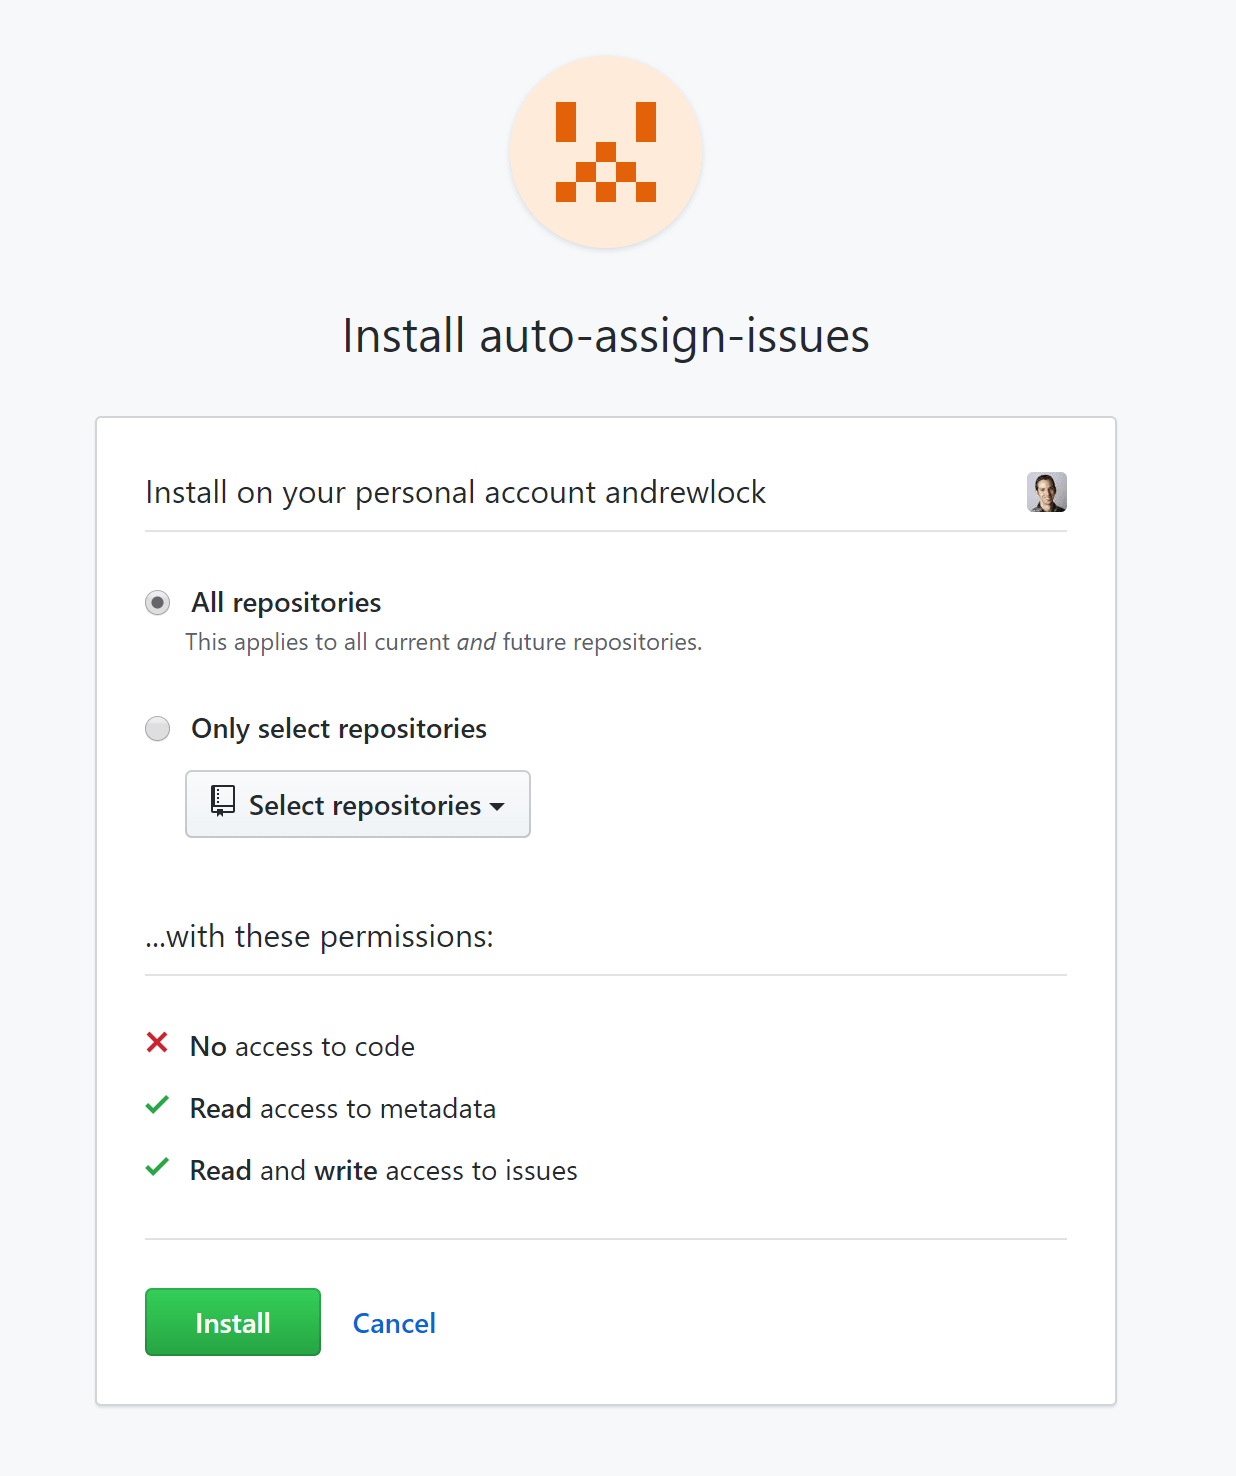
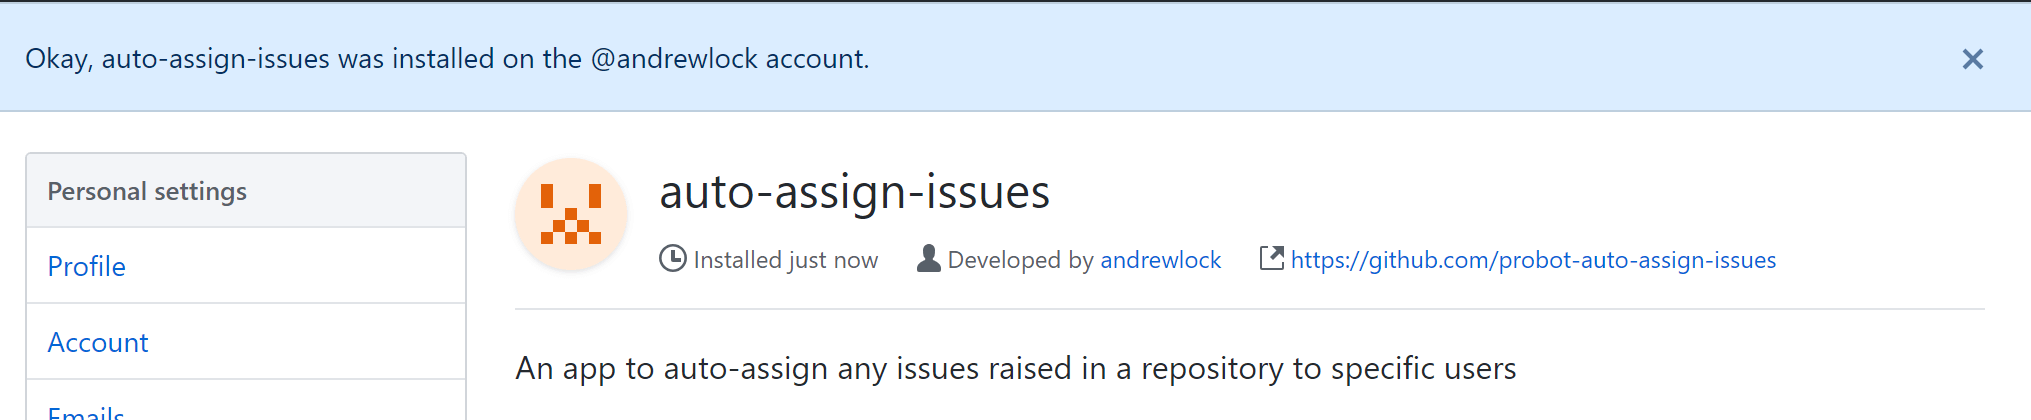
With your repositories selected, your app is installed and running on your account!
6. Testing out the app
After you've registered your app, you may notice a new .env in your repository. This file contains the credentials used by GitHub to authenticate your app, and looks something like this:
WEBHOOK_PROXY_URL=https://smee.io/NVq4QGLm5xu3
APP_ID=123456
PRIVATE_KEY="-----BEGIN RSA PRIVATE KEY-----\nMIIEowIBAAKCAQEAqTySmyd+9qLD9KFAKEFAKEFAKE
+HpzKVMFLcy\n-----END RSA PRIVATE KEY-----\n"
WEBHOOK_SECRET=1234567890abcdef16672f16f37131b
It's very important you never commit this file to your repository. If you copied the .gitignore I showed earlier then the .env file is ignored by git, but it's still worth pointing out.
As well as the authentication details, the .env file also includes the details of a https://smee.io/ URL. This acts as a proxy between GitHub and your app when you're testing with npm run dev. That means you receive real WebHook events from any repositories that have installed your app!
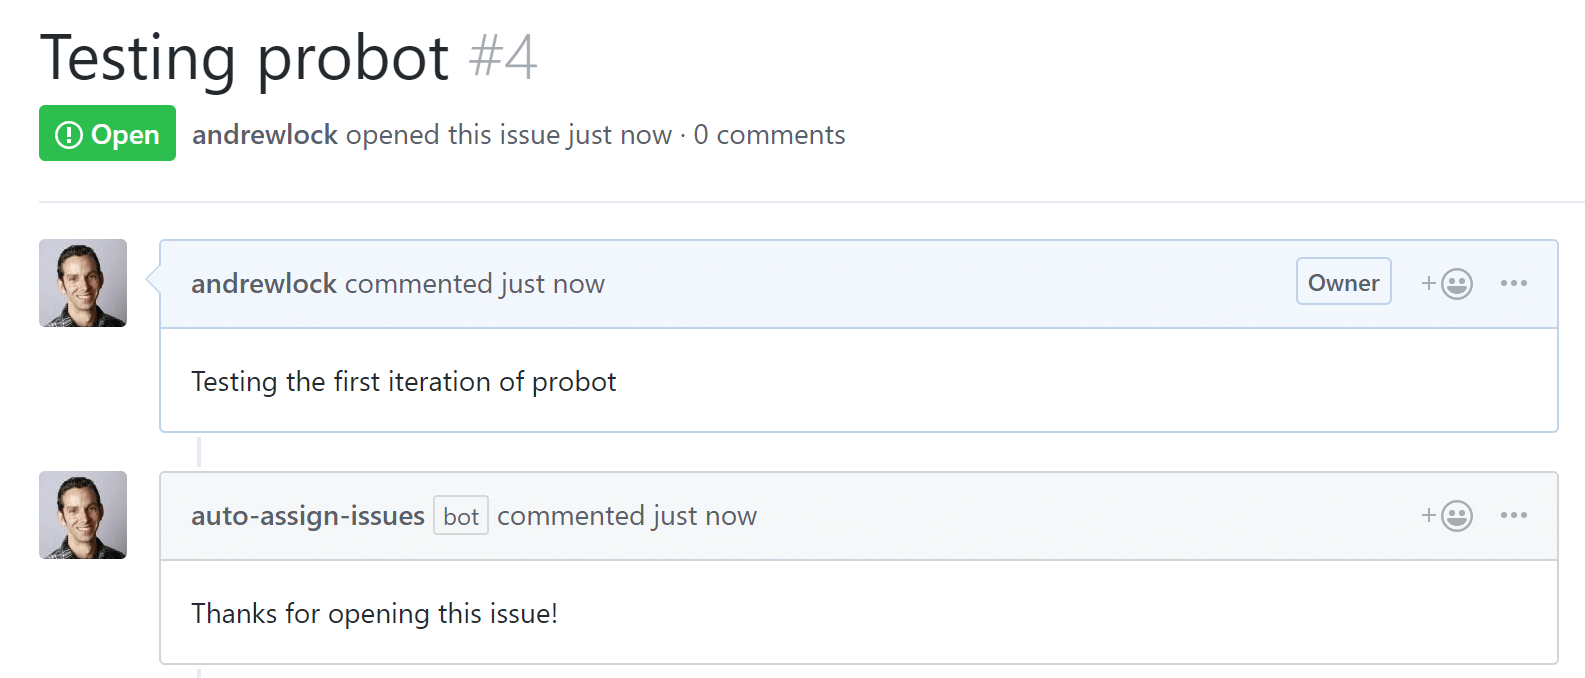
As I mentioned earlier, the default GitHub app template adds a comment to all new issues. You can try it out by raising an issue in your test repository (where you installed your app). Sure enough, shortly after creating an issue, you'll see a new WebHook event is recorded in your terminal console (where you executed npm run dev), and a comment is added to the issue!
The fact that you get live requests coming from GitHub is pretty cool. It also gives you some sample data for writing tests for your app.
That's it for this post. In the next post I'll update the app so it has the functionally I need - auto-assigning issues to me when they're raised.
Summary
In this post I described how to create a new Node.js GitHub app using Probot and the create-probot-app tool. I found a few bugs and issues generating the template, but once you have the app running locally the process is very smooth. The proxy configuration lets you receive live GitHub WebHooks when developing locally which is particularly nice!