So far in this series I've provided a general introduction to Kubernetes. In this post we get more concrete: we'll create a Helm chart for deploying a small ASP.NET Core application to Kubernetes.
Note, as always, the advice in this post is based on my experience deploying ASP.NET Core apps using Helm. If you notice something I'm doing wrong or that could be made easier please let me know in the comments!
The sample app
So that we have something concrete to work with, I've created a very basic .NET solution that consists of two projects:
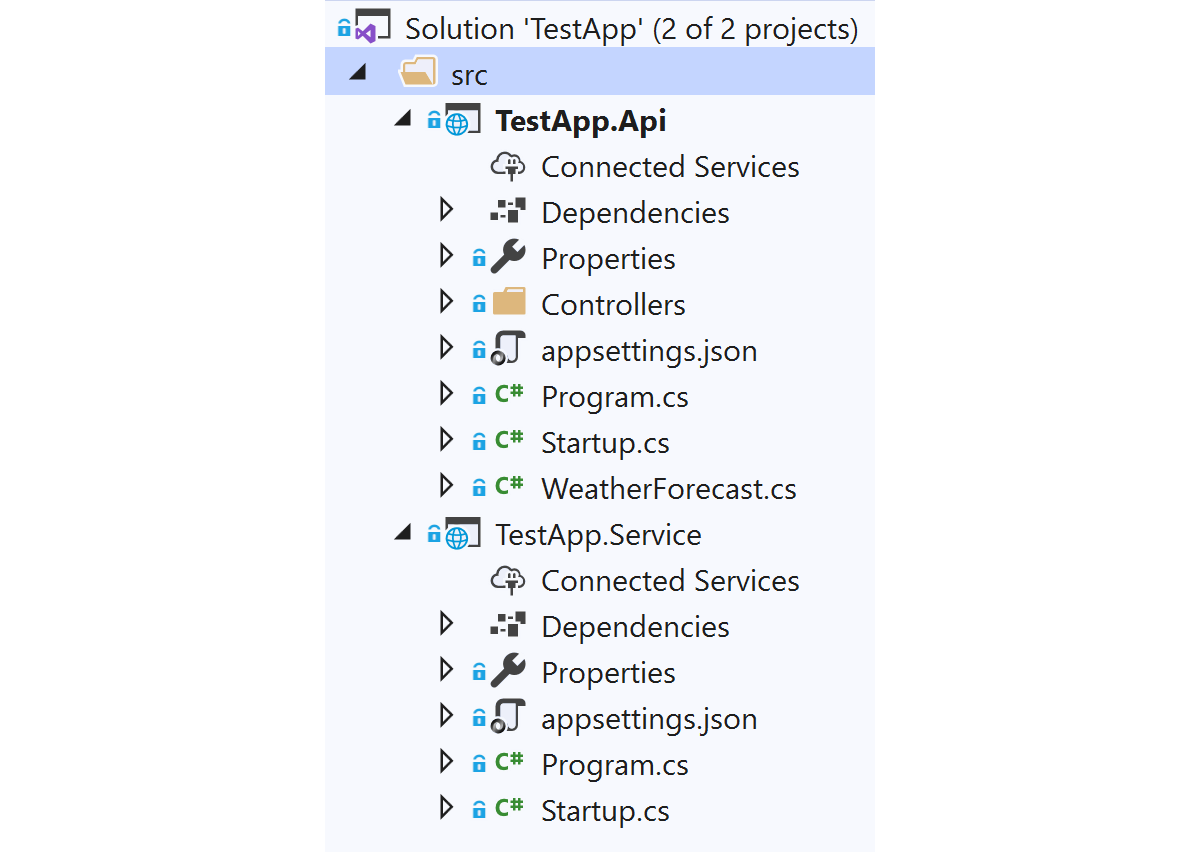
- TestApp.Api is an ASP.NET Core 3.1 app that uses API controllers (that might act as a backend for a mobile or SPA client-side app).
- TestApp.Service is an ASP.NET Core app with no MVC components. This will run as a "headless" service, handling messages from an event queue using something like NServiceBus or MassTransit.
Note that for this example I'm using an ASP.NET Core application in both cases. TestApp.Service is a good candidate for using a "worker service" template that uses the generic Host without HTTP capabilities. Until recently there were good reasons for not using the generic host, but those have been resolved now. However I still generally favour using ASP.NET Core apps over worker services, as HTTP can be very handy for exposing health check endpoints for example.
The details of the solution aren't important here, I just wanted to show a Helm chart that includes multiple apps, one of which exposes a public HTTP endpoint, and one which doesn't.
As we're going to be deploying to Kubernetes, I also added a simple Dockerfile for each app, similar to the file below. This is a very basic example, but it'll do for our case.
FROM mcr.microsoft.com/dotnet/core/sdk:3.1-alpine3.12 AS build
WORKDIR /sln
# Copy project file and restore
COPY "./src/TestApp.Service/TestApp.Service.csproj" "./src/TestApp.Service/"
RUN dotnet restore ./src/TestApp.Service/TestApp.Service.csproj
# Copy the actual source code
COPY "./src/TestApp.Service" "./src/TestApp.Service"
# Build and publish the app
RUN dotnet publish "./src/TestApp.Service/TestApp.Service.csproj" -c Release -o /app/publish
#FINAL image
FROM mcr.microsoft.com/dotnet/core/aspnet:3.1-alpine3.12
WORKDIR /app
COPY /app/publish .
ENTRYPOINT ["dotnet", "TestApp.Service.dll"]
I build and tag the docker images for each app (for the Service app below) using
docker build -f TestApp.Service.Dockerfile -t andrewlock/my-test-service:0.1.0 .
This creates the image andrewlock/my-test-service:0.1.0 on my local machine. In practice, you'd push this up to a docker repository like DockerHub or ACR, but for now I'll keep them locally.
Now that we have an app to deploy (consisting of two separate services), we'll look at how to create a Helm chart for them.
Creating the default helm charts
We'll start off by creating a Helm chart using the helm CLI. Ensure that you've installed the command line and prerequisites, and have configured your local kubectl environment to point to a Kubernetes cluster.
If you're using the latest Helm, 3.0, then Tiller is no longer required.
You can have helm scaffold a new chart for you by running helm create <chart name>. We'll create a new chart called test-app inside a solution-level directory cunningly named charts:
mkdir charts
cd charts
helm create test-app
This will scaffold a new chart using best practices for chart naming, providing, among other things a values.yaml file for configuration, an ingress, a service, and a deployment for one application (a deployment of NGINX):
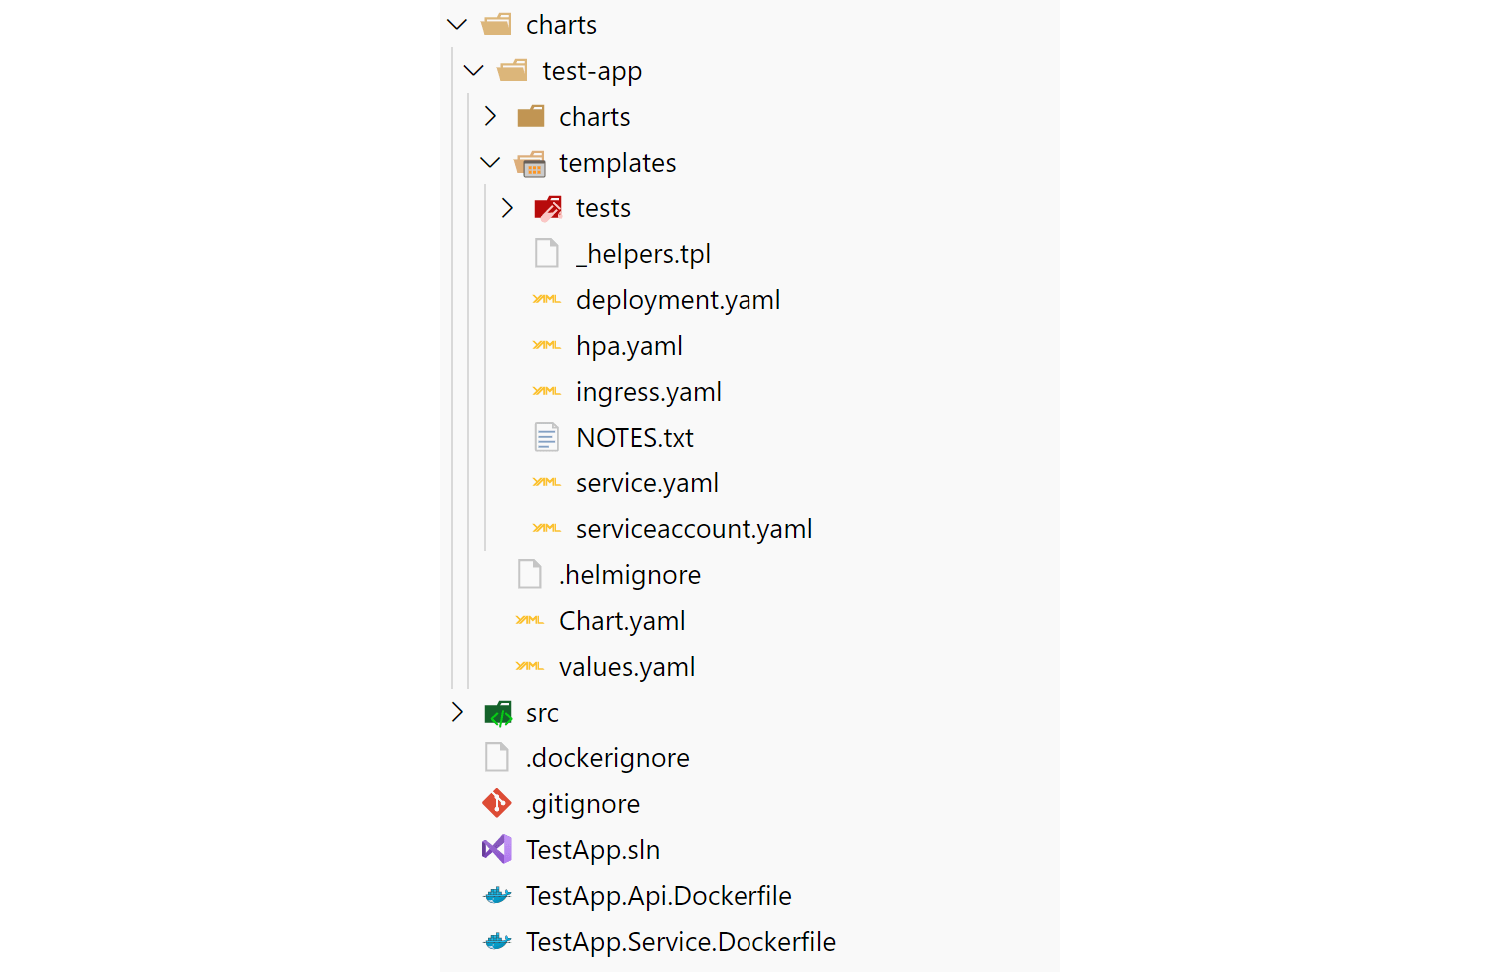
There's a few important parts to this file structure:
- The chart.yaml file includes the name, description, and version number of your app. It can also include various other metadata and requirements.
- The values.yaml file includes default values for your application that can be overridden when your chart is deployed. This includes things like port numbers, host names, docker image names etc.
- The templates folder is where the manifests that make up your chart are placed. In the sample chart the deployment, service, and ingress can be used to run an instance of NGINX.
- The charts folder is empty in the sample, but it provides one way to manage dependencies on other charts, by creating "child" charts. I'll discuss this further below.
There are also manifests for two other resources I haven't discussed yet: a Horizontal Pod Autoscaler for the deployment, and a manifest to create a Service Account. There is also a manifest for running chart tests. I won't be discussing those manifests in this series.
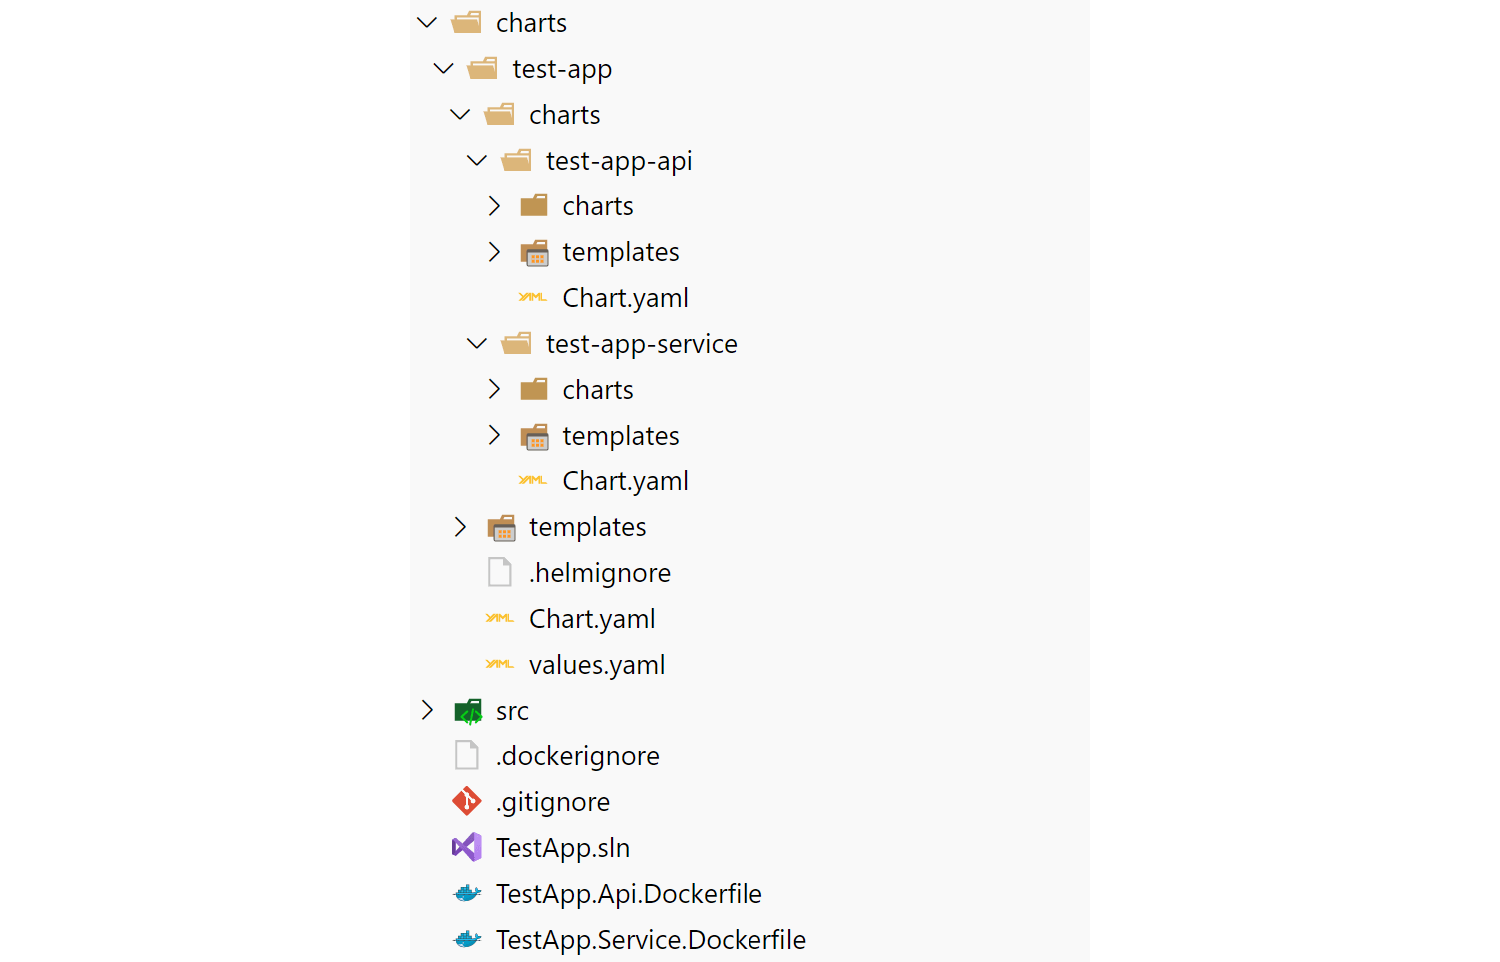
The charts directory inside a Helm chart folder can be used for manually managing chart dependencies. The structure I like to have is a top-level chart for the solution, test-app in this example, and then sub-charts for each individual "app" that I want to deploy as part of the chart. So, to scaffold the charts for the sample solution that contains two apps, I'd run the following:
# Duplicated from above
mkdir charts
cd charts
helm create test-app

cd test-app
rm -r templates/* # Remove contents of top-level templates directory
cd charts

helm create test-app-api # Create a sub-chart for the API
helm create test-app-service # Create a sub-chart for the service

 # we don't need these files for sub-charts
rm test-app-api/.helmignore test-app-api/values.yaml
rm test-app-service/.helmignore test-app-service/values.yaml

# I'm not going to deal with these for now
rm test-app-api/templates/hpa.yaml test-app-api/templates/serviceaccount.yaml
rm test-app-service/templates/hpa.yaml test-app-service/templates/serviceaccount.yaml
rm -r test-app-api/templates/tests test-app-service/templates/tests
The end result is you have something that looks like this, with sub-charts for each app under a "top-level" chart:
There's both pros and cons to using this structure for applications:
- You can deploy the "top-level" chart and it will deploy both the API and Service projects at the same time. This is convenient, but also assumes that's something you want to do. I'm assuming a level of "microservice" here that's scoped to the solution-level
- You have a lot of version numbers now - there's a version for the top-level chart and a version for each sub-chart. Whenever one of the sub-charts change, you have to bump the version number of that and the top-level chart. Yes, it's as annoying as it sounds 🙁. It's quite possible there's a better solution here I'm not aware of…
- You can share some configuration across all the sub-charts. Notice that we only have the "top-level" yaml.values file to contend with. We can provide sub-chart-specific configuration values from that file, as well as global files.
Tip: Don't include
.in your chart names, and use lower case. It just makes everything easier later, trust me.
Updating the chart for your applications
If you browse the manifests that helm created, you'll see there's a lot of placeholders and settings. It can take a while to get used to them, but in most cases the templates are optionally setting values. For example, in the deployment.yaml file, in the spec section, you'll see:
spec:
  {{- with .Values.imagePullSecrets }}
  imagePullSecrets:
    {{- toYaml . | nindent 8 }}
  {{- end }}
This section tell Helm to check if the imagePullSecrets configuration value is provided. If it is, it writes any provided values out under the imagePullSecrets section, indenting appropriately (remember, YAML is white-space sensitive).
We're just going to make the most basic changes required to get our app deployed initially. The main change we need to make is to create separate sections in the top-level values.yaml file for our two sub-charts, test-app-api and test-app-service.
You can create the values.yaml files in the sub-chart folders if you prefer, but I prefer to manage all the default values in a single top-level values.yaml file.
values.yaml sets the default values used for deploying your chart, so you can include as little or as much as you like in here and override the values at install time. For now, I'm just going to configure the basics.
The yaml file below shows two separate sections, one for our test-app-api sub-chart, and one for our test-app-service sub-chart. Settings nested in these sections are applied to their respective charts.
test-app-api:
  replicaCount: 1

  image:
    repository: andrewlock/my-test-api
    pullPolicy: IfNotPresent
    tag: ""

  service:
    type: ClusterIP
    port: 80

  ingress:
    enabled: true
    annotations:
      nginx.ingress.kubernetes.io/rewrite-target: "/"
    hosts:
      - host: chart-example.local
        paths:
        - "/my-test-app"

  autoscaling:
    enabled: false

  serviceAccount:
    create: false

test-app-service:
  replicaCount: 1

  image:
    repository: andrewlock/my-test-service
    pullPolicy: IfNotPresent
    tag: ""

  service:
    type: ClusterIP
    port: 80

  ingress:
    enabled: false

  autoscaling:
    enabled: false

  serviceAccount:
    create: false
Most of this should be fairly self-explanatory. In summary:
replicaCount: The number of replicas each deployment should have. We're only using a single replica for each service by default.image: The Docker image +tagto use when deploying your app. I've not specified thetaghere, as we'll set that at deploy time.service: The configuration for the Kubernetes service. I've just used the defaults for this.ingress: For the API, we specify the ingress details. We're going to be listening on thechart-example.localhostname, at the/my-test-appsub-path for our API. I also added the re-write annotation, so that the/my-test-appprefix is stripped from the request seen by the pod. We don't create an ingress for the backend service, as it doesn't have a public API.autoscaling: We're not using autoscaling in this exampleserviceAccount: Service accounts are for RBAC which I'm not going to discuss here.
Now you have a chart for your app, you can package it up and push it to a chart repository if you wish. I'm not going to cover that in this post, but it's something to bear in mind when setting up the CI/CD pipeline for your app. Are you going to store your charts in your application repository (I suggest you do), and how should you push updates?
Deploying a helm chart to Kubernetes
All of that work so far has been bootstrapping the chart for our application. Now it's time for the exciting bit—actually deploying the application to a cluster.
Typically you would do this by referencing a chart archive that has been pushed to a chart repository, in a manner analogous to Docker images and repositories. In this case, as we have the chart locally, we're going to install it directly from the charts/ directory.
Starting from the charts\test-app directory in your solution directory, run the following:
helm upgrade --install my-test-app-release . \
  --namespace=local \
  --set test-app-api.image.tag="0.1.0" \
  --set test-app-service.image.tag="0.1.0" \
  --debug \
  --dry-run
This does the following:
- This creates (or upgrades an existing release) using the name
my-test-app-release. I could have usedhelm install, but this keeps the command the same for subsequent deploys too - important if you come to use it in your deploy scripts. - This command ses the unpacked chart in the current directory (
.). If we had pushed to a chart repository we'd use the name of the chart here (e.g.stable/redis). - I've specified that everything should be created in the
localnamespace I have in my Kubernetes cluster - I've overridden the
test-app-api.image.tagvalue (which is currently blank in values.yaml), and the corresponding value in the service. --debugenables verbose output, which can be handy if you have issues installing your charts.--dry-runmeans we don't actually install anything. Instead, Helm shows you the manifests that would be generated, so you can check everything looks correct.
If you run the above command, you'll see a bunch of YAML dumped to the screen. That's what helm is going to deploy for you! It consists of a deployment for each app, a service for each app, and an ingress for the API app.

The --dry-run flag also shows the computed values that helm will use to deploy your chart, so you can check that the test-app-api.image.tag value in the previous command is set correctly, for example. Once you're happy with the YAML that will be generated, run the command again, omitting the --dry-run flag, and the chart will be deployed to your Kubernetes cluster.
This should produce output similar to the following, indicating that the resources were deployed
LAST DEPLOYED: Sat Aug 22 10:17:21 2020
NAMESPACE: local
STATUS: DEPLOYED

RESOURCES:
==> v1/Service
NAME                                  TYPE       CLUSTER-IP      EXTERNAL-IP  PORT(S)  AGE
my-test-app-release-test-app-api      ClusterIP  10.96.195.190   <none>       80/TCP   0s
my-test-app-release-test-app-service  ClusterIP  10.109.201.157  <none>       80/TCP   0s

==> v1/Deployment
NAME                                  DESIRED  CURRENT  UP-TO-DATE  AVAILABLE  AGE
my-test-app-release-test-app-api      1        1        1           0          0s
my-test-app-release-test-app-service  1        1        1           0          0s

==> v1beta1/Ingress
NAME                              HOSTS                ADDRESS  PORTS  AGE
my-test-app-release-test-app-api  chart-example.local  80       0s

==> v1/Pod(related)
NAME                                                   READY  STATUS             RESTARTS  AGE
my-test-app-release-test-app-api-77bfffc459-88xp6      0/1    ContainerCreating  0         0s
my-test-app-release-test-app-service-84df578b86-vv265  0/1    ContainerCreating  0         0s
If you have the Kubernetes dashboard installed in your cluster, you can wait for everything to turn green:

Once everything has finished deploying, it's time to take your service for a spin!
If you're following along, you need to ensure that both of your apps respond with a
200status code to the path/. This is due to the liveness checks added to the Helm chart by default. I'll discuss these in detail in a future post
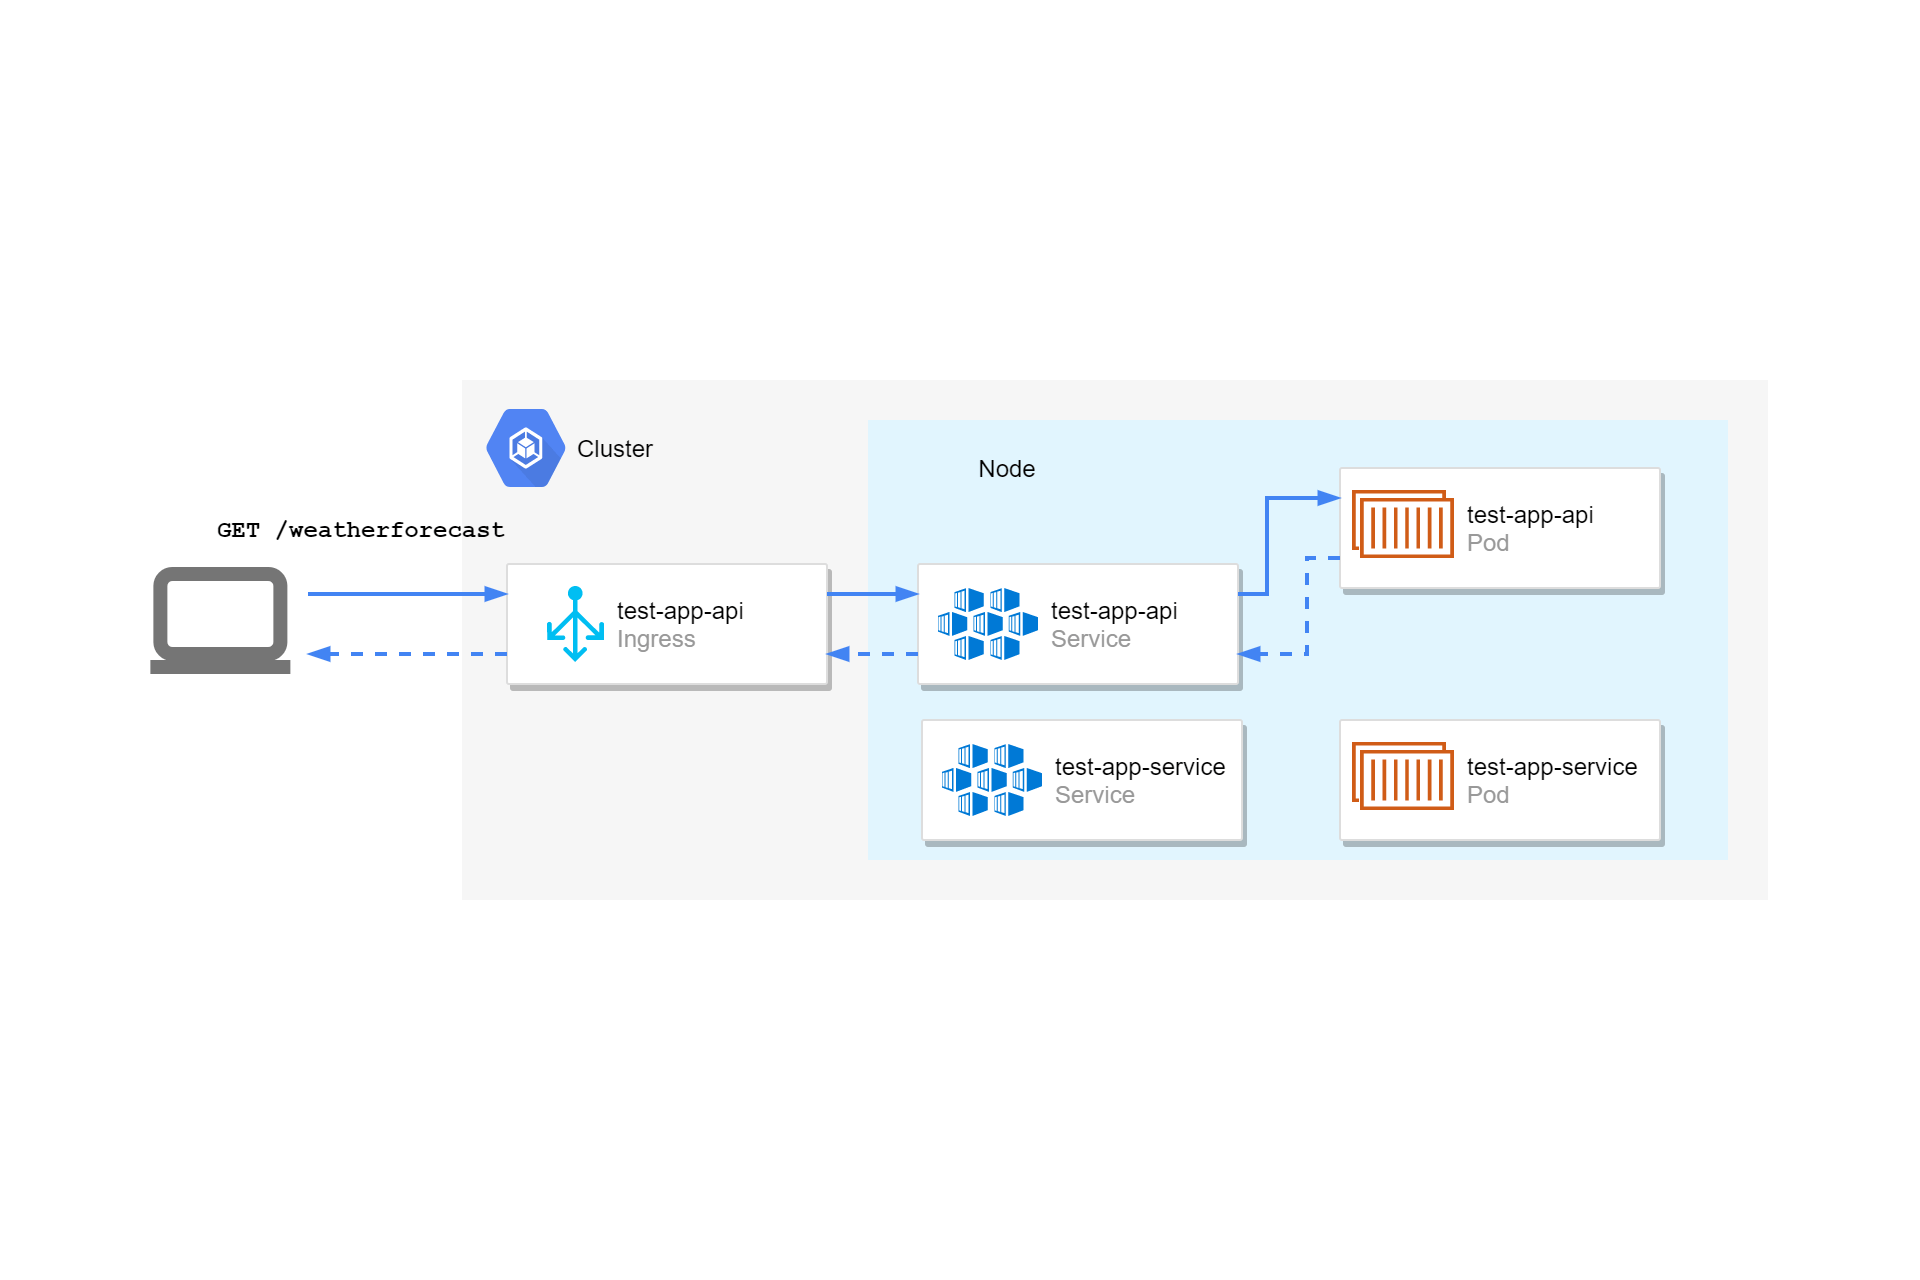
Testing the deployment
We deployed the TestApp.Api with a service and an ingress, so we can call the API from outside the cluster. We configured the API to use the hostname chart-example.local, and the path-prefix /my-test-app, so if we want to invoke the /weatherforecast endpoint exposed by our default API template, we need to send a request to: http://chart-example.local/my-test-app/weatherforecast:
curl http://chart-example.local/my-test-app/weatherforecast

[{"date":"2020-08-23T18:31:58.0426706+00:00","temperatureC":6,"temperatureF":42,"summary":"Freezing"},{"date":"2020-08-24T18:31:58.0426856+00:00","temperatureC":38,"temperatureF":100,"summary":"Warm"},{"date":"2020-08-25T18:31:58.0426859+00:00","temperatureC":-12,"temperatureF":11,"summary":"Mild"},{"date":"2020-08-26T18:31:58.042686+00:00","temperatureC":36,"temperatureF":96,"summary":"Warm"},{"date":"2020-08-27T18:31:58.0426861+00:00","temperatureC":-14,"temperatureF":7,"summary":"Bracing"}]
Obviously the hostname you use here has to point to your actual Kubernetes cluster. As I'm running a cluster locally, I added an entry to the
/etc/hostsfile.
We added the rewrite-annotation to the ingress, so that the TestApp.Api pod handling the request sees a different URL to the one we invoked, http://chart-example.local/weatherforecast, without the /my-test-app prefix. That's important in this case to make sure our app's routing works as expected. Without the rewrite annotation, the app would receive a request to /my-test-app/weatherforecast, which would return a 404.
You can view the logs for a pod either through the Kubernetes dashboard, or by using the kubectl command line. For example, the logs for our API app could be retrieved using the following command:
kubectl logs -n=local -l app.kubernetes.io/name=test-app-api

info: Microsoft.Hosting.Lifetime[0]
      Now listening on: http://[::]:80
info: Microsoft.Hosting.Lifetime[0]
      Application started. Press Ctrl+C to shut down.
info: Microsoft.Hosting.Lifetime[0]
      Hosting environment: Production
info: Microsoft.Hosting.Lifetime[0]
      Content root path: /app
warn: Microsoft.AspNetCore.HttpsPolicy.HttpsRedirectionMiddleware[3]
      Failed to determine the https port for redirect.
These are the standard startup logs for an ASP.NET Core application, but there's a couple of things to note:
- We're running in the
Productionhosting environment. What if we want to specify that this is aDevelopmentorStagingenvironment? - Our app is only listening on port 80. But what about HTTPS? We're using the default ASP.NET Core API template that contains redirection middleware, so it's trying to redirect insecure requests, but our app doesn't know where to redirect them.
In the next post in the series, we'll look at how you can inject environment variables into your deployments, allowing you to control your app's configuration at deploy time.
Summary
In this post we created a Helm chart for an ASP.NET Core solution consisting of multiple apps. We created a top-level chart for the solution and added a sub-chart for each project. You saw how to update the values.yaml file for a chart to configure each sub-chart to set ports and, whether an ingress resource should be generated for example. You then deployed the chart to a cluster and tested it. In the next post, you'll see how to further customise your helm charts, by passing environment variables to your application pods.